Topics in Photographic Preservation 1988, Volume 2, Article 6 (pp. 50-55)
The suction table as a tool for carrying out conservation treatments was introduced by Marilyn Weidner in 1974. Since that time, it has become a basic piece of equipment in most paper conservation laboratories, and is used for a variety of treatments–including flattening, stain reduction, lining, and pulp casting. To our knowledge, however, the suction table is not yet widely used in photographic conservation, although it has great potential.
Four photographs that seemed especially appropriate for treatment on the suction table will be described. These include two crayon portraits (both of which were badly degraded), a silver gelatin photostat, and a photomechanical print. The treatment aspects we will address are backing removals and linings.
In deciding to use the suction table for these treatments, a number of factors were considered, including the need to minimize mechanical manipulation during backing removal, and to ensure alignment of numerous breaks and fragments. There was a certain amount of experimentation–especially in selecting adhesives and lining materials–and, as in any conservation treatment, a certain degree of risk–which we carefully considered. The goal of this paper is to share information on techniques and materials, and to encourage further discussion regarding the treatment of photographic prints on the suction table.
The two crayon portraits treated – one of a man and the other of a child – had similar problems. Both had paper supports mounted onto fabric and were received rolled, and therefore could not be safely viewed without first being humidified and flattened. Once passively humidified and flattened, the fabric linings were observed as very dirty and degraded, and were no longer capable of adequately supporting the paper. Both prints were torn and were broken into numerous fragments, barely held in place by weak starch adhesive. The portrait of a man had been worked up in charcoal, and that of a child, in pastel and charcoal. In both cases the media as well as the support were in poor condition, lightly abraded overall with planar distortion. When both portraits were tested under magnification with a dry white brush there was no perceptible movement of the media, but no evidence of fixative was apparent. The existing media was apparently embedded in the paper support. The major difference between the two crayon portraits was the paper support: the portrait of a man was very soft, pulpy and weak; the other print was brittle and fragile, with numerous large and small fragmentations. Both required careful handling, minimal manipulation, and avoidance of excessive moisture during treatment.
The linings were removed from both portraits using the suction table, with the image face down, contrary to usual practice with the suction table involving such media. However, based on testing of the media and the overall condition of the objects, this seemed the safest approach for treatment, and would maintain the alignment of numerous fragments.
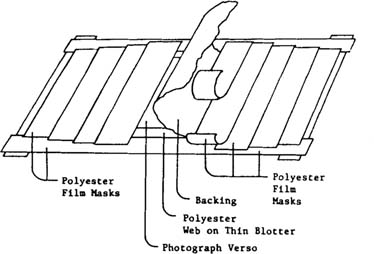
Whatman chromatography paper was first placed on the surface of the suction table to protect the table and to minimize later cleaning time. Thin blotters may also be used for this purpose. A smooth, dense sheet of polyester web was then placed on the chromatography paper, and an area slightly larger than the object was masked with rubber sheeting and strips of polyester film, leaving an air passage in the corner of the table. Suction was first applied to assure flatness and smoothness of the surface, then the suction was turned off. The object was placed face-down on a second sheet of polyester web, which functioned as a support and carrier, and positioned within the masks. Overlapping strips of polyester film were then positioned across the back of the object beginning at one end, and moving toward the section where the backing removal would begin. Low-pressure suction (approximately 2–5 psi) was gradually applied. The backing was then slowly and carefully removed under low-pressure suction, lifting one strip of polyester film at a time, and folding the lining back onto itself, gently moving it at a low angle horizontally across the paper. As the backing was removed, polyester strips were replaced over the surface of the paper to control suction and to maintain alignment of fragments.
Once the backing was removed, and under moderate suction pressure, adhesive residue was gently removed mechanically with a microspatula. Under low suction pressure, dirt and residue were dusted onto a polyester film receiver with a soft brush. Dirt was then further reduced by slightly increasing suction, and forcing dirt through cracks and losses in the paper support, through the polyester web and into the chromatography paper with the aid of a soft brush. It was possible to reduce dirt in this manner since no moisture was involved. If dirt in cracks and losses is not removed, the dirt may be visible from the front after lining.
Depending on the number of fragments and other condition and treatment considerations, and if it is safe to remove the object from suction pressure, the object can be moved with the top layer of polyester web and a secondary rigid support to a light box for further alignment, inserting of losses and mending, as was done with the portrait of a man.
If the brittleness or excessive fragmentation of the object requires the continued application of suction, mending and, if necessary, lining must immediately follow backing removal without moving the object from the table.
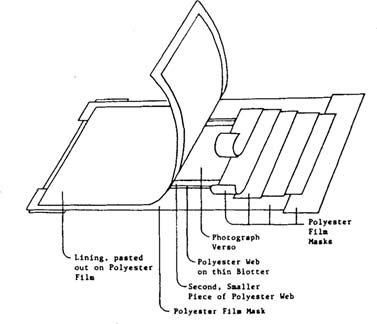
The clean object was placed face down on the suction table, as described under backing removal, under low suction. Beginning at the end that would receive the lining last, overlapping strips of polyester film were positioned across the back of the object, layered so that they could be removed sequentially as the lining was laid down. An air passage was left in one corner of the table to ensure an even draw of pressure on the piece, and to avoid any creasing or wrinkles.
The lining material for both portraits selected for its weight and handle, was Usugami, and the adhesive was dilute wheat starch paste. The lining paper was pasted out on polyester film which was then used as the support and carrier for the lining during the lining procedure.
Lining was carried out as a 2-person operation: one to position and drop the lining at the proper angle, the other to ensure good contact and adhesion by smoothing and working with a soft brush on the polyester carrier. Two people are mandatory with large objects.
Once the lining was in place, pressure was gently applied through the polyester film with suction still on, using the gentle action of a hand or brush. The polyester was removed, and the suction was turned off.
The object was immediately lifted, using the polyester web as a support and set aside; fresh, dry chromatography paper and polyester web were positioned on the suction table. The object was then inverted and placed image side up on the table, and suction was again applied. It is important that these procedures occur efficiently and quickly to minimize moisture penetration through the front of the object. By turning the piece over after lining, moisture is being pulled through the back, rather than the front, as the adhesive dries.
The condition of this photograph as received was rolled, with edge tears, fractures, losses, and stains. After passive humidification and flattening, it was clearly observed to be poorly processed, with degradation of both the image and the paper support. The paper was quite brittle and distorted, and the binder was cracked and broken. The condition indicated that the photograph was in need of support, but that minimal use of moisture during treatment was required.
Working on a secondary support of polyester web on a rigid carrier, the crimps and flaps were laid down using a 50/50 solution of ethanol in deionized water. The print was rehumidified, and the suction table was prepared for lining as described above. Once aligned, the photostat was covered with polyester web and a second piece of board, and inverted. It was then positioned image down on the prepared suction table and the support board was carefully removed.
The print was lined with Usugami and dilute wheat starch paste as described above. The photostat, after lining, was immediately replaced on the suction table face-up. Once in this position, it was possible to very gently apply pressure through polyester film to any problem areas, to ensure adhesion and proper alignment. Such action was possible on this object, but would not have been appropriate if dealing with a friable media. The object was left on the table with the suction on until it was thoroughly dry.
The following describes a less conventional treatment of a halftone print in black printer's ink on a medium-lightweight clay-coated and filled paper. The print was cockled due to previous long-term display in a frame. There was light surface dirt overall, water and mold damage, yellow stains and embedded dirt that corresponded to water damage. There were also slight creases, tears and losses. The treatment goals were to clean and flatten the print, reduce stains, fill losses, inpaint, and improve physical stability.
The media was tested and was stable in ethanol and water. The paper support was stable in ethanol, but very water-reactive. The heavily-filled paper swelled and the clay coating weakened when tested with water alone. If the treatment was too wet, the clay coating would break down, altering the surface of the paper, and risking lifting of the media.
The yellow stain could be moved with water, but not with ethanol alone. The combination of water and ethanol was successful in moving the stains, and did not adversely affect the object if applied sparingly.
After dry surface cleaning and flattening, the stains were reduced locally with 50/50 water and ethanol under suction. Losses were then filled on the suction table, then inpainted.
Because of the nature of the paper and the need to prepare it for long-term display, conventional lining techniques did not seem appropriate for this particular object. A lining that would help control the dimensional reactivity to a greater degree than would paper was required. The lining could also serve as an extension of the print. Rather than hinging, which was undesirable because of problems of moisture reactivity, the lining could be used to attach the print to the mat backing.
A new, lightweight Gore-texTM-HollytexR laminate, which is being used experimentally in a thicker version as a lining material in paintings conservation, was selected as the lining material. Gore-tex is basically an aerated teflon bonded to Hollytex (polyester web) with a Gore-proprietary polyester hot-melt adhesive. Gore-tex is chemically inert, very flexible and has good dimensional stability. It is permeable by water vapor, but not by water droplets, so it acts as a water barrier, but might allow the lined object to breathe, depending on the adhesive film employed for lining. The drawbacks of this material are that it has a tendency to curl and has a static character which sometimes makes handling awkward.
Most traditional lining adhesives were not appropriate for use with either Gore-tex or for this particular object because they would not adhere well to the Gore-tex or because they would be too reactive with the paper support. Therefore, an alternative was sought.
The use of heat-set tissue as a lining did not seem appropriate for use with this treatment, but the acrylic co-polymer emulsion used to fabricate heat-set tissue seemed to be an ideal adhesive for this lining. This acrylic resin-water emulsion* was formulated by the Library of Congress, has excellent working properties and is easily reversible in ethanol. This adhesive does have a low-to-moderate toxicity due to the methacrylates, but it is not unsafe to use in a well-ventilated work area.
The treatment procedure was similar to those previously described. The object was placed face-down on the prepared suction table. Polyester film was misted with water and the Gore-tex-Hollytex laminate was laid Gore-tex side down and smoothed out. The acrylic emulsion (approximately the consistency of milk) was applied to the Hollytex side with a brush. When the adhesive was damp, but not tacky, the lining was laid down, using the heel of the hand or a soft, broad brush to assure adhesion through the polyester carrier. Since the adhesive dries quickly, the suction was immediately turned off, and the object was inverted, replaced on the table and dried flat under suction.
The above, rather experimental treatment procedures were successful methods for backing removal and lining. Although all of the treatments described were performed with the image face down, less problematic objects could be placed face up on a prepared lining with excellent control. The suction table provides a gentle, controllable treatment option with little risk to the object, and is especially useful when the object is severely fragmented or cannot withstand wet treatment. As with any conservation treatment, especially when innovations are employed, it is important to consider every implication of the procedure. Also, when performing treatment as a team, it is necessary to have an especially good working relationship, the ability to communicate comfortably, and to talk through each step of the procedure well in advance. There is a great need for further testing of newer materials and equipment as they become available, and we hope that others will experiment similarly and share their experiences.
* Recipe for Library of Congress emulsion: 75 parts RhoplexR AC-73, 50 parts PlextolR B-500, 50 parts distilled water.