Topics in Photographic Preservation 2003, Volume 10, Article 3 (pp. 19-28)
Presented at the 2003 PMG Winter Meeting, San Juan, Puerto Rico
In recent years, interest in paper negatives has blossomed, both among museums and collectors. This can be attributed to several factors:
Is it any wonder that interest in the preservation and treatment of these materials has vaulted to the forefront of conservation concerns?
In the first half of 2002, the Fellows and faculty at the Advanced Residency Program in Photograph Conservation undertook a study of paper negatives, using the collection of over 600 paper negatives in the George Eastman House as the foundation for their work. Various aspects of paper negative conservation were pursued. These included connoisseurship, treatment, characterization, housing, long-term condition monitoring, duplication for printing, and facsimile production for exhibition. This presentation reports on one of these issues–treatment options available to the conservator.
In North America, paper negatives are rare and their treatment rarer. The North American conservators' collective knowledge of this process and its reaction to treatment is limited. As a result, paper negatives tend to be provided with protective enclosures and possibly stabilized; but more intrusive treatments are avoided. In Europe, treatments are more common, but still tend to be cautious.
Paper negatives have always been prone to deterioration. In 1844, H. F. Talbot, in The Pencil of Nature, commented on this susceptibility. He stated:
The number of copies which can be taken from a single original photographic picture, appears to be almost unlimited…so long as great care is taken of the original picture. But being paper, it is exposed to various accidents; should it be casually torn or defaced, of course no more copies can be made.
Talbot specifically mentioned tearing, but he also used the word “defacing.” Examination of the negatives at the Eastman House helped define the more common forms of defacing. These included the following:
During the Advanced Residency Program's paper negative project, each Fellow received one or two paper negatives for examination and treatment. After completion of the treatment, all approaches and techniques were recorded. To supplement this information, several photograph conservators were surveyed. In general, treatments focused on the most commonly encountered problems-essentially folds, wax creases, and tears. All techniques strove to maintain the surface qualities and the translucency of the negatives.
After the initial examination, it was realized different treatment approaches would be needed for waxed and non-waxed negatives. As differentiation between pre- or post-waxed negatives is not always possible, it was assumed their treatments would be similar.
Surface cleaning was discussed, but was not needed on the negatives in the George Eastman House collection. Erasers might be an option on non-waxed negatives, but never on waxed ones. For waxed negatives, the use of a soft brush was the first choice. If more cleaning was needed, consideration would be given to the use of moist cotton swabs, or the minimal application of weak wax solvents such as ethanol or hexane. Several negatives only needed flattening. This was accomplished through the application of dry pressure or through humidification with subsequent drying between blotters under glass. Both techniques worked, regardless of the presence of wax or not. Humidification was particularly successful.
The treatment of folds expedited the exploration of differing procedures for waxed and non-waxed negatives. While non-waxed material could be treated essentially the same as paper prints, waxed materials posed special problems with surface gloss and translucency. This lead to an investigation of heated spatulas. Spatulas could be heated on mug warmers at temperatures around 225°F. The actual temperature applied to the negative was considerably cooler, as the spatula would cool quickly upon removal from the warmer and it was applied indirectly through a paper interleaf such as thin Silversafe paper. The spatula was inserted into the fold of the negative using the interleaf, and the fold carefully opened. Once opened, the fold was usually lightly pressed with the spatula or further treated with moisture.
Moisture could be applied to the fold (before or after opening) with a brush or through Gore-Tex. The fold would then be dried with or without the application of heat. If further flattening was needed, a tacking iron might be used to apply heat through an interleaf of thin paper (Silversafe) or non-woven polyester (Reemay or Hollytex). Moisture might have been locally applied before the application of heat. All of these procedures were successful, the extent of the success varying greatly with the negative. However, one had to be careful when using the tacking iron, as it could cause significant changes in the appearance of the wax.
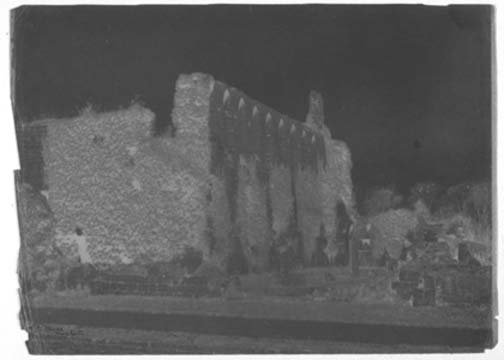
A waxed paper negative by J. R. Mudd of Manchester (figure 1 to figure 3) had severe folds and paper creases, especially along the right edge. With this negative, all three of the flattening procedures were employed, starting with what was considered to be the least aggressive, the heated spatula, and progressing to the most aggressive, the tacking iron in conjunction with moisture. In this case, there was no change in surface gloss. During treatment, the folds were saturated (their translucency was restored), a result of the tacking iron treatment.
Figure 1: J. R. Mudd, “Church Ruins”, 8 5/8 × 11 7/8 inches, verso, viewed with reflected light, before treatment. George Eastman House Collection.
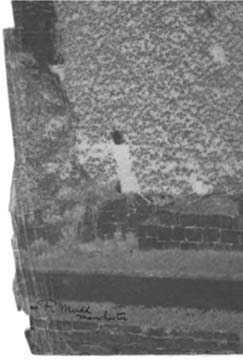
Figure 2: Detail of Figure 1, bottom right corner, before treatment
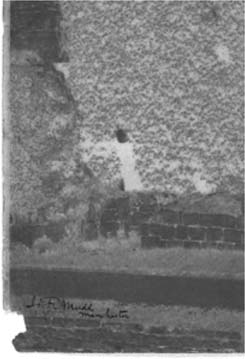
Figure 3: Detail of Figure 1, bottom right corner, after treatment
The reduction of wax creases built upon the techniques explored for the treatment of folds. Wax creases are short white lines in the wax, often crescent shaped. They can be seen as dark lines in transmitted light; but in reflected light are often visible only on the reverse. When printed, or scanned and then digitally reversed, the wax creases show as dark lines. They appear to be a result of mishandling. Since wax and paper become brittle over time, it is probable that waxed negatives are much more susceptible to this type of damage today than they would have been when they were first made. The reduction of wax creases is mostly an aesthetic treatment, as it provides no increased stability to the negative; however, it does improve the negative's printing properties. They would undoubtedly have been removed by nineteenth century photographers prior to printing. While aesthetics and printing characteristics are important, there may also be good reasons for not removing these creases.
Reduction of wax creases employed one or more of the following tools: a warm metal spatula, the Leister hot air gun, or a tacking iron. As heat treatment did not always sufficiently reduce the appearance of certain creases, the application of beeswax to the crease was at times an integral part of this treatment. The use of the warm metal spatula to reduce the wax creases was essentially the same procedure used to flatten folds. The spatula was heated on the mug warmer and then applied to the wax crease (on the reverse of the negative) through a paper interleaf. The interleaf minimized the risk of gloss resulting on the wax. With time and care, this technique could work well, with minimal risk to the object.
The Leister heat gun also successfully reduced these creases. Heat was applied through a shield of polyester film. A small sheet of film would be folded in half and a tiny hole (1mm wide and maybe 2 or 3mm long) cut in the center of the fold. The hot air from the gun would be directed toward the hole in the Mylar film. This in turn was carefully aligned with the wax crease in the negative. When working properly, this technique could provide seemingly miraculous results. The creases would disappear as soon as the airflow was directed at them. However, there was risk with this technique. The heat could result in a slight change to the wax surface. This might be a slight darkening (essentially saturation) of the crease, or a slight mottling of the negative surface. These changes were visible on the reverse, but not on the image side of the negative.
The third tool used to reduce wax creases was the tacking iron. Essentially, the technique was as described for the reduction of the paper folds–the tacking iron applied to the reverse of the negative through an interleaving layer of thin paper or non-woven polyester.
All three of these techniques were sometimes augmented with the addition of beeswax to the crease. (Beeswax could also be used to minimize the white lines resulting from paper folds.) Beeswax, the wax commonly used to produce these negatives, was melted on the mug warmer (often on a small piece of Seal release paper). The melted wax was picked up onto a metal spatula or needle, and while still warm applied to the crease. The wax would immediately set, and therefore need to be reheated. One could use a heated spatula, a tacking iron through a non-woven polyester interleaf, or the Leister hot air gun. This would cause the wax to melt into the paper fibers, saturating the crease and making it less visible. Excess wax could be removed by heating the crease through an absorbent paper. (Silversafe worked well, as it was not only absorbent, but also translucent enough to be able to see through.) An alternative technique that worked equally well was the application of wax to a crease using a waxed paper. A modern lightweight wove paper was impregnated with beeswax. This waxed pa was then placed over the crease and heat was applied to the upper surface of the waxed pa with a heated spatula, providing a controlled application of wax.
Tears can pose serious threats to the preservation of paper negatives. Most of the tears encountered during this project were small and located at the edges; but a few were longer, extending relatively far into the image area. A survey of conservators indicated their tendency to use either wheat starch paste or Klucel G for mending. Familiarity with the adhesive being the deciding factor in most instances. Mending almost always started by applying adhesive to the tear edges and drying under weights. If additional reinforcement was needed, most conservators used single fibers of Japanese paper. In more severe cases, strips of Japanese paper (something similar to Paper Nao's RK0, a very thin and transparent Kozo paper) or lens tissue were applied to the reverse of the negative. Mends that did not alter the transparency or surface qualities of the negative were difficult to obtain. Several techniques were employed to make mends less visible. These included inpainting, toning of the mending tissue, application of wax, and the incorporation of gloss reduction agents into the adhesive (such as fumed silica into Klucel G).
In the George Eastman House collection is a negative of a Frankfort street (figures 4 to 7), which had many obvious problems. On the recto, there were folded corners, mold damage, and some severe creasing. The most obvious concern was the tear down the center of the image. This tear extended into the image from the top and bottom edges, but did not meet in the middle. The middle third of the image although folded, was not torn. The edges of this tear were cupped towards the front of the negative, making a good mend difficult. When the reverse was examined, the severity of the wax creases and folds became even more apparent. This negative had not been handled well over its 150-year lifespan.
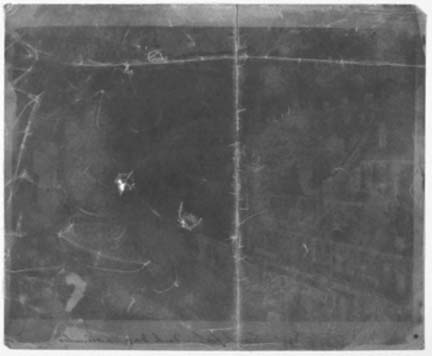
Figure 4: Anonymous, Frankfort Street, 7 5/16 × 8 13/16 inches, verso, viewed with reflected light, before treatment. George Eastman House Collection.
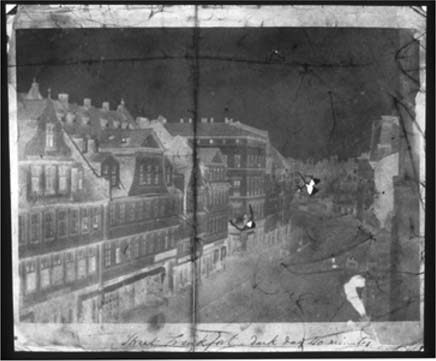
Figure 5: same image as figure 4, recto, viewed with transmitted light, before treatment.
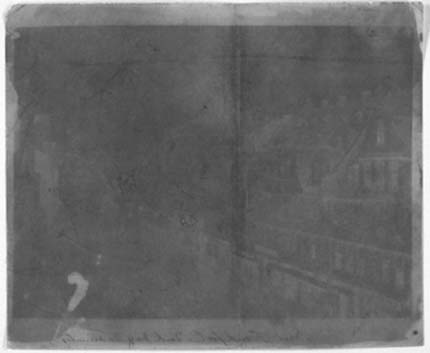
Figure 6: same image as figure 4, verso, viewed with reflected light, after treatment. George Eastman House Collection.
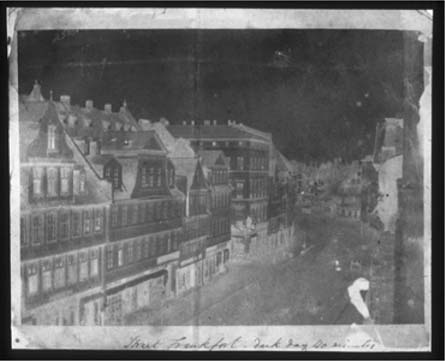
Figure 7: same image as figure 4, recto, viewed with transmitted light, after treatment.
Treatment consisted of the following:
Treatment resulted in tremendous improvement in the structural integrity of the n It is now much stronger and able to be safely handled. There were also dramatic improvements in the object's aesthetic qualities.
Fellows were very successful at filling losses. In general, they used thin papers such as Silversafe, Permalife tissue, Gampi, or thin Japanese paper. Watercolors and acrylics were used for toning, with touches of graphite or acrylic gold to imitate bronzing. If necessary, inserts were waxed for translucency. Wheat starch paste or Klucel G was used to adhere them to the negative.
Very little tape removal was attempted. From our conservators' survey, we determined that tape removal usually proceeded along a 4-step path:
Mention has been made of risks associated with treatments, especially during the application of heat. These risks are real and should not be underestimated. Whenever heat is used, there is the possibility of a change in surface texture, gloss, or color. Very localized application of heat at temperatures around the melting point of beeswax (150° F) minimizes this possibility; but even so, with current experience it is very hard to predict when problems might arise. One possible harbinger of change may be the thickness of the wax application. It seems that the more wax on a negative, the more likely it is that a surface change will occur as heat is applied. Possible changes include the following.
The changes resulting from heat application are often subtle, but not always. For example, during treatment of the Frankfort Street negative, a very obvious white halo appeared around the area of heat application. Two years ago, Gary Albright stated one of his treatment principles as follows: Look beyond the norm. The less aggressive treatment may be the more damaging procedure. Stated another way, what is normally accepted as the more conservative or risk-free treatment, may in fact lead to the most trouble. Problems such as those with the heat treatments, lead to some thinking “outside of the box,” an evaluation of some more aggressive treatments. Maybe there were safer ways to treat these forms of deterioration. Could these negatives be washed in water? Could methods of applying more generalized heat, such as with a drymount press or hair dryer, prove successful?
Needless to say, there was opportunity to apply some of these ideas during our treatments. The heat halos, which occurred on the Frankfort Street negative during mending, were removed by heating the negative in a drymount press at 165° F for 30 seconds. It was later discovered that a hair dryer (one that produced hot air at 200° F) could also be effective at reducing this sort of localized surface change. As a result of Topics in Photographic Preservation, Volume Ten (2003) 25 multiple treatments, a preliminary order of risk for heat application can be proposed: very local heat application is safest, followed by the hair dryer, then the heat press. The technique causing the most change appears to be the tacking iron.
What about washing? When might one use it and what would be the effects? Treatment of a paper negative impregnated with wax (figures 8 to 11) depicting St. Michel is a case in point. The tape mend on the reverse was adhered with a water-soluble adhesive. The tape had contracted and caused disturbing cockling to the paper support of the negative. In this case, it was suspected that an overall water treatment would be less risky than local water application. Therefore, the object was washed in cool water for approximately 30 minutes. The tape and adhesive were easily removed. Upon drying, it was immediately noticed that the reverse had a lighter tone, as if the wax had blanched and was no longer saturating the paper as much as it had originally. A test in the lower left corner with a tacking iron resulted in the darkening of the negative in this area, essentially a reformation of the wax. Therefore, to reduce the overall blanching, the negative was heated in a drymount press at 165° F for 30 seconds. Heating saturated the negative and resulted in reduction of the physical distortions.
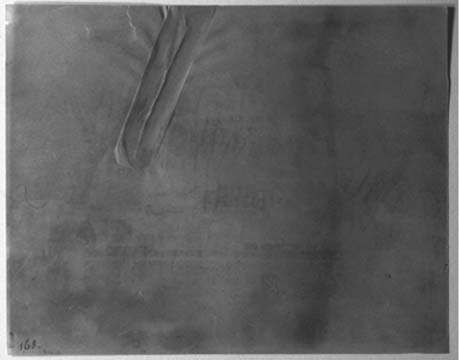
Figure 8: Anonymous, St. Michael, 8 ½ × 10 ¾ inches, verso, viewed with raking light, before treatment. George Eastman House Collection.
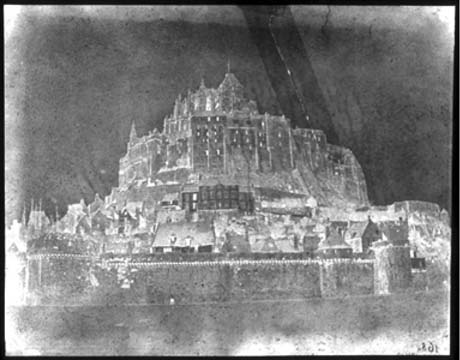
Figure 9: same image as figure 8, recto, viewed with transmitted light, before treatment.
Figure 10: same image as figure 8, verso, viewed with raking light, after treatment.
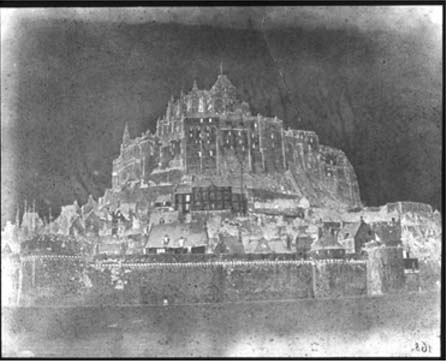
Figure 11: same image as figure 8, recto, viewed with transmitted light, after treatment.
The tear was mended with wheat starch paste without the use of reinforcement. It was not needed in this case. After applying beeswax to the tear, it was retouched with watercolors.
Was this treatment a success? It is true that the water and heat treatments have changed the surface. Surface changes may be unavoidable whenever a paper negative is washed. And, while changes resulting from heat can be minimized (by using local treatments and other options), it is possible they cannot be completely avoided either. Yet, this does not preclude either of these procedures as treatment options. All treatments weigh risks against benefits, and in this case the benefits outweighed the risks.
Paper negatives were determined to be much more “treatable” than had been suspected. Paper negatives are not overly fragile; their treatment does not have to be approached with trepidation. In fact, they are fairly forgiving, thus making feasible many treatment options thought to be not possible before undertaking this project. Paper negatives have as many treatment options available to them as do most paper prints.
In the Sotheby's catalogue for the Andre Jamme's sale (March 22, 2002), Jean Adhemar wrote, “It is worth emphasizing the seductive character of the paper negatives that served as the masters for printing his (Nègre's) calotypes…. When studied in transmitted light, these precious relics come alive, evoking the magic of the moment of exposure one and half centuries ago.” As conservators of art, we have the responsibility to preserve both the physical object and its aesthetic beauty. One of the great satisfactions in our profession is to see an object “come alive” as a result of treatment. Hopefully, this paper has added a few treatment options for paper negatives to your portfolio. Options which will preserve these “precious relics,” while revealing their “magic.”
The authors wish to thank the Advanced Residency Program faculty, Mark Osterman and Grant Romer; the Advanced Residency Program fellows of the second cycle, Adrienne Lundgren, Hanako Murata, Sara Shpargel, Elena Simonova-Bulat, and Fernanda Valverde; and those conservators who participated in the treatment survey, Silvia Berselli, Barbara Brown, Claire Tragni, Giula Cucinella Briant, Lee Ann Daffner, John McElhone, Paul Messier, and Tram Vo.
Berselli, S. and Cucinella Briant, G. 1996. La restauration du Fonds Tuminello: Problémes techniques de restauration et de conservation des premiers négatifs photographiques. ICOM-CC 11th Triennal Meeting, Edinburgh 1–6 Sept. Preprints vol. 2: 567–572.
Berselli, S.. 1996. La negativita del negative: riflessioni sulla conservazione ed il restauro dei negative. International Conference on the Conservation and Restoration of Archive and Library Materials. 22–29 April. 709–720.
Coe, Brian. 1974. The Recognition of Early Photographic Processes, Their Care and Conservation. Royal Photographic Society Symposium, 16th March, London. 1–15.
Daffner, L. 1995. Examination and Investigation of 19th Century Paper Negatives. A Study of Process, Materials, and Deterioration Characteristics. Topics in Photographic Preservation 6: 1–10.
Esmeraldo, S. 1993. Etude de vingt-six négatifs sur papier de Désiré Charnay et reproduction du procédé negatif au collodion humide. Thesis for the Memoire de fin d'etudes. IFROA, Paris.
Koch, M.S. ed. 2002. Klaus B. Hendriks, A Life Remembered. The Royal Danish Academy of Fine Arts, School of Conservation.
Related Articles
Murrell, V. J. 1971. Some aspects of the conservation of wax models. Studies in Conservation 16: 95–109.
Misnomers
Anon. Chemical Aid for an Old Calotype. 1982. Time-Life Books. Caring for Photographs: Display, Storage, Restoration. 28–35.
Doscher-Freelove, P. Exhibition and Treatment of Three Calotypes. 1976. Paper presented at the Art Conservation Training Programs Conference. 55–63.
Gary E. Albright, Conservator in private practice, Honeoye Falls, NY.
Jiuan-Jiuan Chen, Assistant Director for Conservation Education, Advanced Residency Program in Photograph Conservation, George Eastman House, Rochester, NY.
Kate Jennings, Photograph conservator, London.
Papers Presented in Topics in Photographic Preservation, Volume Ten have not undergone a formal process of peer review.