Topics in Photographic Preservation 2005, Volume 11, Article 3 (pp. 6-16)
Presented at the 2004 AIC Meeting in Portland, Oregon
Print curl can be a common, unwanted result of humidification and controlled drying of gelatin silver developed-out prints. The direction of the curl is consistent and predictable based on the grain direction of the paper. This article discusses experiments by the author that may help explain the mechanism of print curl. The morphology of gelatin is discussed in relation to print drying techniques. Passive versus direct humidification techniques are considered in relation to reducing print curl. Practical implications for treatment are given, including a treatment tip for aligning “sprung” tears.
Photographs suffering from physical distortions are commonly brought into the conservation lab for treatment. However, factors can occasionally come into play making aqueous treatment risky or undesirable. Such factors can include: mounts that can or should not be removed, water soluble retouching or inscriptions, vulnerable emulsions, or even project size or scope. In these situations, reducing distortions through humidification and flattening may be the best option. As most conservators come to realize, “flattening” is a relative term.
In considering the challenges of humidification and flattening, I attempted to gain a better understanding of the gelatin/paper relationship during treatment. Unfortunately, there are surprisingly few treatment articles in the conservation literature about the humidification of gelatin silver prints. While there are a number of articles written about film-based gelatin materials, prints remain largely ignored (Adelstein, etal., 1997; Calhoun and Leister, 1959). Through a wide-ranging literature search, numerous conversations with industry professionals and other conservators, three small investigative experiments, and two treatment case studies, I have compiled some observations, and possible explanations, about the nature of gelatin silver prints.
During the late part of 2002, 110 tightly rolled aerial photographs came into the National Archives and Records Administration (NARA) Document Conservation Laboratory for treatment. The double-weight gelatin silver developed-out prints measured 24″×36″ and larger. In order to facilitate researcher access, the prints were passively humidified through Tyvek® fabric and dried under blotters and weight. Unfortunately, several dozen prints had tears measuring four inches or more. Most of these tears were “sprung” and could no longer be aligned for proper mending. Image unity is necessary for the proper use of aerial photographs and inpainting was not considered to be an appropriate option.
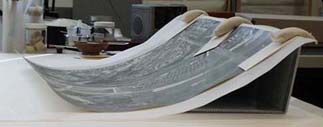
Ultimately, only one alignment technique gave satisfactory results. A concave form was made by bending corrugated plastic board into a triangle with one large curved surface. Working with the print face up, the support board was pushed in until the desired curvature was reached. The tear was then easily aligned and mended in sections with gelatin, or with wheat starch paste when more strength was needed (Fig. 1). The photograph was then placed face down on a convex surface. The convex surface was made up of thin strips of blotter covered over with a large blotter and polyester web. The mend was then reinforced on the verso with Japanese tissue and wheat starch paste (Fig. 2). Small bag weights were used to hold down squares of polyester web and blotter during drying.
Figure 1. Concave support board
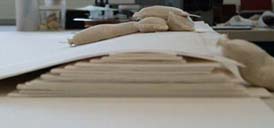
Figure 2. Convex support board
In Figure 3, an example of a well aligned mend is located directly below the arrow. Again, no inpainting was done. Using this technique, the prints did not suffer from any local distortions as the two sides of the tears were reunited. The mended tears were quite strong and could easily withstand flexing of the prints.
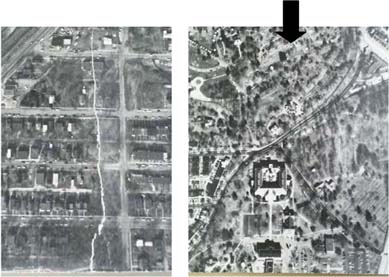
Figure 3. Improperly aligned mend on left, properly aligned mend on right
The first investigation was designed to see if there was a connection between grain direction and sprung tears in photographs.
Conservators often use a traditional flexing method to determine the grain direction of paper. Since grain direction is independent of image orientation, this method is useful for determining the grain direction of photographs. The print is gently flexed from the sides, then again from the top and bottom. The sides that show the least resistance will be parallel to the grain direction.
Individuals in the photograph industry determine grain direction, or machine direction, by looking at the coating direction of the gelatin (Gristwood 2003). The theory is that at the factory, the paper is rolled out with the grain direction following parallel to the direction of the conveyor movement (Stroebel etal 1986). As the gelatin is applied, either by dipping or spraying, it develops a slight orientation which is also parallel to the direction of the conveyor.
The coating direction is quite visible in reflected light. When the print is held face up, overhead light is reflected on the surface of the emulsion. When the print is turned 90°, the reflection looks quite different. Subtle striations are visible in the gelatin that will indicate the machine direction. This technique seems to work on nearly all vintage gelatin silver developed-out prints, with the exception of very matte, textured or glossy photos. Also, any texture resulting from the impression of the fabric conveyor belt of a print dryer is still visible as a separate characteristic.
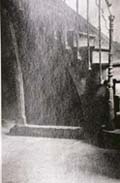
Figure 4. Arrow indicates coating direction as seen in reflected light
For this experiment, the grain direction was marked on four sets of vintage test prints. A large tear of the same length was torn on each set of prints, with the grain and across it. The prints were humidified in a humidity chamber and dried under blotter and weight. The tears still remained aligned, indicating that sprung tears are not easily induced. In order to generate sprung tears, the prints had to be subjected to repeated cycles of humidification and unrestrained air drying.
There were four main observations to be made from this test.
The hysteresis of paper and gelatin are well known to conservators: after humidification and drying, paper tends to expand across the grain and gelatin shrinks (Scott 1989, Calhoun and Leister 1959). Because of this, it is commonly believed that gelatin silver prints curl towards the emulsion, across the grain. In fact, every print in the study did indeed curl towards the emulsion, but with the grain (fig. 5). The heads and tails of the fibers, so to speak, were the ends that curled.
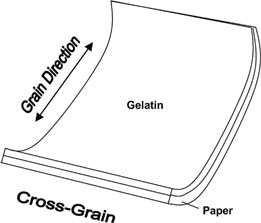
Figure 5. Prints curl in the grain direction
Investigation #2 was designed to help explain why the treated prints curled along the grain. In this experiment, different types of gelatin silver prints were humidified and dried under blotters and weight. It was hoped that trends might be seen based on print characteristics that could help better predict results during actual treatment. Since the investigation was only designed to indicate trends in phenomena, it should not be considered a true scientific experiment with high statistical standards.
Two similar sets of eight prints were used for a total of sixteen test samples. The samples included ten vintage gelatin silver photographs of unknown dates ranging from the 1940's to the 1960's, two modern prints, two modern sheets of uncoated photographic paper, and two modern sheets of baryta-coated paper. The baryta-coated paper had a thin layer of barium sulfate in gelatin but no emulsion layer. The modern prints, photographic paper and baryta-coated paper were all donated by Ilford for this experiment.
The following data was taken from each sample: machine direction, length, width, planar distortion, thickness, and moisture content of both the gelatin and paper sides.
The machine direction was determined by both the traditional flex method and by observing the coating direction.
The length was taken on the edge parallel to the machine direction, regardless of the image orientation. Likewise, the width was taken on the edge parallel to the cross-grain.
All measurements were taken in millimeters with a stainless steel, flat edged ruler. To aid in consistency of future measurements, all measurements were taken on the left and bottom edges of each print. Print thickness was measured with calipers.
Moisture content was measured by using a portable UV-Visible- Near Infrared Spectrometer. NARA Physicist, Mark Ormsby, used the spectrometer to show water peaks in the near IR range of the spectra. Measurements of both the gelatin and paper sides were taken before humidification, during humidification and after drying.
The method of describing and measuring planar distortion was taken from the ISO standard that specifically deals with determining the curl of photographic materials (ISO 18910:2000). The terminology is very clear: a plus or minus sign is given to indicate if the curl is towards or away from the emulsion. The letter L is given to indicate if the curl is in the longitudinal or machine direction, or T if it is in the cross-grain or transverse direction. Several sophisticated methods for measuring the amount of curl of uniform samples are given in the standard, however the only method appropriate for use on actual photographs is also, fortunately, the simplest. The photograph is placed flat on a table and the distance of each corner from the table is measured. The four measurements are then averaged to give the amount of curl in the print. The relative humidity in the room will alter the amount of curl. The RH levels in NARA's conservation lab were steady enough to show overall trends in the curl measurements.
The prints were indirectly humidified by placing them on rigid screening suspended over damp blotters. For ease of use, the dome of a suction table was used as the humidity chamber but the main functions of the suction table were not used, like pulling a vacuum or introducing water mist. Damp blotters were the only source of water vapor. When the prints were limp, they were dried immediately between polyester web and blotter under weight. They were left undisturbed for five days.
In order to see what effect repeated treatment had on the prints, the samples were humidified and dried under restraint three times. A full set of measurements was taken after each treatment for comparison.
The thickness of the prints could not be accurately determined using the calipers because the resulting curl severely threw off the measurements.
Unfortunately, the moisture content data also could not be used. Although there were clearly differentiated and proportional peaks for the paper and gelatin, a specific numerical value for the peaks could not be determined. I hope that this technology will be investigated further and tested against other types of moisture meters.
After treatment, the uncoated paper was completely flat. The baryta-coated paper curled very slightly in the machine direction. The other prints all curled in the machine direction as well. As any photographer or photograph conservator would expect, the single-weight prints curled much more than the double-weight prints. With each subsequent humidification and drying cycle, the severity of the curl increased. Figure 6 shows the samples after three humidification and drying cycles.
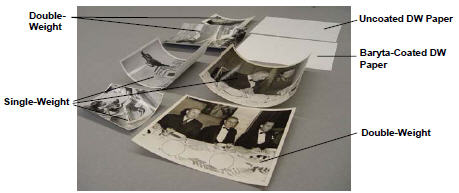
Figure 6. Severity of print curl
The next factor to consider was the dimensional change of the samples. The uncoated paper reacted exactly as photographic paper is expected to react: dried-in stresses were released causing a slight shrinkage along the grain and the paper slightly increased in width, meaning it expanded across the grain (ISO 18903:2002). The baryta paper did not change in width but it did slightly shrink in length or with the grain. The double-weight papers shrunk in both width and length, with slightly more shrinkage occurring across the grain. The single-weight papers shrunk the most, especially across the grain (Fig. 7).
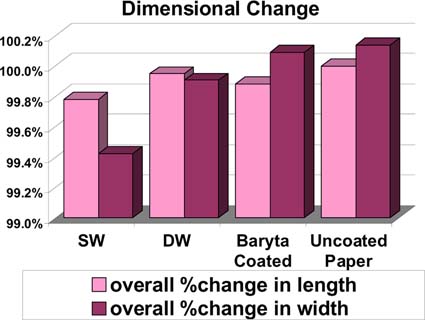
Figure 7. All samples contracted a little in the machine direction. The photographs, particularly those on single-weight paper, all contracted across the grain. The baryta-coated paper neither contracted nor expanded across the grain. The uncoated paper expanded across the grain
At this point, it is essential to consider how gelatin is made to see the relationship between curl and dimensional change in a photograph. Gelatin is a large, polymeric molecule made up of amino acids. The form these molecules take is modified by the addition of silver and hardening agents and by the method of drying or solidifying the gelatin (Bradbury and Martin 1952, Kozlov and Burdygina 1981). The gelatin molecules in solution form long random strands in a so-called statistical coil or random coil. If the gelatin sol is dried quickly under high temperatures, the gelatin retains this configuration and cross-linking occurs at random locations.
If the gelatin solution is allowed to dry slowly at room temperature, the gelatin sol first forms a gel, liberating water more slowly. This gel stage encourages the formation of a triple helix structure, therefore cross-linking is at smaller and more regular intervals. The helical molecules tend to be arranged parallel to the plane of the paper, but in both the machine and cross-grain directions. No one direction predominates (Bradbury and Martin 1952).
This characteristic is key to gelatin hysteresis. Manufacturing techniques of any particular paper or company are highly guarded trade secrets, so it is unknown if any particular photo paper was made by sol drying or gel drying. Sol drying may be used to speed production but gel drying may be used to give a better surface quality (Gristwood 2003, Reike 2004, Rose 2004). In any case, during darkroom processing, most photographs are dried using a print dryer or hot press. I suspect that this acts as a modified hot and quick drying method, so helix formation is again discouraged. When prints are later humidified and dried under blotters and weight, again I speculate that this simulates the cold and slow drying process. Helical formations are encouraged and the gelatin contracts.
It is important to note that a sheet of dried gelatin will expand and contract uniformly in both length and width (Hendriks, etal. 1984). It does not favor one direction over the other because the helixes themselves are scattered in both directions.
But as previously illustrated, photographs are consistent in how they differentially shrink and curl. The data indicates that as the gelatin uniformly shrinks in length and width, it is constrained by the paper base. The paper can more easily contract across the grain, therefore keeping pace with the gelatin. However, the paper cannot readily contract along the grain, therefore as the gelatin shrinks in the machine direction, the paper has no where to go but up in the form of a curl. As expected, photographs that have a large proportion of paper to gelatin, can better overcome the shrinkage of the gelatin.
If prints are humidified and dried using traditional conservation methods, meaning at room temperature and slow, then some amount of curl is likely to occur, with the possible exception of keeping prints restrained for a very long time, perhaps months or years.
So, what is a conservator to do if humidification is called for but the photograph cannot be kept under weight for an extended period of time? In the third study, different drying techniques were used on single-weight humidified prints. Single-weight prints were chosen because they tended to curl the most. It was hoped that a technique could be found to maximize the paper's ability to counteract the contraction of the gelatin and stay flat.
Over a dozen drying techniques were tried, including using Mylar® to slow the drying on the gelatin side, using Mylar® to slow the drying on the paper side, drying under increasing pressure and drying over curved supports. A few prints were dried in a traditional print dryer even though this is not a technique used by conservators because of the potential risks. However, it is a common commercial technique and it was used only as a point of comparison. In fact, the only prints to successfully dry flat were those that were dried with the grain direction in the print dryer. Again, I speculate that the hot and quick drying method discouraged the formation of helixes. While I would not advocate running vintage photographs through a print dryer, many conservators have occasionally dried prints in a hot press with success. The same drying principal applies, but in a more controlled manner. The results I achieved with the hot press were mixed but it is likely that this was due to uneven pressure and inadequate temperature of the press.
By concentrating on drying techniques, I was admittedly only looking at one side of the equation. Through humidification, the moisture content of paper was only sufficient for the fibers to be internally plasticized by the water, therefore it was unable to overcome the tendency to curl. As Sugarman and Vitale demonstrated in their research on paper drying methods, more water is necessary for the hydrogen bonds between fibers to be broken. (Sugarman and Vitale, 1992) It's only through breaking and reforming inter-fiber bonds can the paper overcome deformations.
So instead of altering the drying method, it was necessary to modify the humidification method. Six test prints were passively humidified then additionally sprayed on the verso with a fine mist of water. I suspect that this raised the moisture content sufficiently to break the hydrogen bonds between the fibers. Prints were then dried immediately between blotters and weight. Prints treated in this way had an average curl measurement of half the average of prints passively humidified alone then blotter dried.
This process does raise the moisture content of the gelatin emulsion as well. Therefore, this procedure might not be suitable for prints that should not get quite so wet, as well as those with water-soluble inscriptions. Caution must also be shown with direct humidification due to an increased risk in altering surface texture and other characteristics.
This last theory was utilized in an actual treatment. Within NARA's holdings, there is one record series that contains original U.S. Navy photographs from the Korean War era. This is a large series that is used frequently by researchers. Unfortunately, about 200 of the boxes arrived at NARA in poor condition. The drymounted prints were not supported properly in the box, so they slumped and became too distorted for researchers to handle. The Still Pictures archival staff identifies boxes in need of treatment during their normal processing and re-housing activities. This is an ongoing project in which the conservation lab treats approximately 2,000 prints per year.
First the prints were passively humidified through Tyvek® fabric. The mounted prints were sandwiched between Tyvek® and damp blotter, under plastic. When the prints were humidified and pliable, the backs of the mounts were quickly sprayed with a fine mist of deionized water. After both passive and direct humidification, the prints were dried face down on polyester web in blotter stacks covered with plexiglass and weights. The blotters were changed once after 24 hours, then left undisturbed for another four days.
Figure 8 illustrates the results. The print on the left has not yet been treated. The center print was humidified through Tyvek® only, then dried under blotters. The print on the right was humidified and sprayed on the verso, then dried under blotters. The additional water was enough for the paper fibers to reform their inter-fiber bonds, resulting in a flatter print. While this procedure worked well for this group of photographs, the possible effects of this treatment on surface texture must be carefully evaluated before other prints are treated in this manner.
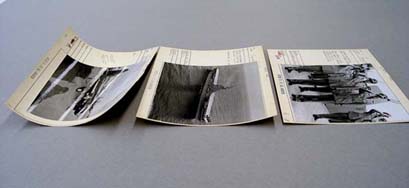
Figure 8. The introduction of direct humidification can significantly reduce the amount of distortion, compared with passive humidification alone
As part of this project, the treated photographs were rehoused with new folders and boxes. The prints were also properly supported in the box with a blueboard spacer. It is worth noting that most photographs with a slight curl can be gently restrained during storage as long as the prints are slightly flexible. Proper restraint and support can be as simple as an enclosure or more customized, such as 4-flaps or fitted boxes.
Sprung tears, particularly those along the grain, can be satisfactorily aligned using curved supports during the mending process.
Gelatin silver prints have a tendency to curl along the grain after humidification and drying. The curl is the result of the contraction of the gelatin, which is made worse when the gelatin is dried slow and cold. The paper fibers cannot contract along the grain at a sufficient rate to keep up with the gelatin, explaining the orientation of the curl.
The only likely ways to minimize curling are to dry the humidified prints under restraint for a very long time, to use a fast and warm drying method, or to use a direct humidification method which encourages a more proper realignment of the paper fibers.
Although this research has shed some light on how and why prints tend to curl, like most research, many new questions have risen. How does humidification compare to aqueous treatment in terms of drying? How do subtle differences in humidification techniques compare with each other? What is the best way to incorporate moisture content data into the treatment process? I hope that this research can act as a catalyst to a more comprehensive discussion among photo conservators about the nature of gelatin silver prints and what can be done to maximize treatment options.
Adelstein, P. Z., J.-L. Bigourdan and J.M. Reilly. “Moisture relationships of photographic film.” Journal of the American Institute for Conservation 36 (1997): 193–206.
Bradbury, E. and C. Martin. “The effect of the temperature of preparation on the mechanical properties and structure of gelatin films.” Proceedings of the Royal Society of London. 214 (1952): 183–192.
Calhoun, J. and D.A. Leister. “Effect of Gelatin Layers on the Dimensional Stability of Photographic Film.” Photographic Science and Engineering, 3 (1959): 8–17.
Gristwood, Michael, formerly of Ilford. Private communication. 2003.
Hendriks, K. B., B. Lesser, J. Stewart, and D. Nishimura. “Properties and Stability of Gelatin Layers in Photographic Materials.” American Institute for Conservation 12th Annual Meeting Preprints, pp. 52–62. 1984.
ISO 18903:2002, Imaging Materials — Films and paper — Determination of dimensional change. International Organization for Standardization (ISO).
ISO 18910:2000, Imaging Materials — Photographic film and paper — Determination of curl. International Organization for Standardization (ISO).
Kozlov, P. V. Burdygina G.I.. “The structure and properties of solid gelatin and the principles of their modification.” Polymer 24 (1983): 651–666.
Riecke, Edward, PhD. Eastman Kodak Co. Research Labs (ret.). Private communication. 2004.
Rose, Philip I., PhD., Eastman Kodak Co. Research Labs (ret.). Private communication. 2004.
Scott, W. E and S. Trosset. Properties of Paper: An Introduction. Atlanta: TAPPI Press, 1989.
Stroebel, L., J. Compton, I. Current and R. Zakia. Photographic Materials and Processes. Boston: Focal Press, 1986.
Sugarman, J. B., and T. J. Vitale. “Observations on the Drying of Paper: Five Drying Methods and the Drying Process.” Journal of the American Institute for Conservation 31 (1992): 175–97.
I would like to express my appreciation to Mark Ormsby, Catherine Nicholson, Mary Lynn Ritzenthaler, Doris Hamburg and numerous other colleagues at the National Archives for their valuable time, encouragement, insight and support. I am also indebted to numerous conservation and industry colleagues for supplying many of the fragments of this complex puzzle. Of critical assistance were Mike Gristwood of Ilford and Drs. Philip Rose and Edward Riecke both retired from Eastman Kodak. Asman Photo of Washington, DC, generously allowed me to use their print dryer for this research.
Brenda Bernier
Senior Photograph Conservator
National Archives and Records Administration
8601 Adelphi Road
College Park, Maryland 20740
Papers presented in Topics in Photographic Preservation, Volume Eleven have not undergone a formal process of peer review.