Topics in Photographic Preservation 2007, Volume 12, Article 23 (pp. 144-159)
Face-mounting of photographs acrylic sheet has become an established method for solving the issue of support for large format photographs. One of the main conservation issues with face-mounted photographs is the repair of a scratched or abraded acrylic surface. Scratches frequently occur on the plastic facing material as a result of shipping, vandalism, routine cleaning, and handling. To address the problem, several fill materials (e.g. epoxies and acrylics), as well as mechanical smoothing and forming techniques (e.g. heating and roll pressing) were tested. Hxtal NYL-1 epoxy was the best performing fill material that combines a low viscosity to allow wicking into fine cracks with a long working time. The most useful mechanical technique was to transfer heat to the scratch using a block of stainless steel (hot rolling), where the edges of a scratch were preferentially affected and the fragmented trough was mildly affected. While this reduced the overall appearance, the scratch was still visible.
The goal of this project was to survey new options in the treatment of scratches on photographs face-mounted to acrylic sheeting. Treatments with the potential to positively affect the visual appearance in any way were considered. Experiments were conducted using materials with refractive indices matched to acrylic, and those materials were applied using common deposition methods. Starting with this information, conservators can choose a range of appropriate materials and conduct further studies to determine applicability for their particular acrylic issues.
A wide array of plastic materials has been used to face-mount photographs. Acrylic, poly(vinyl chloride), polyester, polycarbonate, and polypropylene are some examples. Polymethyl methacrylate (PMMA) has a refractive index of about 1.49 and is the most common material used in face-mounted photographs (Sale 1993, Pénichon and Jürgens 2005). PMMA, which is often referred to as acrylic, was developed in 1936 by Rohm and Haas in Germany. It may be cast or extruded and is also known by various trade names, such as Plexiglas, Perspex, Acrylite, and Lucite.
In the 1970s, a method of face-mounting photographs to hard, acrylic sheets was developed in Europe. One main goal of this process was to increase the saturation of the image (Daffner and McGlinchey 2004). In addition, face-mounting improved the photograph's resistance to fading when UV inhibitors were incorporated in the plastic, protected the photographic surface from pollutants and handling, and provided rigid support (Pénichon and Jürgens 2002). Large photographs tend to have unique issues of display. Glass, when used as a glazing material, can be heavy and generally requires a frame. Acrylic, when used as a glazing material for large works, has the propensity to sag. Face-mounted photographs, however, are often unframed and can be supported by a metal or wood framework or cleats on the verso.
These features make face-mounting a visually unique, cost effective, and simple method for supporting and displaying large-format photographs.
One of the better known face-mounting processes, Diasec®, comes from Switzerland. Diasec® was patented by Heinz Sovilla-Brulhart in 1971 and is available today at licensed lamination studios. The formulas for the adhesive and primer are proprietary secrets that are maintained by Sovilla-Brulhart's widow and son, who took over the business after his death in 1992 (Pénichon and Jürgens 2001).
The Diasec® process uses silicone rubber to adhere the acrylic sheet to the front side of the photograph. The type of acrylic sheeting is not specified by the Diasec® process, but according to Pénichon and Jürgens, most labs use PMMA with ultraviolet absorbers (Pénichon and Jürgens 2001). An electric roll press is used to press the components together, and the silicone rubber cures for forty-eight hours. Many lamination shops face-mount using their own unpatented processes and materials, where pressure sensitive adhesives as well as silicones are used. The silicone rubbers generally used for face-mounting photographs cure at room temperature when exposed to moisture, which is obtained from the water in the gelatin layer in traditional photographs. Poly(dimethyl siloxane) is frequently used as the curable component of silicone rubber. Once cured, it remains flexible and inert. There are, however, various silicone rubber formulations that contain additional materials such as cross-linking agents, fillers, and processing additives. The content and concentrations of these materials in commercially available silicones are often kept as proprietary company information, making it difficult to determine the propensity to off-gas, yellow, or age irregularly (Pénichon, Jürgens and Murray 2002).1
The silicones used for face-mounting photographs have viscosities similar to household bathroom caulk. Because these are quite viscous, a primer is often applied to both the surface of the photograph and the acrylic sheeting. The primer is usually a 0.5–2% solution of organo-bi-functional silane in an organic solvent such as ethanol and water. The functionalities are often reactive moieties that can chemically link the substrate and adhesive. The organo-functional silane solution is much less viscous than the adhesive and formulated to wet and coat the substrate. Thus, in addition to chemically bonding the substrate to the adhesive, it can displace adsorbed air and water vapor, which helps enable intimate contact between the plastic sheet and the adhesive (Pénichon and Jürgens 2001).
Scratches that pose aesthetic problems in the presentation of face-mounted photographs range from barely visible scrapes to deep gouges. The variety of scratch types may lend to treating with a range of methodologies and materials. The best approaches will vary depending on the depth and width of the scratch, the type and source of PMMA, and the lightness or darkness of the image attached to the sheet. Hence, the methods described herein will require optimization by conservators in the field. Table 1 lists the techniques and materials studied as well as general observations. Details on specific materials tested follow. Solvent compatibility was taken into account when choosing a fill material or treatment technique. Some fill materials contain solvents. Crazing of PMMA can be caused by treatment with solvents such as acetone and ethanol; this limits the types of adhesives and fill materials that may be used without harming the substrate.
Table 1. Overview of Techniques and Results.
| Strategy Number | Method/Material | Reversible? | Visual Affect | Comments |
| 1 | Physical Pressure | No | None | Difficult to apply pressure without scratching |
| 2 | Solvent Cements | No | Improved clarity and shadowing | Difficult to mask control application |
| 3 | Localized Heat | No | Flattened edges, decreased reflections from fractured areas | Acrylic specific pre-testing required |
| 4 | Acrylic Co-polymer in solvent | Yes | Improved clarity and shadowing | Difficult to mask and control application |
| 5 | Cast Acrylic Co-polymer | Yes | Slight improvement | Difficult to mask and control application |
| 6 | UV-curable adhesives | No | Improved clarity and shadowing | Risk bleaching photograph |
| 7 | Two-part epoxies | No | Improved clarity and shadowing | Long working time, low viscosity |
This work focuses on filling and non-abrasive techniques. There are also commercial abrasive materials available, such as Novus® Plastic Polish that may be used successfully in conjunction with some of the fill materials presented here. Abrasive techniques are not always desirable, as they necessitate the loss of the facing material. The wearing away of the plastic may be gradual, but polishing is not an easily reversed conservation method. An advantage of fill materials is that they are additive rather than subtractive by nature. This does not necessarily mean that fills are reversible; indeed, mistakes made during the application of fills and the nature of the materials used may be irreversible and/or cause permanent harm to the facing plastic.
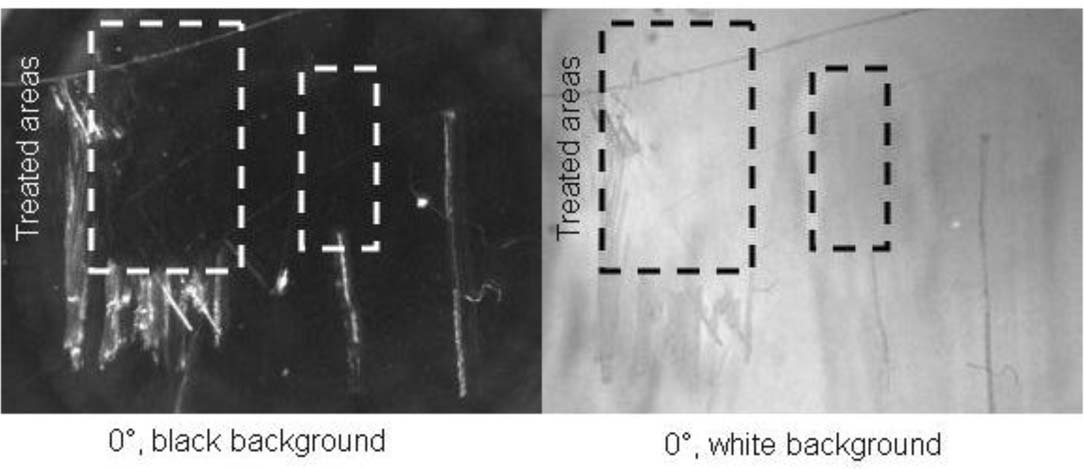
For all tests 0.25 inch thick Cyro Acrylite GP acrylic was used; this acrylic sheeting has a refractive index of 1.49 and can be attacked by solvents, such as methyl and ethyl alcohols, aromatic solvents, methylene chloride, and ketones.2 The test scratches were created on acrylic with a variety of metal tools, including stainless steel needles and pointed files, resulting in a range of depths and widths. The average test scratch was between 0.2 to 0.5 millimeters wide. This was measured using a calibrated function on The Metropolitan Museum of Art's Keyence VHX-500k digital microscope. Two 1″ long scratches were placed side by side for each test materials. Half of one of the scratches was treated. In a few cases, a cluster of scratches was also included alongside the other test scratches, where only a portion of the cluster was treated. Imaging was performed using the Keyence microscope, under 25–150x magnification. The scratches on the PMMA were photographed with the lens and light at two different settings-at 0° and 30° from the normal of the PMMA surface, though due to minor differences in the images, all images published herein were captured at 0° from normal. In practice, these sheets would be attached to the faces of photographs, as the appearance of the test scratches before and after filling depends on the underlying image. To simulate the presence of the photograph, the scratches were photographed against an all-black background and then on an all-white background. The black background allowed the diffuse, white appearance of the scratches to be evaluated, while the white background allowed the shadows cast by the scratch on the background to be viewed.
Treatment details for each material and method used are reported in the following “Treatment Strategy” sections.
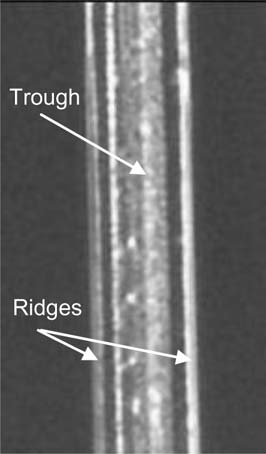
Light is often reflected by the raised edges on either side of the trough of a scratch, resulting in a visual disturbance <Figure 1>. The raised edges in the scratch shown in figure 1 appear as bright lines. The visibility of the scratch may be reduced if the raised edges are smoothed or flattened. Abrasive polishes accomplish a similar end, but areas of the surface beyond the scratch are also eroded during the polishing process. Repeated polishings tend to lead to a noticeable divot. Physically flattening the elevated portions would reduce the loss of original material and potentially reduce the overall visibility of the scratch.
Figure 1. PMMA Scratch (150x, 0°)
A metal roller designed for flattening small infrared microspectroscopy samples was used to flatten the ridges.3 Moderate hand-pressure was applied to the roller as it was passed parallel and perpendicular to the lengths of the scratches. No change was apparent in either the single or clustered scratches after rolling. The edges of the metal roller occasionally created small, additional scratches on the PMMA as it was difficult to apply even pressure while rolling and keeping in perfect contact with the surface. Also, pieces of the PMMA that were dislodged from the scratches became flattened and attached to the adjacent areas. This was avoided by removing debris with Scotch tape prior to and intermittently during rolling.
No obvious edge flattening occurred, as the PMMA was hard and difficult to deform smoothly at room temperature. Also, the majority of the scratches used in this study were relatively wide and fractured in the trough at the deepest parts of the scratch <Figure 1>. Because the roller was much wider than the width of the scratch, the trough was not expected to be affected by this treatment.
Two proprietary solvent cements, which are typically used to join PMMA for the production of vitrines and other three dimensional objects, were tested in reducing the appearance of scratches.4 IPS Weld-On #4 is a low viscosity adhesive for acrylics,5 and Rez-N-Bond is a solvent bonding agent.6 Both of these compounds contain dichloromethane, also known as methylene chloride, which dissolves PMMA.7 This property was exploited to dissolve and soften the rough surfaces of scratched areas. Both dry quickly-Weld-On dries in a few hours, while Rez-N-Bond dries in minutes. The drying time was an important consideration, as contact with the surface of the PMMA needed to be limited to prevent the solvents from penetrating beyond the scratched areas. Limiting the amount of solvent also reduced the risk of penetration.
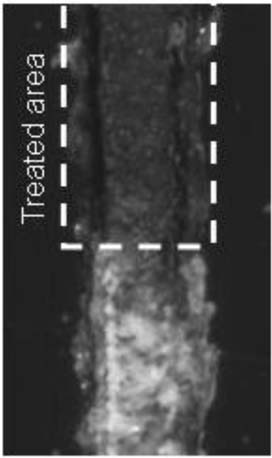
The solvents were applied to the scratches using a glass capillary tube that had been heated and pulled to a diameter of less than one millimeter, a triple-zero brush, and a gas-tight 10 μL syringe typically used for gas chromatography. The syringe allowed for the greatest amount of control in delivering 1–2 μL. To deliver small amounts, the tip of the needle needed to be clean to avoid having the solvent climb the needle rather than form a droplet. Solvent application was undertaken with the ventilation of a fume hood, as methylene chloride is a known health hazard. The IPS Weld-On caused the scratch to appear blanched, while the Rez-N-Bond resulted in a slightly improved appearance <Figure 2>. With the Rez-N-Bond sample, there was some improvement in the clarity of the scratch when viewed with a black background as well as a lightening of shadows when viewed with a white background.
Figure 2. Rez-n-Bond (150x, 0°)
Localized heating was used to melt and clarify scratches. An Ersa Minor 6-Volt heat tool was employed with two different attachments-a spade that measures 9.5 millimeters in length and 6.5 millimeters in width and a narrow point measuring less than 0.5 millimeters in diameter. The MashIR roller used in ‘Treatment Strategy 1’, above, was also used. Cyro, the company that manufactures Acrylite GP, reports that the sheet can be heated to temperatures between 171 and 193 °C in order to make the form malleable.8 An Ersa Minor tool was heated to an approximate range of 150 and 200 °C using a Regelbreich Minor regulator and was applied to the PMMA through a barrier of silicone-coated Mylar to prevent sticking. The MashIR hot roller was preheated to 205 °C in a furnace and was applied directly to the acrylic immediately upon removal from the furnace.
The larger, spade tool was too large for application to the 0.2 to 0.3 millimeter-wide scratches. A distorted pool of melted PMMA formed beyond the confines of the scratches. The finer, pointed tool also appeared to be too wide for the scratches, and it did not result in the formation of a smooth, flattened layer due to the rounded shape of the tool. Rather, small divots were formed in the PMMA surface, which were as noticeable as the scratches themselves. Neither method reduced the appearances of the scratches in a satisfactory manner. The treated areas felt smoother when touched with a finger than untreated areas, due to the deformation caused by the heated tools.
Attempts to soften the appearance of a scratch were made by holding the heated tools over the surface of the acrylic. The distance from the acrylic to the heated element was maintained at approximately 1–2 mm. The temperature of the element needed to be dramatically increased (300–400 °C) to see an effect on the acrylic. Because the tool was difficult to control and was heating a larger area than the scratch, the areas surrounding the scratch tended to warp and melt making the visual appearance worse than the initial scratch. This method may be improved by masking the non-scratched areas with thin glass or ceramic materials to localize the heat on the scratch.
The MashIR rolling tool was applied to the acrylic surface immediately after removing it from the furnace. A back and forth rolling motion was used in initial attempts. While these reduced the visibility of the scratch, markings along the path of the roller were also generated. A better approach was to place the roller on the scratch with minimal movement. This allowed heat to transfer from the roller to the acrylic. The edges of the scratch flattened in this case, and the fractured deeper portions of the scratch showed a limited amount of visual softening <Figure 3>.
Figure 3. Hot Roller (150x, 0°)
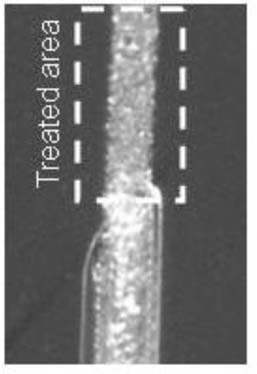
This method seems like a viable option for reducing the appearance of scratches in acrylic. The Ersa Minor tool was not successfully utilized; however, with further experimentation it may be possible to apply this tool in a more effective manner. The MashIR roller flattened the edges and softened the fractured depths of the scratch. The roller was composed of a stainless steel wheel that holds heat well. Other finely polished stainless steel forms could be used rather than the roller. The key was to use a metal with a low thermal conductivity. Factors such as temperature, tool shape, contact time, and metal type could be adjusted to obtain the desired affect.
Scratch-filling with acrylic monomers is currently being tested by Richard Stenman of The Better Image (www.thebetterimage.com), a laboratory dedicated to the conservation and preservation of photographic materials. Stenman conducted trials on scratched and gouged face-mounted samples using Paraloid B-72 and B-67, which are acrylic copolymers and are widely used in conservation for their non-yellowing and relatively reversible characteristics. Eva Grieten, a fellow at the Art Institute of Chicago, also employed B-72 as a fill material (Grieten 2007). Both conservators found B-72 to be a worthwhile fill material for scratches on PMMA, but the material posed challenges in application and leveling after solvent evaporation.
Paraloid B-72 consists of an ethyl methacrylate (70%) and methyl acrylate (30%) copolymer, and was procured as dry granules (CAMEO: www.mfa.org/_cameo). Based on Stenman's work, two solvent systems were used in this study. The first was a 1:4 mixture of hexane and toluene, and the second was xylenes. One gram of B-72 dry pellets was added to a 4 mL solution of hexane and toluene. These solutions were applied by brush. A low concentration of the copolymer made for easier application, but repeated applications were necessary because of shrinkage resulting from evaporation. For very small scratches, neatness and accuracy of reapplication were difficult. Stenman also employed a higher concentration (40%) of the copolymer in solvent but found that this solution spread less readily and formed a skin due to rapid solvent evaporation from the surface. The higher concentration may have applications on deeper scratches (Stenman 2007). In this study, the 20% B-72 in xylenes solution allowed slightly more time for manipulation after application than the hexane/toluene solution. The hexane/toluene solution formed a skin more quickly, so subsequent manipulation lead to surface disturbances. These solvents pose a risk to the PMMA substrate, so exposure time and solvent type should be carefully considered by the conservator.
Masking was used to isolate the fill material to the scratch. Scotch-brand “Magic” tape and Parafilm were used to mask the adjacent, unscratched areas of PMMA. The solvents in the fill materials appeared to dissolve the Scotch tape adhesive and Parafilm. A clear, sticky film was left on the PMMA after the Scotch tape was peeled from the surface. The Parafilm was softened and after its removal, a foggy residue was left on the surface of the PMMA. Scotch tape employs an acrylic adhesive that is soluble in aromatic solvents. These aromatics also may have dissolved a component of the Parafilm, leaving behind the residue.9
The B-72 in hexane/toluene reduced the appearance of the scratch better than the xylenes solution on both black and white and in all lighting conditions <Figure 4>.
Figure 4. 20% B72 in Hexane/Toluene (45x)
This technique has the advantage of filling with pieces of B-72 without solvent. B-72 is a thermoplastic, so it may be reheated and cast. A 20% solution of B-72 in acetone was spread onto silicone-coated Mylar sheet and allowed to dry. After drying for 48 hours, the B-72 was cut into small pieces and inserted into the crevices of scratches. The B-72 was heated in place using a small heat spatula set to around 150–200 °C.
Again, isolating the fill material was problematic as the B-72 tended to spread beyond the scratch edges. It was difficult to cut and apply sufficiently small pieces of B-72, making this a possible solution for the treatment of wide and or deep gouges. In addition, an appropriate masking material was not found. With the heat application, the Scotch tape and Parafilm tended to melt and deposit residue onto the PMMA surface. Another danger was that the PMMA can melt in this temperature range and even with known manufacturer and make/model, destructive testing of a chip would likely be needed to determine the actual melting point of a particular piece of acrylic. Overall, the appearance of the scratch was diminished very slightly and resulted in a pool of excess fill material surrounding the scratch.
Because of their transparency, low viscosity, and long working time, ultraviolet light curing adhesives were investigated as scratch filling options.10 A major advantage of this method was the increased ease of application, as the fill material would not harden until irradiated with UV-light. Also, less shrinkage was expected relative to solvent based co-polymer solutions. Minimal shrinkage upon curing allowed for single or fewer applications to a particular scratch. Parafilm was used as a masking material, as it did not react adversely to the UV-cure materials tested.
Some of the UV-curing materials tested in this project were reported to cure under low-intensity light with wavelengths in the range of 300–400 nm. Not all manufacturers stated specific parameters in their product literature. Star Technology, which manufactures a variety of UV-cure adhesives, suggested using an exposure of less than 30 seconds with a minimum of 100 mW/cm2 at wavelengths between 320–400 nm with the optimal wavelength of 365 nm, for its adhesive, UVA4101.11 Dymax listed a 15 second exposure time with an output of 150 mW/cm2 using the company's 5000-EC flood lamp, which delivers filtered UVA light (320–400 nm), for its adhesive, 3016.12 These figures were used as estimates of cure times for all tested adhesives.
A Green Spot UV Spot Cure System was obtained from American Ultraviolet. Prior to shipping, the system's UV output was determined by the manufacturer and measured to be 12.15 W/cm2, which was well above the dose levels suggested by the adhesive manufacturers. A fiber optic light guide was mounted to a stand so that the exposure could be started and stopped with a footswitch some distance away from the light. The light from a short arc mercury lamp was delivered to the sample via a fiber-optic light guide with a diameter of 5 mm. The light was filtered to release UV light in the 300–480 nm range, with peak intensity at 365 nm.13 The setup was arranged to minimize the operator's exposure to UV radiation.
The UV-curing materials were visually assessed for transparency and degree of yellowing after curing.14 The products tested are listed in Table 2.
Table 2. UV-curable materials tested for transparency and degree of yellowing
| Manufacturer | Adhesive Name | Main Components | Color after Curing |
| Permabond | UV620 | Methacrylate ester | Colorless |
| Electro-Lite | ELC2728 | Epoxy | Dark yellow-brown |
| Electro-Lite | ELC4481 | Urethane acrylate | Medium yellow |
| Dymax | 3016 | Epoxy | Light yellow |
| Dymax | 4–20638 | Urethane acrylate | Colorless |
| Star Technology | VLA4101 | Acrylic resin | Light yellow |
| Star Technology | UVA4101 | Acrylic resin | Colorless |
About 0.1 mL of each adhesive was dropped onto a sheet of PMMA. A smaller amount was used for Dymax 3016 and 4–20638, as they had low viscosities and tended to spread widely. Each drop of adhesive was exposed for 15 seconds at three different intensities, which were created by varying the distance from the end of the fiber optic light guide to the PMMA surface at 2, 5, and 10 centimeters. Previously irradiated samples were masked with cardboard to prevent further exposure.
Three adhesives did not perceptibly yellow: Permabond UV620, Dymax 4–20638, and Star Technology UVA4101. The adhesives that yellowed increasingly discolored when the light was intensified. It should be noted that none of the adhesives cured fully after 15 seconds of irradiation, as the surfaces remained tacky.
The three non-yellowing adhesives were then applied in small amounts to scratches using a triple-zero brush. The areas adjacent to the scratches were masked with Parafilm prior to applying the adhesive. Star Technology UVA4101 had a medium to low viscosity akin to thin syrup (250 cp). Permabond UV620 was quite viscous (2500 cp). Dymax 4–20638 was extremely fluid like water (75 cp).15 The Dymax 4–20638 flowed easily into fine scratches but was more difficult to clean than the viscous Permabond UV620.
A reasonable level of curing was achieved by exposing each of the filled scratch samples for 5 minutes at a distance of 5cm, but the light had to be activated for thirty, 10-second intervals to avoid melting the sheet. When irradiated for shorter periods (15 seconds) or further away (10cm), the samples remained tacky. Exposing for up to 120 seconds at 2 cm distance also left the samples incompletely cured and melted the acrylic. The optimal cure conditions reported in this study vary from those indicated by the manufactures. Our curing conditions may have been affected by the thickness of the samples being cured (up to 2–3 mm) and the presence of oxygen. UV-curing is known to occur most rapidly in an oxygen free atmosphere because oxygen inhibits the free-radical mechanism of ultraviolet curing (Bolon and Webb 1977). A noble gas or nitrogen-rich environment could reduce the amount of light exposure needed to achieve a full cure.
The Dymax 4–20638 had the most satisfactory appearance in 0- and 30-degree lighting on a black background, as the adhesive wet the scratch and leveled well <Figure 5>. Star Technology UVA4101 viewed in 0- and 30-degree lighting on a white background reduced the shadowing from the scratch. The Permabond UV620 did not significantly improve the appearance of the scratches on either the black or white backgrounds.
Figure 5. Dymax Urethane Acrylate (25x)
Some important issues that have not been addressed in this study concern the longevity of the fill materials and the effect of ultraviolet light on the photograph. In order for this technique to be considered, much lower exposures to UV-light would be necessary to avoid discoloration of the underlying photograph. Examples of potential improvements are to produce more light-sensitive formulations (e.g. different or more photo-initiator) or more optimal curing conditions (e.g. wavelength matching to photo-initiator or reducing atmospheric oxygen).
Hxtal NYL-1 is a two-part epoxy resin system that is commonly used in the conservation of glass and consists of the diglycidyl ether of bisphenol A and triethylene diamine. Hxtal has a refractive index of 1.51, which is slightly higher than that of PMMA.16 This epoxy has the advantages of minimal dimensional change upon curing, a low initial viscosity, and slow curing. Approximately 90% cure is reached after seven days at room temperature; however, the curing process may be accelerated with heating of the substrate (120 °C).17 Slow curing affords a working time of several hours, during which the viscosity slowly increases. Because the initial viscosity is low, it is able to flow into minute scratches easily. Heating the substrate prior to application can also decrease the initial viscosity to improve Hxtal's ability to wick into cracks. If filling fine crevices is unnecessary, the epoxy may be left for a few days to thicken slightly before application. Some disadvantages of this material are that it may eventually yellow with light exposure, and may require mechanical removal or removal via solvents that will harm PMMA.18 Grieten has employed Araldite 2020, which is another low-viscosity epoxy used in glass adhesion, but found that the material did not fill scratches adequately on acrylic.19
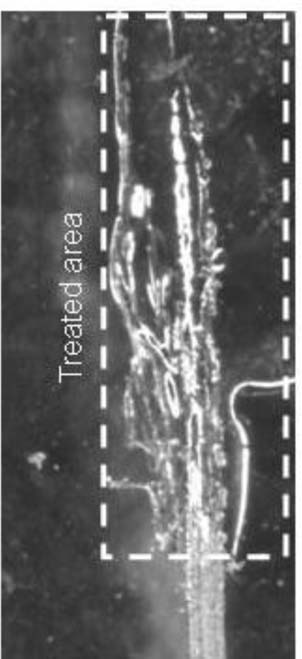
To prepare Hxtal, resin (A) and hardener (B) were mixed in a 3:1 ratio by weight - 1.5 grams of A to 0.5 grams of B-and mixed thoroughly in a glass beaker with a glass stirring rod.20 Two methods of applying Hxtal were employed using a 3/0 Yasutomo Silverado round brush. The first was to load the Hxtal into the brush followed by careful application by painting the depth of the scratch. The edges were cleaned of excess material with a small cotton swab. The second involved wicking the Hxtal into the scratch from a brush over several hours. For this method, the acrylic sheet was placed on a horizontal surface, and a brush was clamped such that only the very tip contacted the scratch <Figure 6>. The brush was then loaded with Hxtal using a 26 gauge needle on a disposable syringe. The Hxtal was allowed to flow into the scratch overnight, and the brush and clamp were removed. For both methods, the treated area was then covered with a tented piece of Mylar. The Mylar covering was necessary to prevent debris from contaminating the surface.
Figure 6. Hxtal Wicking
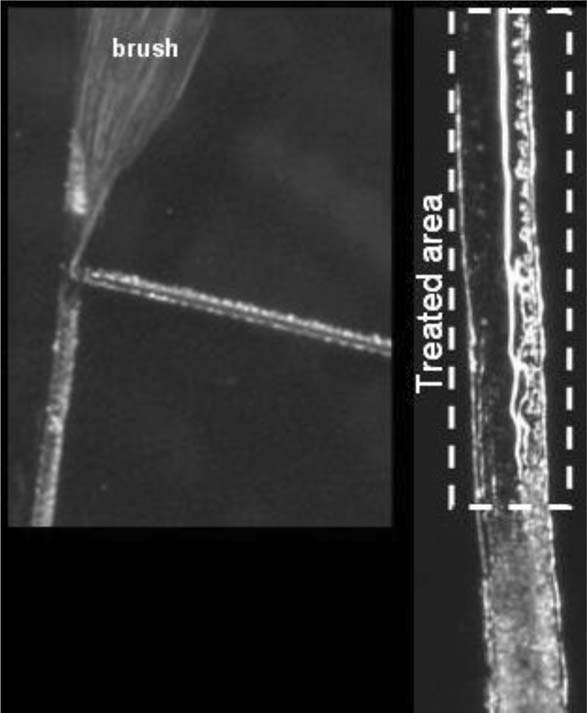
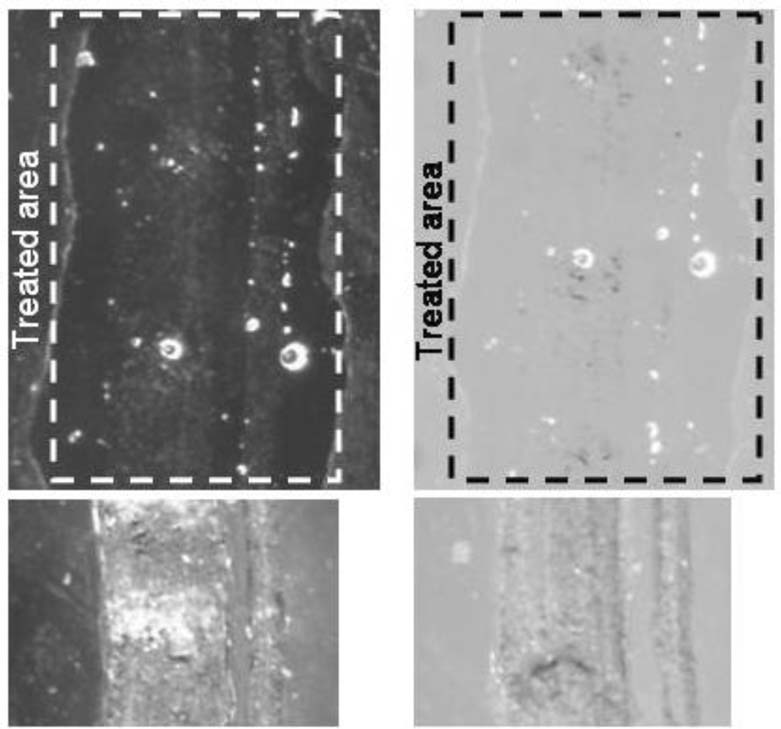
After seven days, the filled scratches were examined and photographed using the Keyence microscope. As with all other scratch treatments in this study, only a portion of a long scratch was treated using the paintbrush technique. Because of Hxtal's low viscosity and very long cure time, it was able to wick through the entire length of the scratch. For the wicking method, a “T” shaped scratch was used, and the brush was placed at the intersection of the scratch lines with the brush hairs aligned along the top line of the “T”. The Hxtal preferentially covered the top line of the “T”, but some Hxtal wicked into the lower perpendicular scratch (lower line of the “T”). The treated area shown in figure 6 shows dark and smooth areas as well as bright white lines. The dark areas are where the Hxtal wet the trough portion of the scratch. The white lines surround the rough edge of the scratch giving some indication of the topography of the scratch. For this sample, small burrs of acrylic protrude above the smooth plane of the acrylic sheet at the right edge. Because the burrs are above the plane of the acrylic sheet, the Hxtal does not easily wet those areas. Instead, the Hxtal surrounds the base of the burrs. Otherwise, the visual effect in this case was similar to the ‘painting’ technique. The scratched appearance was abated fairly well by the Hxtal fill as viewed over both black and white backgrounds <Figure 7>. In these studies, air bubbles were the main defect in the repair followed by an under-filled surface. Abrading the scratch prior to filling, degassing the Hxtal, and careful application may improve these problems.
Figure 7. Hxtal (150x, 0°)
As these experiments were conducted as an introductory survey of scratch repair techniques and materials, conservators should consider each as a viable possibility depending on the condition, location, and severity of the damaged acrylic. It may also be advisable in some cases to combine techniques. For example, if a scratch is deep with high edges, the hot roller technique could be used to flatten the edges, and Hxtal may fill the deep trough. With practice and innovation some of the short-comings of these materials and techniques may be overcome.
The most promising purely mechanical method of scratch repair was heating with the stainless steel bearing of a MashIR roller. Practice and fine tuning of conditions may convert this into a reliable method for reducing the visibility of deep scratches. With some scratches, it tended to leave a seam or scar at the scratch site that was much less visible than the original scratch, and for those scratches with raised edges, the roller was capable of melting and flattening the edges.
The most successful fill materials were the UV-curing urethane acrylate, Dymax 4–20638, and Hxtal, the two-part epoxy. Other, more familiar materials may be manipulated by conservators with success, such as B-72 in solvents, but the long setting time of the Hxtal and the control allowed with UV-curing materials may reduce the margin of error for many conservators. All of these materials have refractive indices that are close to that of the acrylic sheeting:
| Material | Refractive Index |
| Cyro Acrylite GP | 1.4921 |
| Paraloid B-72 | 1.479 – 1.48922 |
| Dymax 4–20638 | not known23 |
| StarTechnology UVA 4101 | 1.482324 |
| Hxtal NYL-1 | 1.5125 |
Hxtal has more favorable properties than the UV-cure materials, as it has a longer record of successful use in conservation, namely, on glass objects, and it does not require the underlying photograph to be exposed to UV-radiation, which may cause bleaching or other damage. None of the materials or techniques tested, however, returned the PMMA surface to a pristine condition; the “successfully” filled scratches may still be apparent at various viewing angles. Further research is needed before a strong recommendation for scratch repair can be made, though some materials used in this study show definite promise.
Emy Kim, Conservation Center at the Institute of Fine Arts, New York University
Eric Breitung, Department of Scientific Research, The Metropolitan Museum of Art
22 August 2007
The authors would like to thank to Richard Stenman and Nora Kennedy for their guidance on this project. The experiments were carried out in the Department of Scientific Research at The Metropolitan Museum of Art and at the Institute of Fine Arts at New York University, Conservation Center. The authors would also like to thank Kimberly Ritch and Eva Grieten for their assistance and American Ultraviolet for loaning the UV equipment.
Bolon, D. A. and K. K. Webb. “Barrier coats versus inert atmospheres. The elimination of oxygen inhibition in free-radical polymerizations,” Journal of Applied Science. Vol. 22, No. 9 (June 1977): 2543–2551. Abstract available online at http://www3.interscience.wiley.com (Accessed on April 11, 2007)
Daffner, Lee Ann and Christopher McGlinchey. “The Big Picture: Conservation Research Program for Contemporary Color Photographs,” Modern Art, New Museums: Contributions to the Bilbao Congress, 13–17 September 2004. London: International Institute for Conservation of Historic and Artistic Works, 2004. 109.
Gismondi, Thomas E. “The Influence of Acrylate Monomers on the Resistance of UV-Cured Coatings to UV-Induced Degradation,” Journal of Radiation Curing. Vol. 11, No. 2. (April 1984): 14–18.
Grieten, Eva Unpublished Research Notes from e-mail correspondence. April 12, 2007.
Murphy, Erin L. “Treatment of Andreas Gursky's Rhine II: Testing of Dusting Materials and Cleaning Cloths,” Abstract presented at 2005 PMG Winter Meeting in Vancouver, BC. Topics in Photographic Preservation. Vol. 11. Washington, DC: American Institute for Conservation of Historic and Artistic Works, 2005. 79.
Museum of Fine Arts, Boston. CAMEO: Conservation and Art Material Encyclopedia Online. http://cameo.mfa.org (Accessed April 11, 2007).
Pénichon, Sylvie and Martin Jürgens “Two Finishing Techniques for Contemporary Photographs,” Topics in Photographic Preservation, Vol. 9. Washington, D.C.: American Institute for Conservation, 2001. 91.
--“Issues in the Conservation of Contemporary Photographs: The Case of Diasec of Face-Mounting,” AIC News. Vol. 27, No. 2 (March 2002).
--“Plastic Lamination and Face Mounting of Contemporary Photographs,” Coatings on Photographs: Materials, Techniques, and Conservation. Ed. Constance McCab e. Washington, DC: American Institute for Conservation, 2005. 220–221.
Pénichon, Sylvie, Martin Jürgens and Alison Murray. “Light and Dark Stability of Laminated and Face-mounted Photographs: A Preliminary Investigation,” Works of Art on Paper: Books, Documents and Photographs, Techniques and Conservation, Contributions to the Baltimore Congress, 2–6 September 2002. London: International Institute for Conservation of Historic and Artistic Works, 2002.
Sale, Don “The Effect of Solvents on Four Plastics Found in Museum Collections: A Treatment Dilemma,” Preprints of Contributions to the Modern Organic Materials Meeting, Edinburgh, 14–15 April 1988. Edinburgh, Scottish Society for Conservation and Restoration: 1988. 105–115.
--“An Evaluation of Eleven Adhesives for Repairing Poly(methyl methacrylate) Objects and Sculpture,” Saving the Twentieth Century; The Degradation and Conservation of Modern Materials. Ottawa: Canadian Conservation Institute, 1993. 325–326.
Stenman, Richard “Acrylic Fill Research,” Unpublished manuscript. January 2007.
1 According to Pénichon, Jürgens, and Murray, delamination has occurred along the edges of some face-mounted photographs.
2 Cyro offers a full description of Acrylite GP on its website: www.cyro.com (Accessed April 11, 2007).
3 MasherIR flattening tool purchased from Kevley in Chesterland, OH, 440–842-6892.
4 Samples of these adhesives were provided by the Plexiglas Shop at the MMA.
5 According to the IPS company website (http://www.ipscorp.com/industrial/acrylics.html), this formulation is, “4 -Non-flammable, water-thin, moderately fast setting, solvent cement for bonding acrylics. Also bonds styrene, butyrate, PETG, and polycarbonate to themselves. Will not bond to cross-linked acrylics” (Accessed April 11, 2007).
6 This product is manufactured by Schwartz Chemicals.
7 The MSDS sheet for Rez-N-Bond #1 can be found at http://www2.siri.org/msds/f2/bmv/bmvlk.html. The MSDS sheet for Weld-on #4 can be found at http://msds.ogden.disa.mil/msds/owa/web_msds.display?imsdsnr=197569 (both accessed April 11, 2007).
8 A PDF document, “Working with Acrylite,” can be found on www.cyro.com.
9 Scotch tape is a proprietary brand manufactured by 3-M that employs a pressure-sensitive adhesive. Parafilm is a stretchable film composed of polyolefins and paraffin wax, manufactured by American Can. Information on these materials has been found from www.mfa.org/_cameo (Accessed on April 11, 2007).
10 Stenman and Breitung have consulted each other on UV-cure and solvent-based filling techniques.
11 The curing time and intensity are available in literature accompanying the product. The365nm wavelength for optimal curing was provided by a company representative in a telephone conversation (August 1, 2007).
12 Information regarding the 5000-EC lamp is available on the company's website: http://www.dymax.com/products/curing_equipment/flood_lamps/flood_lamps_5000series.php (Accessed July 31, 2007). The exposure time for the 3016 UV curing adhesive was taken from a product data sheet supplied by the company.
13 These specifications are available in the literature accompanying the Green SpotTM UV Curing System.
14 These adhesives were collected from various manufacturers by Richard Stenman.
15 These values are available in the literature accompanying each product. These materials were collected by Richard Stenman.
16 This information was obtained on CAMEO at http://www.mfa.org/_cameo. (Accessed April 11, 2007).
17 A summary about Hxtal is available online from http://www.glasscolor.com/files/HXTAL-NYL.pdf (Accessed April 11, 2007).
18 The makers of Hxtal have a “Cured Epoxy Dissolver” and there is an anecdotal post by a conservator on the AIC distlist website that has used acetone: palimpsest.stanford.edu/byform/mailing-lists/cdl/1996/1216.html. (Accessed July 5, 2007).
19 Unpublished, e-mail correspondence. April 12, 2007.
20 Many thanks to Alisa Eagleston (NYU Conservation Center) for sharing some tips about preparing Hxtal.
21 Source: manufacturer website, www.cyro.com
22 Source: CAMEO, www.mfa.org/_cameo (Accessed July 5, 2007)
23 This has not been tested by the manufacturer (Phone conversation, July 5, 2007)
24 Source: manufacturer's literature included with sample
25 Source: CAMEO, www.mfa.org/_cameo (Accessed July 5, 2007)
Papers presented in Topics in Photographic Preservation, Volume Twelve have not undergone a formal process of peer review.