Topics in Photographic Preservation 2009, Volume 13, Article 22 (pp. 160-169)
Presented at the 2009 PMG Winter Meeting in Tucson, Arizona
This paper presents a case-study, the treatment of an American political tintype badge bearing the image of Abraham Lincoln and his Vice-Presidential running-mate. The tintype was in very poor condition and required immediate conservation treatment. Combination of different materials in one object (die, iron, collodion, asphaltum varnish), small scale and limited published experience provided challenges. The treatment required conservators to innovate treatment methods, test new materials, and develop specialized tools for working under the microscope.
This case study was presented as a joint paper at the 2009 PMG Winter meeting in Tucson Arizona. The first section of that paper, not included here, was presented by Wiegandt who broadly addressed philosophically the benefit of applying cross-disciplinary conservation specialty techniques commonly used in treatment of non-photographic objects to treating photographic objects. Wiegandt provided examples of such applications in general, and Karina Beeman presented this complete case-study as an example of the interdisciplinary benefit of problem solving drawing on techniques from other conservation specialties.
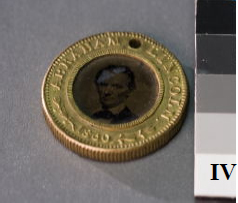
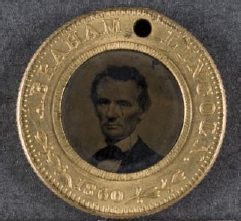
The object for treatment was a political badge – very often called a button - for the first president campaign of Abraham Lincoln in 1860 (Fig. 1). It is a round two-sided medalet with tintype photographs of president and vise-president candidates on each side. Two tintype images are encased in a solid brass frame, which is 25 mm in diameter. The verso of the frame is inscribed: “Abraham Lincoln 1860”; on the recto: “Hannibal Hamlin 1860”. On each side there are olive sprays with two leaf clusters on the bottom of frame. A hole for hinging is on the top of the frame. The portrait of Abraham Lincoln used as a master copy for production of this particular badge is a reproduction of the famous “The Brady Cooper Union Portrait”, taken in the morning of February 27, 1860. This was the first picture, taken of Lincoln in New York City and one of the few full-length photographs of him before he became president. It is also famous being one of few images picturing Lincoln without the beard. Ferrotype badges are plentiful for the 1860 campaign and exist in numerous sets for all candidates – Lincoln, Douglas, Breckinridge and Bell. This particular badge is relatively common and listed as Sullivan/DeWitt AL-1860- 97 (Sullivan 1981).
Fig. 1. Political double-sided badge, 1860, tintypes in brass frame, diameter 2 ½ cm. Before treatment.
2. Technology of the Tintype Badge, Technique and Materials
There are three inventions that led to production of this badge and many other political badges. First, the invention of the tintype process was patented in 1856 (Smith 1856). The patent illustrates “the obtaining of positive impressions upon a japanned surface previously prepared upon an iron or other metallic or mineral sheet or plate by means of collodion and a solution of a salt of silver”. The six basic steps involved in the tintype process were: coating, sensitizing, exposing, developing, fixing, washing the metallic plate and varnishing. Second, mass production of ferrotypes was made possible by Simon Wing’s invention of the multiple tube camera (Wing, 1860).
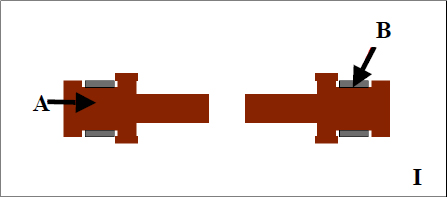
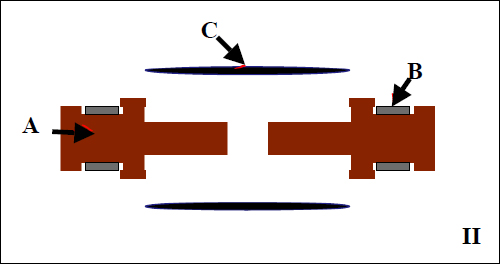
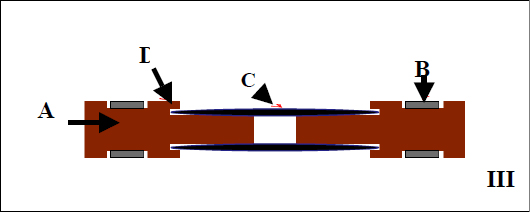
Fig. 2. Schemes of making of a tintype badge as described in a patent paper:
I. The sheet of metal die-cut with a matrix by stamping press; A – solid metal; B – decorative rim with text.
II. A photographic picture placed on each side of a frame; A – solid metal; B – decorative rim with text; C – tintype images.
III. The rim was pressed down to secure the photographs A – solid metal; B – decorative rim with text; C – tintype images; D – securing rim. IV. The badge is small, the diameter of a frame is 2 ½ cm.
Ferrotype pictures were produced by copying a master portrait with a multi-lens camera. The lenses with the furthest angle from the master produced a slightly distorted image. And third invention of D.F. Maltby of Waterbury, Connecticut, who conceived the idea of preparing special medals with tintype portraits of the candidates in the 1860 campaign. As many as thirty-six ferrotypes could be taken on a single plate, and then cut apart. The double-sided medalet was made by setting tintypes on each side of a brass frame (Fig. 2). From this period onward, with the development of mass production of tintype badges, they became essential ephemera of political campaigns.
When tintypes were pressed inside the frame, they obtained a slightly domed shape and an unsupported hollow space was introduced inside the frame of medalet. Normally the campaign medals were made in the shape of the coins of that time. The traditional way of displaying them was to make a hole in the top of the frame, through which a ribbon was run and attached to the wearer’s coat or waistcoat. The medals were made struck from dies, precisely as in coin manufacture. Also badges might have variations allowing for different manner of portrayal: such as a pin-back, shank-back and hinge ring.
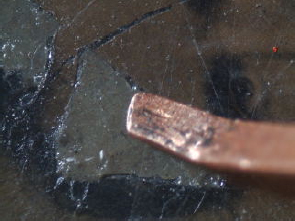
The badge had many of the common problems that tintypes can have. The badge had soiling, dust, and accretions overall, especially on the perimeter of each tintype (side). The collodion emulsion on both tintypes – the portrait of Abraham Lincoln and the portrait of Hannibal Hamlin - was cracking. The Lincoln tintype was the most severely damaged and unstable. It had two losses of collodion on the image. The collodion on the Lincoln side had significant cracks all over the tintype, with loose particles lying on the surface. Because of the iron support being electrostatic these particles of collodion were very fragile and could further loosen and move at any moment. This complicated the handling and treatment significantly, since with any slight touches the fragments of cracked collodion moved. The iron support was visible in the loss areas and iron corrosion was visible under magnification. The side with the portrait of Hamlin did not have much cracking but had a fingerprint right in the center and degraded varnish. Note that the size of the badge is only 2 ½ cm in diameter.
The badge had an immediate need for stabilization. Vulnerability of the damaged Lincoln portrait with its loose pieces was the primary reason for the urgent treatment.
It also needed restoration. The areas of loss were located on the sitter’s face and severely disfigured the image. It was very desirable to compensate losses and restore the image. Long-term storage was an also an issue. An preservation enclosure was needed to safeguard and protect the object from further damage.
These are not unique needs for political badges and tintypes in general. Quite often they have cracking in the collodion that leads to image losses. Such damage diminishes and devalues the object. It can get worse over time – most often from mishandling, which is easy with such a small object.
There were a number of obvious conservation treatment challenges.
- The combination of several different materials complicated the choice of materials to use for treatment. It is preferable to work on tintypes (and other metallic objects) with non-aqueous materials to prevent corrosion or rusting in the case of ferrous metals.
- The small size of the badge and tintype image required specialized fine tools and precise applications, including housing and fixturing set-ups to facilitate maneuvering and handling during treatment.
- The fact that it was a two sided object and the relatively poorer condition of the severely damaged collodion on the Lincoln side.
- Lack of guiding information in the conservation literature and relevant publications. Published conservation experience on loss compensation and consolidation of tintypes is quite limited (Chen 2000).
Ralph Wiegandt, Andrew W. Mellon Advanced Research Fellow at George Eastman House, who had previous experience as an objects conservator was available to propose innovative treatment options and potential materials, generally uncustomary to photograph conservators. This collaboration resulted in some new approaches and customized tools for the treatment of this Lincoln badge.
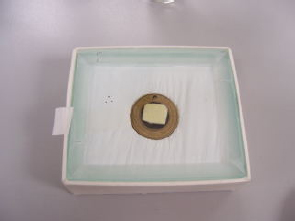
Because the object was very fragile due to damage and diminutive scale, in order for it to be handled safely, a custom box was created first – for storage and for protection of the treatment (Fig. 3). The box was made from 4-ply acid-free board, which held the retaining cushion with a cavity cutout that secured the .the badge. It was fabricated from Volara® Foam that was covered with inert, soft Teflon™ film, sold as Relic Wrap™. After the treatment a smaller box for storage was created, with the same cushion inside.
Accretions were carefully removed with a fine sable brush No 000 as much as possible at this point in the treatment.
The badge had an urgent need for consolidation. The side with the portrait of Lincoln was more damaged; it had numerous loose particles of collodion and most of the damage was on the image area. The cracks and loose flakes of collodion were consolidated with 5% solution of Paraloid B-72 in toluene. The percentage of this adhesive solution was figured through experiment –a lower percentage was too thin and did not achieve consolidation, and higher percentage was too thick and did not flow efficiently. Precautions were made due to the toxic nature of the solvent, and work was carried out under a solvent exhaust unit. Adhesive was carefully applied on the area of losses and cracking with fine sable brush No000. Brushes from Windsor & Newton series 7 were found to be the finest and the best to work on a small scale, due to the finest hair of these brushes. The difficulties at this moment resulted from the electrostatic charge. The flakes that were loose on the surface easily “jumped” from their place with any slight touch of the brush hairs. To move them into proper place a sharpened wooden stick was used; thus eliminating the electrostatic charges. The tintype needed to be consolidated three times. Residue of adhesive was removed mechanically with sharpened wood stick. After complete consolidation of the Lincoln side, the tintype on the other side of badge (Hannibal Hamlin) was consolidated in the same way. All procedures were performed under the microscope.
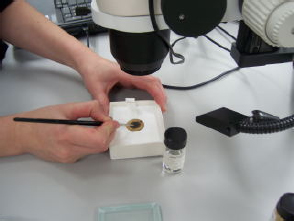
Fig. 3. During treatment: the badge is in custom made box; work is performed under the microscope.
The surface of the tintype after the consolidation was not totally flat – pieces of collodion that were had originally lain flat now formed a somewhat faceted shape. To minimize this complication, the consolidated area was placed under minimal weight after each cycle of consolidation. Only light pressure was used: silicon-release Mylar (dimensioned to the diameter of the tintype), overlain by a piece of latex sponge to fill the space, and compressed by only a piece of glass 0.5 mm thickness placed on top (Fig. 4).
Fig. 4. System of light press after each consolidation cycle: the badge is in custom box, silicone release Mylar, latex sponge and glass on top.
The area of loss was covered with thin layer of B-72 solution. This was done to create an isolating layer for the subsequent fill material and to prevent further development of corrosion.
Now that the loose collodion particles were secured by consolidation, another cleaning attempt was made. Both sides of the tintype especially cemented accretions near the rim of the frame were cleaned with saliva applied by cotton swabs. It was rinsed with distilled water applied with cotton swabs.
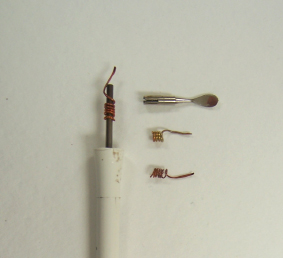
Fig. 5. Heat spatula with original tip and custom-made micro tips (shaped copper wire).
At this point the object was ready to have its losses compensated. The method of compensation was proposed by Wiegandt. A mixture of Cosmolloid 80H microcrystalline wax and Arkon P-90 resin, colored with fine dry pigments was used as loss compensation material. To prepare mixture, wax and resin should be warmed up on the hot plate until uniform and transparent. The proportion of the wax-resin mixture can be varied: more wax in mixture will create softer filler, more resin – harder fill. The author tried 1: 1 (proportioned by weight), and 1:2, but eventually used the 1:1 mix. For convenience, the mixture can be poured into a silicone mold to cool and harden into sticks or any shape.
The wax-resin mixture can be mixed with dry pigments on a ceramic palette with a heated spatula, temperature at an approximate temperature of 60°C.
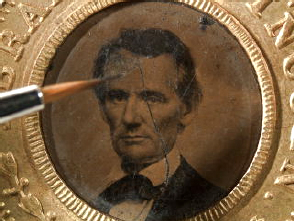
The colored mixture was applied to the loss area with a customized hot spatula. The temperature of 50°C degree for the spatula setting for the fill mixture application was worked the best. For application the author used a Micro Matic™ Electronic Waxer and custom micro tips, made of copper wire, shaped and wrapped around the point of a spatula (Fig. 5). For application of the mixture a pointed tip was used, and for flattening and for polishing a flat tip was used (Fig. 6 and 7). All work had to be performed under the microscope due to the small size of the losses. The fill should be built up gradually, dot by dot, not up to the edges. After that the fill was flattened and evened with the edges of the loss. The fill was covered with silicon release Mylar™, and flattened with small bone spatula. Sometimes a hot spatula was used to flatten the fill, in this case with maximum temperature 40°C in order not to melt the entire fill (Fig. 7). After flattening Mylar™ was not removed from the working area immediately, and the fill was allowed to cool down. Heptane solvent, applied with a fine brush, also helped to make the fill smoother. Application of heptane was done under a solvent exhaust unit, due to the hazard of the solvent.
Fig. 6. Application of wax-resin mixture. 6.5X
Fig. 7. Flattening of the wax-resin fill with a custom heat spatula, made of copper wire. 6.5 X
Fig. 8. Retouching of the forehead area with dry pigments in Heptane an a Windsor&Newton series 7 sable brush No 000
It was possible to remove the excess of mixture application with aliphatic solvents (petroleum benzine or VMP Naptha). Naptha had no effect on the collodion or B-72 consolidant, which was convenient especially since it was necessary to redo the fill many times to achieve the best outcome with little danger to the object.
The forehead and hair were retouched using only heptane as the carrier for dry pigments (Fig. 8). High density could be achieved without building up additional layers in the very small loss area. However, on the very black areas the black pigment alone did not give enough density and looked gray rather than black. It was mixed with wax again. This way it was possible to get the deep black color.
The final step was to overcoat the image. A spray application of PVA resins (AYAA and AYAC) modifies the gloss and adds protection to the wax-resin fill. The 10% mixture of AYAA and AYAC resins in ethanol and toluene (1:1 by weight) was prepared. Then 10 drops of cellulose acetate was added to 15 ml of this mixture in order to modify the gloss. After several experiments it was found that airbrush application in 5-6 layers would provide an even finish with the desired semi-gloss.
This case study addressed a very specific object – a tintype badge in metal medalet. Although the particular object has primarily historical value, the method of treatment developed in this case can be applied to any tintype artifact. Taking into account limited publications on this topic, the author hopes this article will promote further studies. The treatment was quite successful. The loss area is not visible with naked eye (Fig. 9). The loss compensation method using wax-resin mixtures appears to be a promising method for many photographic objects. It is an easily reversed and versatile material to work with on sensitive surfaces. The Cosmolloid 80H microcrystalline wax and Arkon P-90 resin mixture creates a fill material that is easy to modify and reshape. Depending on wax to resin ratio the fill could be modified to be softer, more flexible or harder. In this particular case author did not observe much difference between use of softer and harder versions of wax mixture probably due to the very small size of the fills but it is definitely a property that could be useful for other objects. Despite the custom made tips for heated spatula, it was quite difficult to work on such small scale. The whole experience proved that there is a clear need to develop new tools for photograph conservators to work comfortably under the microscope.
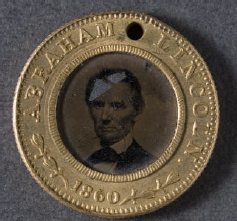
Fig. 9. Badge after treatment
This case study was successful, and showed a few topics to develop further. During the experiments the author used the method on various tintypes from the study collection. The method was not successful on all objects; some losses did not have enough depth to accept the wax-resin fill. Obviously there is a need for an impainting media that would be thin enough, safe for collodion, match the visual appearance and be reversible. There were also a few experiments on damaged ambrotypes with the application of wax-resin mixture and consolidation with Paraloid B-72 of damaged ambrotypes. Results were quite promising, but further research is needed.
Acryloid (Paraloid®) B72
Copolymer of ethyl methacrylate and methyl acrylate
Rohm and Haas Company Philadelphia, Pennsylvania
(Avalable at Talas)
Cosmolloid 80H microcrystalline wax
Astor Petrochemicals Ltd
(Avalable at Talas)
Talas
330 Morgan Ave. Brooklyn, NY 11211
Phone: 212-219-0770
Fax: 212-219-0735
Arkon P-90 resin
Arakawa Chemicals Industries, Chicago, Illinois
Various dry pigments
Kremer Pigments Inc.
247 West 29th Street New York, NY 10001
Phone (212) 219-2394
Fax (212) 219-2395
http://www.kremerpigments.com/
Winsor & Newton brushes
11 Constitution Avenue
Piscataway New Jersey 08854
Telephone: 800-445-4278
Fax: 732-562-0941
Micro Matic™ Electronic Waxer
Kerr Corporation
Customer Service: 800-537-7123
www.kerrlab.com
Relic Wrap™
Plastomer Technologies
10633 W. Little York, Bldg3 Suite 300,
Houston, TX 77041
http://www.plastomertech.com/relicwrap.htm
Volara® Foam
Sekisui Voltek
Available at MASTERPAK™
145 East 57th Street
New York, NY 10022
Telephone: 1 (800) 922-5522
Fax: 1 (212) 586-6961
This work was performed during the two year fellowship of The Advanced Residency program in Photograph Conservation supported by the Andrew W. Mellon Foundation. The author received a lot of help from all faculty members. The method of consolidation and loss compensation, as well as customizing the heat spatula was developed by Ralph Wiegandt, whose advice during the treatment and help with this paper was invaluable. The author would like to thank Jiuan-Jiuan Chen for comments, suggestions and encouragement.
Chen, J., Edmondson, T. M., McElhone, J., and I. Brukle. The “Perfect” Fill for the Tintype, Topics in Photographic Preservation. Vol. 9, 2001.
Doyle DeWitt, J. 1959. A Century of Campaign Buttons, 1789-1889. Hartford: The Traveler’s Press.
Hamilton, C., and L. Ostendorf. 1963. Lincoln in photographs: An Album of Every Known Pose. Norman: University of Oklahoma Press.
Sullivan, E. B., and J. Doyle DeWitt. 1981. American political badges and medalets, 1789-1892. Lawrence, Mass.: Quarterman Publications.
Schimmelman, J.G. 2002. American photographic patents 1840-1880: the daguerreotype and wet-plate media. Nevada City, Calif.: Carl Mautz Publishing.
Tragni, C., and T. Meller. 2003. Consolidation treatment of flaking tintypes, Treatment practicum core, . Unpublished.
Dolson, S. Collector’s web-site. http://politicalbadges.com
The Rail Splitter Journal for Lincoln Collector. www.railsplitter.com
United State Patent and Trademark Office. http://www.uspto.gov/
Maltby, D.F. 1860. Photographic medal, U.S. Patent 29655.
Smith, H. L. 1856. Photographic pictures on japanned surfaces, U.S. Patent 14,300.
Wing, S. 1860. Improvement in photographic pictures, U.S. Patent 30850.
KARINA BEEMAN (Kashina)
Conservator
Paul Messier Conservation of Photographs and Works on Paper
Papers presented in Topics in Photographic Preservation, Volume Thirteen have not undergone a formal process of peer review.