
Dear Children of the ‘80s and ‘90s,
Fear not, our childhood has been well preserved. You may have been concerned to hear our Muppet friends were suffering from the ill effects of aging and, I’ll be honest, the diagnosis (and the pictures!) seemed grim. Internal decay, failing support structures, foam hemorrhages, and alopecia were just some of the concerns. Fortunately Sunae Park Evans, Senior Costume Conservator at the National Museum of American History, was up to the challenge.

From both clinical and personal standpoints, the scope of the treatment was fascinating and produced some strangely existential questions. What makes a Muppet a Muppet? Where do you draw the line between replaceable miscellany and canonical Muppet accoutrements? And then, once you determine what is essential to Jim Henson’s original creations, how do you fit conservation techniques geared towards human costumes to a creation where the only human shape is Jim Henson’s arms and hands? With close consultation with original member of the Muppet design team Bonnie Erickson, Ms. Evans was able to navigate these questions while maintaining the integrity of the Jim Henson Legacy.
It may surprise you that puppets so seemingly innocent could have so many inherent vices. First there is the issue of the primary material, Scott Foam, which is a staple in puppeteering for its flexibility. However, the answer to the question of, “What is Scott Foam made of?” was repeatedly, “Scott Foam.” After speaking with several employees of the manufacturer, Ms. Evans was able to confirm that it was a low-density polyurethane which explained the large-scale deterioration and degradation of the Muppet’s internal structure, leading to the loss and collapse of other features. Polyurethane wasn’t the only material at issue as the Muppets were designed more for budget than longevity and featured attachments such as soup spoons and ping pong balls for eyes and leather shoe soles for the mouth. It was determined that much of the foam would have to be removed, leaving only the heads still intact, but the fabrics, facial features, and other appendages would be maintained as much as possible.

Next is the matter of how to classify and treat a movable, usable object used by humans that are not human but emote like a human. Is it a stationary object, costume, installation, or kinetic sculpture? Ms. Evans stated that she struggled greatly with the question and it seems the answer lies somewhere in the middle of all of them. She was able to use standard costume conservation materials and techniques to create the very non-standard forms shown below. By using the jointed base structure she was able to allow for the potential of movement and by padding them out with Ethafoam she was able to customize each form as one would for a costume. Once each Muppet was mounted on its new support and positioned in keeping with its unique personality, Ms. Evans and Ms. Erickson reviewed the new display but something was still off. It turns out that because the Muppets were made to be viewed on screen, they must also be considered as a 2D image. Many of our enigmatic friends were only made to be viewed from a specific camera angle. The Swedish Chef, for example, was always filmed at a downward angle so when he was positioned to be viewed straight-on, the resulting image did not match that from our childhood memories.

What won’t come as a surprise is that Miss Piggy remained a diva. The structure of the current Miss Piggy was still several decades old and the screws holding her together had rusted closed. Only the careful and intuitive navigation of Ms. Erickson, Miss Piggy’s original creator, were the conservators able to cut the joints without disrupting the remaining support and recreate the body with archival materials.
One of my favorite parts of any project is getting to know the object being treated and I was happy to know that Ms. Evans not only spent countless, tireless hours watching The Muppet Show, but also that she remained in constant communication with the Muppets, themselves, during the treatment. With creatures so full of life it’s not hard to imagine they’d have much to say.

*All images are of the PowerPoint slideshow presented by Sunae Park Evans.
Category: Textiles Conservation
44th Annual AIC Meeting- Textile Session, May 16th, Assessing Collection Emergency Training and Response: The Risks of Adrenaline.
The paper presented by Lois Price and Joelle Wickens examined current training techniques implemented at the Winterthur University of Delaware Program in Art Conservation (WUDPAC) and their evolution to take into account the role of adrenaline in disaster response.
Initial training consisted of rotations through the different labs and discussions of possible issues before stepping up to muck up drills. The results of this training was mixed, showing that participants were able to recover objects, but that assessment of the materials before their movement was compromised as the goal became more a mission to get objects out of harms way and less about documentation and evaluation.
With this knowledge in hand, training methods were reassessed to try and bring assessment to the forefront; as good assessment aids in the long term success of disaster recovery.
The new method of approach looked to combine soft training, ie discussions in a classroom setting with an assessment only drill followed by a wet artifact recovery training session.
This ordering of training allowed first for discussions of all rolls in a disaster response plan, in a controlled environment without the risk of adrenaline. It forced holistic thinking of an entire situation.
The assessment workshop placed students is a mock disaster and forced assessment only of objects, no recovery. It was crafted to include numerous object issues, as well as registration issues that all should be taken into account during the recovery process. By increasing the complexity of the objects that students were assessing the importance of documentation and registration processes were reinforced. This reinforcement helped strengthen the importance of the assessment process in students’ minds and drive home that without through assessment good recovery is almost impossible.
After the assessment drill wet object recovery training further reinforced this training. Objects were first assed while dry before they were wetted out, reassessed, and then the training on handling was done. Students were then given unseen objects; removing the opportunity for the first assessment and introducing the students to the object in “trouble”.
This method of training helped students to see the importance of assessment and clarified the fact that slowing down is truly the key to effective response.
This talk was fascinating for me after being brought in for disaster recovery at the Glasgow School of Art during my final year of graduate school. In analyzing what went on with the materials in that situation and listen to the training techniques used at WUDPAC, I can say with some confidence that such training would have made me better prepared for that situation. While nothing can truly prepare you for the real thing, the repetition on the importance of assessment is helping prepare the students for situations we can hope they never have to face, but if they do, they may enter with an idea of how to initially respond.
Joint 44th AIC Annual Meeting and 42nd CAC-ACCR Conference – Textile Session, May 16, "Vial Things: Preserving the Unexpected in the Occult Jewelry of Simon Costin", by Sarah Scaturro
To say Sarah Scaturro had me at “semen” is both entirely accurate and the oddest phrase I have ever put to virtual paper. To be precise, she had my interest at “Vials of evaporating semen…”, the jaw-dropping opener to her abstract, and she held it for her entire talk on the conservation of jewelry by Simon Costin contained within the Metropolitan Museum of Art’s Costume Institute collection.
The two necklaces of discussion were Memento Mori, made by Costin in 1986, and Incubus, made in 1987. Both presented unique preservation problems not frequently encountered by textile conservators. Faced with unfamiliar challenges, Scaturro sought first to better understand the mechanisms of degradation affecting the necklaces: this involved conducting artist interviews and consulting alternatives resources on taxidermy and liquid-preserved specimens.
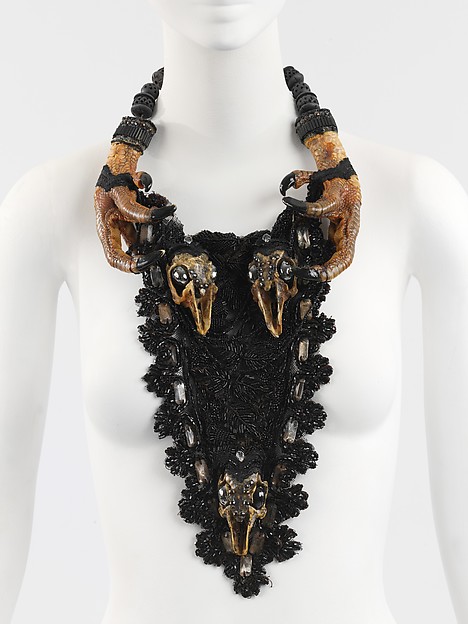
In the case of Memento Mori, the turkey feet and rabbit skulls, incorporated into the necklace’s design, had begun to degrade due to insufficient preparation methods. The fats contained within the skin of the turkey feet had oxidized leading to a rancid odor – a smell all too familiar to me having recently completed the degreasing of beluga whale jawbones. The oxidized fats were also pooling at the surface of the feet, risking degradation of the neighboring necklace elements. The rabbit skulls, which retained some bits of flesh and hair, suffered from discoloration and mold, negatively impacting the artist’s intended aesthetics. Swabbing with ethanol proved to be the solution for both of Memento Mori’s problems – ethanol was used to degrease the surface of the turkey feet while it also acted as a biocide, killing the mold on the rabbit skulls, in addition to reducing the discoloration. Scaturro also employed preventive strategies which included the use of barriers to prevent transfer of the turkey fats to other parts of the necklace and anoxia to slow the oxidation of the fats.
The treatment of Incubus, the inspiration for the talk’s title and my grim interest, was still in progress at the time of Scaturro’s talk. The necklace, which resulted in a charge of indecency for the artist at the time of its unveiling, contains 5 vials of semen, one donation having been made by the artist himself. Over the past 30 years, the semen has discolored and partially evaporated – how best to address this issue, Scaturro was undecided. She raised two amusing points while discussing her research into the degradation mechanisms of Incubus: one, there is little information available on how semen degrades over thirty years; and two, it would be interesting to understand what elements of the five donations were responsible for the variations in color and evaporation rate.
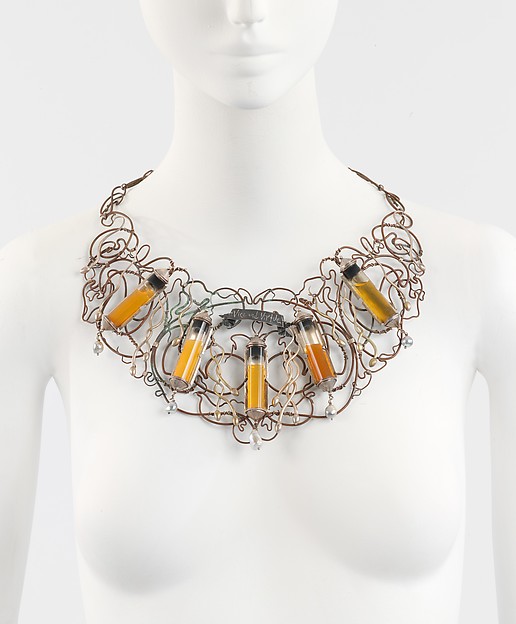
Her first steps to the treatment of Incubus involved the creation of permanent upright storage for the necklace, thereby avoiding contact between the rubber stoppers on the vials and their contents. Scaturro made note that storage and display at a consistent temperature (as opposed to cold storage and room temperature display) was best practice for slowing the evaporation of the semen. She was also considering applying cyclododecane to improve the seal of the vials – the benefit of cyclododecane wax being its gradual sublimation at room temperature, making it possible to display the necklace without wax coatings affecting the aesthetics.
Scaturro concluded by noting that further interviews with Simon Costin were planned with the hopes that he might be able to offer direction as to the refilling or not of the vials of semen.
Overall, Scaturro handled the unusual topic with professionalism, inciting only minimal nervous giggling. The talk provided a window into the extremes of art and art conservation, and offered an example of how to approach the even the most macabre of objects.
44th Annual Meeting, Textile Session, May 15, "The Creation of a Digitally Printed Reproduction Sleeve for and Eighteenth-Century Painted Silk Dress", by Miriam Murphy and Alexandra Barlow
When I heard the title of this talk, I must admit images of laser scanners and super computers came to mind. And while the technology is doubtlessly impressive, I was relieved to learn that it is far more accessible (and much less sci-fi-esque!) than I had originally imagined.
The dress at the center of this talk was a silk taffeta Robe à la Polonaise, circa 1780, that had been donated to the Metropolitan Museum of Art in 1976, sans one proper left sleeve.

Because the silk was hand painted, the best option for recreating it in the 1970s was to hand paint a new sleeve as well. However, after four decades, and three exhibits, the reproduction had become damaged. Before being featured in the 2015 show China: Through the Looking Glass, it was decided a new sleeve would have to be made. For the 2004 show, Dangerous Liaisons: Fashion and Furniture in the Eighteenth Century, an entire reproduction petticoat had been digitally printed, so it was not a technology with which the Met was unfamiliar. Digital printing has also, in recent years, been used to create fabric for mounts, upholstery for chairs, and a dress for a historical interpreter at Colonial Williamsburg.
The first step in the process was to get a good digital image of the fabric, ideally through scanning. As luck would have it (or so they thought) a flat pattern piece of the same fabric was at the Cooper-Hewitt, Smithsonian Design Museum. Unfortunately, it was soon discovered that there were subtle but definite differences between the two. Because of the 3-D nature of the dress, scanning was not an option, so digital photography had to be used instead. The petticoat was selected for this process, rather than the present sleeve, because it offered a large, flat expanse, and the majority of the pattern repeat. The image was taken at the Met’s photography lab and sent to Dyenamix textile printing, for image manipulation. This proved more difficult than expected because the undulations of the petticoat, visible in the photograph, had to be removed, and the full pattern repeat stitched together. Another stumbling block was what part of the repeat to print? Should they go with a mirror image of the extant sleeve, or could it be assumed that such expensive fabric was used conservatively, without an attempt at symmetry? Ultimately, the former path was selected.
The next step was to find a suitable base fabric. Although the fabric texture can be printed, the best results are achieved when a close match is found, which was a challenge since 18th century taffeta was finer than that available today. When a good approximation was sourced (from Manhattan’s Garment District), both white and ivory was purchased. Dyenamix first sent the fabric to Jacquard in California for pretreatment, to prepare it to accept the ink. When the fabric returned, it was ready for the printing process. The printer prints ¼” at a time, going over each section eight times.
It took many attempts and many weeks to get the colors exactly right. Most of the early attempts were too bright and saturated, qualities prized by industry clients, but not by conservators. Once the fabric was printed, a pattern was taken from measurements and multiple mock-ups were made before the final sleeve was constructed. All-in-all, the process took six weeks and $2,400 (not including the time of the Met staff) to complete. Interestingly, roughly half of that seems to have been because Dyenamix did the image manipulation, judging by a similar project done in the Met’s upholstery department.

Dyenamix had claimed that their inks were archival and because the dress needed to be ready for exhibition, no further tests were performed beforehand. However, after the exhibition closed, the fabric was given the Oddy test, which it failed. In response, the sleeve was removed from the dress and stored separately.
I would be interested to know what caused the sleeve to fail the Oddy test: was it the pretreatment done by Jacquard to ready the silk for the ink, or the ink itself? This process is a great tool for any conservator to have and (as always!) more research is desired!
43rd Annual Meeting – Textile Session, May 30, "A Turkish Kilim: Analysis, Stabilization, and Loss Compensation” by Cathleen Zaret.
Cathy Zaret presented on the techniques and challenges she encountered during the conservation treatment of a large Kilim. The Kilim was a 6 x 8 ft fragment from a private collection. After the completion of her treatment, the fragment would be returned to the private collector where it would be displayed over the back of their sofa.
Cathy’s introduction to Kilims provided helpful terminology and historical context. Kilims are woven tapestries, hangings, or rugs. They have non vertical panels with slits in the weave, but the design is such that the slits are small. Kilims formed part of the dowry of women in Anatolia and were made for personal use. Women wove many different designs and motifs into their Kilims and the choice of design does not appear to be geographically associated. Cathy searched through the literature to find a Kilim that appeared similar to hers and could only find one other similar example.
The Kilim fragment had a number of distinct manufacturing and condition features. The yarn in the fragment exhibited color variation and the condition of the yarn seemed to relate to the color. For example, the brown weft was most susceptible to loss, possibly because it had been dyed with iron oxide, rendering it vulnerable to additional damage. There had been many previous campaigns of restoration, all of which were documented as part of this treatment.
The goals for this treatment were to stabilize the Kilim and perform loss compensation on the largest areas of loss while being aware of the future use of the item. Since the prior repairs were in good condition and part of the history of the object, they were left intact.
- Cathy lined the fragment with net for structural support during cleaning and removed it after cleaning.
- The kilim was cleaned with a surfactant and then rinsed repeatedly before rolling it in towels and laying it out to dry. This successfully removed most of the soiling from the tapestry.
- The kilim was mounted on a saw horse tensioning frame for treatment.
- Used a whip stitch to stabilize the lower edge.
- Repaired or replaced warp with handspun singles. Introduced the new warp into an undamaged area near the loss and wove it through the area of loss and then moved the yard to an adjacent warp and wove it back across the loss.
Cathy overcame many challenges during this treatment related to the size of the object and its context. To keep track of her treatment on a fragment of this size (6 x 8 ft), Cathy divided the kilim into six sections and worked on one section at a time. She also learned how to manage her treatment when the cost of conservation is higher than the perceived value of the textile.
I primarily work on objects but have occasionally had the opportunity to work with a textile conservator on something that crosses the line between textile and object. Cathy’s talk was comprehensible to conservators well versed in textiles and applicable for those of us who work on the fringes of textile conservation. I look forward to using her conservation techniques and well-organized approach in the future.
43rd Annual Meeting – Textile Specialty Group Session, May 15, “Tip Session on Mount Making: Materials and Methods for Exhibition and Display by Robin Hanson, Shelly Uhlir, Laura Mina, Denise Krieger Migdail, and Joy Gardiner”
The Tip Session was the final presentation of the Textile Specialty Group. If you missed this session, you missed scads, mountains, and heaps of useful mounting information from six knowledgeable presenters. They shared techniques, and sources for materials and mounting supplies. The presentations were so rich with information, I could not hope to scratch the surface in this post.
The first presenter was Robin Hanson, Associate Conservator of Textiles, with the Cleveland Museum of Art. Her presentation was titled “Modular Mount for pre-Columbian Tunics.” The subject was a display method she developed along with mount makers Carlo Maggiora and Philip Brutz. This tube mount for support and display of multiple pre-Columbian tunics, for a traveling exhibition, had custom fabricated end caps of cylindrical aluminum rod, and custom padded inserts made for each tunic. It is versatile. Variations of the mount were made for inclined wall mounts and for display in the round. The mount reduces handling of the fragile tunics, and can remain in the garment for shipping and in storage. We are in luck, because her poster of the technique will be posted.
Shelly Uhlir is an Exhibits Specialist and Mount Maker at the National Museum of the American Indian. Her presentation, “Joints and Connections: Attempts at Locking Motion,” was divided into three categories for the creation of arm to torso connections: pinned, keyed, and magnetic. Shelly wanted us to keep in mind that shoulder joints are best when they are easy to find and release. Shelly proposed the idea of a collaborative arm connection / mannequin joint wiki-page. I hope that her clever solutions will be posted soon.
Laura Mina, Associate Conservator from the Costume Institute of The Metropolitan Museum of Art presented “Hats for Egg Heads.” Laura shared how to support and secure hats while they are perched on highly polished, featureless egg-shaped mounts. She used felt, and double stick tape as well as small constructed forms of Volara, polyester batting, twill tape, and silk. They were a clean and simple solution for display.
Susan Heald, Textile Conservator at the National Museum of the American Indian, presented “Adjustable Angle, reusable slant boards for mounting hides and textiles with magnets.” Susan explained the evolution of the slant boards for hides and textiles used at NMAI. She described how they went from being custom cut to the shape of a hide, to light weight reusable aluminum honeycomb boards with larger handling margins. She shared their construction, materials used, types and size of magnet, sleeve options for the back of textiles, and her choice of sueded polyester to cover magnets used to secure hides to the slant boards.
Denise Krieger Migdail, Textile Conservator at the Asian Art Museum presented “A new 3M: Minimal Magnet Mounts.” Denise pointed out that magnetic mounts can be beautiful, functional, and of infinite variety. Her talk was packed with information about the ways she has used magnets for mounts. She had two categories: strip fasteners with magnets embedded into various types of board to spread the pressure evenly along the length of an object; and as point fasteners when magnets are used singly. She shared storage and separation techniques, such as keeping the magnets interleaved with twill tape, and using a stronger magnet as an aid for separation.
Our last speaker was Joy Gardiner, Assistant Director of Conservation, at the Winterthur Museum, Garden & Library. Her presentation was titled “To Avoid Further Piercings: The Mounting of a 1795 Sampler with Original Paper Backing via a Paper Conservation Hinging Method.” The technique that Joy adapted to keep the backing intact was found in the realm of paper conservation in the article by Hugh Phibbs, “Recent Developments in Works on Paper” published in The Book and Paper Group Annual, Volume 24, 2005. Japanese tissue paper hinges were attached to the sampler backing. The hinges were then passed through slits in a four-ply board, and then adhered to the back of that board without disturbing (or piercing) the sampler or the backing.
The session finished with Q & A followed by time with the speakers, and their examples and handouts.
43rd Annual Meeting – Textile Specialty Group, "The Effect of Light Emitting Diode Lamps (LEDs) on 19th century Dyed & Printed Cotton Fabrics," Mary Ballard, Courtney Bolin, Taylor McClean
Although Mary Ballard was unable to attend the conference, Ines Madruga, Paintings Conservation Fellow at the Smithsonian’s MCI, read the paper and gave a dynamic presentation. Mary and her coauthors worked closely with the color scientists at the National Institute of Standards and Technology (NIST) to explore the ways in which differently colored LED lights can change perceptions of colored textiles. They used samples from a 19th-century handbook for dyeing and printing cotton and the Spectrally Tunable Lighting Facility at NIST.
The “Practical Handbook of Dyeing and Calico-Printing” was published by William Crooke 1874. Since each sample in the handbook included detailed information about the dye used, the results of the study should be informative for many textiles made on or before 1874.
The STLF is able to simulate many different types of light, measure spectra, and provide side-by-side comparisons. For more information, visit their website (http://www.nist.gov/pml/div685/grp03/vision_lighting.cfm). After comparing the samples in many different types of light, the authors were able to create a guideline with recommendations for LED lights that provide the best overall color.
The NIST website has many helpful resources, including a spreadsheet with Color Quality Scale information. The spreadsheet allows users to predict how how color qualities will change with different lights. The spreadsheet, which includes a tab with directions for use, can be downloaded here.
This presentation builds on work presented at the previous AIC meeting. For additional information, consult this paper:
Bolin, Courtney, Mary Ballard, and Scott Rosenfeld. 2014. “Assessing Colorants by Light.” (http://aics42ndannualmeeting2014.sched.org/event/ca5c64b579ff2d67e284decc878e72ee#.VV9Euk_Byyo)
43rd Annual Meeting, Textiles Specialty Group, “Breaking Canvas: A Case Study on a French Embroidery,” Rebecca Beyth
Rebecca Beyth, Assistant Conservator, Textile Conservation, Metropolitan Museum of Art, presented an interesting case study of a pair of embroidered curtain panels in the Met’s collection. The panels had been selected for display in the Met’s 2013-14 Invisible Globe exhibit. Beyth noted that in first looking at the pieces while they were being considered for the exhibit, she and her colleagues thought that they would need very little treatment. Once the pieces came into the lab, the conservators were able to examine the pieces more closely and realized that they were much more fragile than they had originally seen. The ground canvas was splitting and shredding.
Beyth reviewed the treatment history of these pieces at the Met, which showed some previous treatments, including stitching repairs, removal of the linings that were on the curtains when they came into the collections (these are now preserved in the Met’s Ratti Center), and attachment of a lining in the 1980s. This review of past treatments conformed to my experiences – no matter how good you think your documentation is, it is never complete and never answers some of your key questions! Beyth and her colleagues felt that the 1980’s lining did not offer enough support for the three month exhibition, for which the curtains were to be displayed vertically. They decided to remove the 1980s lining and begin again.
This time, they used a heavier weight fabric from Creation Bauman. To allow researchers access to the back of the embroidery, they made the lining in three wide, vertical strips, leaving two-inch areas between the lining strips. The back of the embroidery was visible in these areas. To me, this was the best aspect of the treatment. The linings were applied to the curtains by sewing, using couching stitches in areas of damage and herringbone stitches for the main support. A header of the same fabric and a Velcro strip were sewn to the top edges.
To display the curtains, they used what they call a “gallery installation mount,” a fabric-covered rigid mount. They stapled the hook side of the Velcro to the mount and affixed the curtains with the Velcro. For display, the mounted curtains were placed in a five-sided Plexiglas box.
This treatment permitted these colorful objects to be a part of an important exhibit. It allows them to be stored rolled, to save space, and provides access to researchers. I also enjoyed the presentation as it gave a few more views of the Interwoven Globe exhibit, of which I am a huge fan.
AIC 43rd Annual Meeting- Architecture Specialty Group Session, May 16th: “One Piece at a Time- The Repair of Felt-Bases Sheet Flooring at Johnny Cash’s Boyhood home in Dyess, Arkansas” (Christina Varvi)
Christina first discussed the location- a New Deal planned farming community of 500 homes. It is now the only surviving home from the community and the town now has only 388 residents today. The home was acquired by the Arkansas Heritage Sites if Arkansas State University, located an hour and a half away. The home was furnished with 2 rooms of original flooring and objects owned by the family augmented by furniture dating to the time and 2 rooms of floor covering belonging to nearby Dyess Colony houses. The house was to be opened as a historic site for visitors in August 2014
RLA (Rosa Lowinger & Associates) was brought in at the end of the project to conserve the original floor coverings. Consideration had to be taken into account that the living room flooring would be walked on. There was little time and budget due to this being an add-on to the project at the last minute. The original estimate was double what the project could afford. Discussions led to a scale back in the project and priorities were set to what was most important to happen right away. Treatment was mostly confined to the 2 original-to-the-house floorings- those in the living room and Johnny Cash’s boyhood bedroom. Treatment was confined to cleaning (vacuuming and surface wet cleaning), stabilization of tears (on back with Japanese tissue and B72), fills and in-painting on living room flooring, and varnish (applied by brush) to protect the surface of the flooring. The non-original-to-the-house flooring was not varnished. Recommendations for now are furniture pads to protect the floor underneath, recommendations for visitors to remove shoes and use booties in the living room and roller shades to reduce light during off hours. Next steps are to raise additional funds to finish work on the floor, work on additional buildings on site (outlying farm buildings) and to raise funds for a visitor center.
There were many complexities to this project: the area was very rural, there was no running water in the house, the house was climate controlled but not airtight, no shops to be able to get supplies and the client was an hour and a half away. Everything had to be brought in. Additionally since the floor covering project was a last minute addition, furniture was already in place and could not be moved out of the house. With careful planning, much more was accomplished in the time given than was though possible and the treatment was a success.
AIC 43rd Annual Meeting- Practical Philosophy General Session May 15th: “Suspended Rules for Suspended Worlds: Conserving Historic Stage Scenery” (Mary Jo (MJ) Davis)
I was interested in this talk because it seemed an interesting intersection between textiles and objects together with the complications of working on objects that are still in use.
MJ discussed the set of challenges of working with historic stage scenery: climate, use, lack of funds, space to do treatments, ect. The “Curtains Without Borders” team (started 15 years ago in the state of Vermont) of conservators came up with a standard method of treatment that could be applied, with some differences as need, to the stage curtains. The typical treatment consists of: on-site technical examination, cleaning (vacuuming and dry sponging), mending tears with patches of muslin w/B72, inserts to areas of loss, consolidation of edges (all sides reinforced with muslin w/B72), structural support at top edge if necessary and reattachment of bottom roller, paint consolidation (sprayed B72), in-painting of losses and reinstallation with volunteers or professional riggers as needed. All work is done onsite by conservators and a team of local volunteers (with at least 2 at all times). Many conserved curtains have been revisited over the years and additional issues have been attended to. Issues have mostly come from handling of curtains once they were re-installed.
The project has been a success all over New England- with more requests coming in from all over the country for help. There are plans to continue the project and expand territory.