45th Annual Meeting – Objects Specialty Group, May 31st, “Carbon Fiber Fabric and Its Potential for Use in Objects Conservation” by Carolyn Riccardelli

In this talk, objects conservator Carolyn Riccardelli introduced us to carbon fiber fabric and shared some of the ways in which this material has been used for the conservation and mounting/display of objects at the Sherman Fairchild Center for Objects Conservation, Metropolitan Museum of Art (MMA).

The first part of the talk focused on explaining what carbon fiber fabric is and its various uses outside the museum world. It was primarily used in the 60’s and 70’s for aeronautics but is now found its way into many industries such as automotive and sporting goods. Though the widespread adoption of this material wasn’t seen until the late 20th century, carbon fibers have been around since the late 19th century. The first commercial carbon fiber was created by Thomas Edison in 1879 for use as a filament in the first incandescent bulbs. Edison’s carbon fibers were made through the heating of cotton threads or other cellulosic materials. Today’s carbon fibers are made from polyacrylonitrile (PAN).

Carbon fibers are chosen over other fiber reinforced composites, such as fiberglass, when high strength is needed but the material needs to remain lightweight. Some advantages that carbon fiber fabric has that may make it a better option over other materials are:

  • the fibers are conductive
  • they are very small, about 5-10 microns in diameter (smaller than a human hair!)
  • they are chemically resistant
  • they are very strong
  • they have low thermal expansion

There are different ways that you can buy carbon fiber fabric and Carolyn has purchased it as a fabric and a tape from the company Fibre Glast. For the work that’s been done at the MMA using this material, the two most common carbon fiber products have been 6K 5HS satin weave carbon fabric and carbon fiber tape (non-adhesive backed).

Carolyn offered up some tips for the use of carbon fiber fabric for those of us who may consider trying out this material after hearing her talk. Some of the helpful things she pointed out were:

  • Be careful when choosing resins for laminating carbon fiber layers. Different resins can be used but she has primarily used epoxies to ensure strength and rigidity. The epoxy she has purchased is sold by Fibre Glast and is the one the company recommends for use with carbon fiber fabric, the System 2000 epoxy. Carolyn did mention some people have used epoxies from West Systems, however these are not for high performance applications. She stressed the importance of using resins made specifically for carbon fiber fabric because this would ensure that the composite system will perform the way it should, especially when needed for supporting a lot of weight.
  • Several layers of carbon fiber fabric are needed for create a strong enough composite fabric. For the carbon fiber tape, which is good to use when you need strips of support material, 3 layers have generally been enough.
  • In certain cases, when the composite layer of carbon fiber fabric and resin is quite thick, power tools, such as a rotary cutter, can be used to cut away or shape the material. When doing this, you should wear a mask, and you should always wear gloves when handling carbon fiber fabric.

After introducing to what carbon fiber fabric is, its advantages and offering tips for its use, Carolyn walked us through some projects at the MMA where this material was used.

Tullio Lombardo’s Adam
For the reconstruction of Tullio Lombardo’ sculpture of Adam, carbon fiber tape was used to create external armatures and straps during the fitting of fragments. A corset and flange was made out of carbon fiber to help support Adam’s torso. The use of carbon fiber for the treatment of this sculpture can be seen in the video After the Fall: The Conservation of Tullio Lombardo’s Adam as well as the time lapse video Conserving Tullio Lombardo’s Adam: Time-Lapse showing the reconstruction of the sculpture.

Della Robbia’s Prudence tondo
For the Prudence tondo created by artist Andrea della Robbia, carbon fiber was used to aid in mounting the heavy glazed terracotta object. The brass mounts that had been used previously to support the object were no longer strong enough. Therefore, Carolyn turned to carbon fiber fabric in order to create a much stronger, but lightweight, support. Clips were made out of 7 layers of carbon fiber fabric which were laminated together using epoxy. After creating the clips and bending them to the shape needed to support the tondo, they were painted so they were not visible when the object was viewed by the public.

Examples of two of the clips made from carbon fiber fabric for the “Prudence” tondo mount.


Turtle shell mask, Torres Strait Islands
The final example Carolyn talked about was the use of carbon fiber fabric for the repair of a turtle shell mask from the Torres Strait Islands. The mask was made from thin sheets of turtle shell shaped, carved and decorated to depict a human face with a frigate bird on top. The bird appears to be in flight and the wings protrude to either side. One of the wings was damaged and required repair. The repair material needed to be strong to support the wing, but also needed to be light weight. Carbon fiber fabric seemed to be the perfect material. Pieces of carbon fiber fabric were laminated together using epoxy (Epotek was used for the carbon fiber layers in contact with the object and epoxy from Fibre Glast for the other layers). Once the laminated support was created, it was adhered to the damaged area using Paraloid B-72

In closing, Carolyn brought up some things one should consider before purchasing carbon fiber fabric for a project or treatment:

  • What is your budget? – Carbon fiber fabric is expensive and it takes several layers to create a laminate thick enough to provide enough strength and support
  • Do you really need that level of rigidity or such a stiff material? – If not, maybe something like fiberglass based fabric might be a good alternative.
  • Will you be using this material in contact with a metal? – Because carbon fibers are conductive they can promote galvanic corrosion of the metal substrate.
  • Will you be using this in contact with a sensitive material or in a closed environment? – Carbon fiber tape (and likely some of the epoxies used in the lamination process) have not been Oddy tested so it is something to keep in mind when using this material.

Carbon fiber fabric looks to be a really useful material when one needs a strong material for support, that can easily be molded to fit the shape of an object, but still needs to be lightweight. The various examples from the MMA highlighted some interesting applications for this material. I look forward to seeing more presentations in the future on how carbon fiber fabric can be used in objects conservation, and hope to get my hands on some to begin experimenting with it in the lab.

44th Annual Meeting – Objects-Wooden Artifacts Session, Monday 16 May 2016, "The study of boxwood prayer beads and miniature altars from the Thomson Collection at the Art Gallery of Ontario and the Metropolitan Museum of Art” presented by Lisa Ellis

Lisa Ellis, Conservator of Sculpture and Decorative Arts at the Art Gallery of Ontario (AGO), presented collaborative work on the study of boxwood prayer beads and miniature altars from the early 16th century (c. 1500-1530). The beads and altars are very small, complex, and intricately carved artifacts whose construction has not been well characterized. Teams at the AGO and the Metropolitan Museum of Art (MMA) are exploring the carving techniques and joinery strategies using careful examination, micro-computed tomography (µCT scanning), and physical deconstruction of select artifacts to better understand how the pieces were created.
Because of their depth and small size, traditional photography has been inadequate to capture the various layers in focus within one image, making distance sharing and comparative work impossible. In order to better share between institutions and scholars, the AGO set out to photodocument these artifacts with high resolution images that are in focus throughout the depth of the artifact. In order to do this, they are taking a series of photos at various focal depths, then stacking the images to maintain sharpness. The image quality is profoundly improved from the old hazy images that made it impossible to understand the detail.

 Workshop of Adam Dirksz, Prayer bead, AGOID.29365. Detail showing “The Coronation of the Virgin.” The Thomson Collection of European Art © Art Gallery of Ontario.

Prayer bead, AGOID.29365. Detail showing “The Coronation of the Virgin.” The Thomson Collection of European Art © Art Gallery of Ontario.

 
Through preliminary x-radiography, they found that the artifacts can be grouped in to two broad classes: artifacts created in simple relief and artifacts created with a complex design. The complex artifacts were then µCT scanned, revealing the multiple elements joined together. Using medical imaging software, they were able to better understand the parts and see that the beads were created in layers. With the software, the various layers could be virtually deconstructed so that each layer could be examined and stacked, as if each piece were separate. At the MMA, Pete Dandridge, Conservator and Administrator, was able to disassemble a bead to physically see the pieces, which further helped to interpret the µCT data and reinforced the understanding of the layers. Since not all artifacts can be taken apart, the µCT scans provided to be invaluable in examining the construction and documenting the process. One example showed a bead attached to a rosary that had multiple roundels set into the main structure. The roundels could be virtually removed with the µCT scans and software, revealing a numbering system beneath.
Workshop of Adam Dirksz, Prayer bead, AGOID.29365. Micro CT scan revealing use of pegs in depiction of “The Coronation of the Virgin.” The Thomson Collection of European Art © Art Gallery of Ontario. Scans courtesy of Sustainable Archaeology at Western University.
Prayer bead, AGOID.29365. Micro CT scan revealing use of pegs in depiction of “The Coronation of the Virgin.” The Thomson Collection of European Art © Art Gallery of Ontario. Scans courtesy of Sustainable Archaeology at Western University.


In addition to examining the construction, they also looked at the limited polychromy present on some beads. Although most pieces were unpainted, a few pieces had painted details in blue, black, or red. These elements, along with adhesives and coatings, are being analyzed at the MMA and the Canadian Conservation Institute (CCI) with a suite of techniques.
These artifacts and findings about them will be presented in an exhibition, Small Wonders: Gothic Boxwood Miniatures, opening in Toronto on Nov. 5, 2016. The exhibition will feature over 60 boxwood carvings from institutions and private collections across Europe and North America. Following its debut at the AGO, the exhibition will open at the The Cloisters at The Metropolitan Museum of Art on Feb. 21, 2017, before travelling to the Rijksmuseum on June 15, 2017. For more details about the exhibition and related programming visit www.ago.net and follow #miniAGO on twitter and instagram.
For images and further details on the work being carried out at the AGO, visit this link at the CODART eZine: http://ezine.codart.nl/17/issue/45/artikel/investigating-miniature-boxwood-carving-at-the-art-gallery-of-ontario-in-toronto/?id=119#!/page/1
Investigation on these materials have been on-going. For some background on earlier work that started this process, visit this link on the AGO website: http://www.ago.net/idea-lab
Other collaborators not mentioned above include: Alexandra Suda (AGO), Andrew Nelson (Sustainable Archaeology, Western University), Barbara Drake Boehm (MMA – Cloisters), Elizabeth Moffatt (CCI – retired), Jennifer Poulin (CCI)

Joint 44th AIC Annual Meeting and 42nd CAC-ACCR Conference – Textile Session, May 16, "Vial Things: Preserving the Unexpected in the Occult Jewelry of Simon Costin", by Sarah Scaturro

To say Sarah Scaturro had me at “semen” is both entirely accurate and the oddest phrase I have ever put to virtual paper. To be precise, she had my interest at “Vials of evaporating semen…”, the jaw-dropping opener to her abstract, and she held it for her entire talk on the conservation of jewelry by Simon Costin contained within the Metropolitan Museum of Art’s Costume Institute collection.
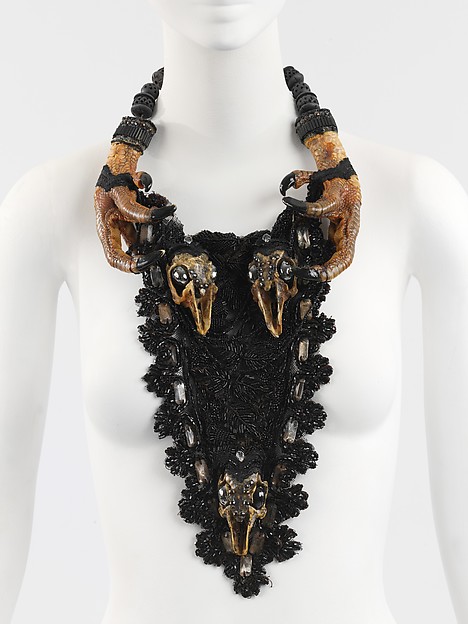
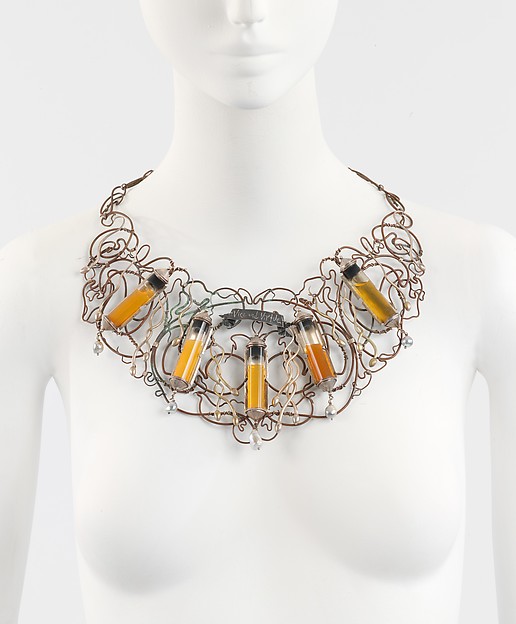
The two necklaces of discussion were Memento Mori, made by Costin in 1986, and Incubus, made in 1987. Both presented unique preservation problems not frequently encountered by textile conservators. Faced with unfamiliar challenges, Scaturro sought first to better understand the mechanisms of degradation affecting the necklaces: this involved conducting artist interviews and consulting alternatives resources on taxidermy and liquid-preserved specimens.

Simon Costin, Memento Mori, 1986. Wood, metal, bone, claw, synthetic, jet, crystal, bone, hematite. Metropolitan Museum of Art (2006.354a–c).

In the case of Memento Mori, the turkey feet and rabbit skulls, incorporated into the necklace’s design, had begun to degrade due to insufficient preparation methods. The fats contained within the skin of the turkey feet had oxidized leading to a rancid odor – a smell all too familiar to me having recently completed the degreasing of beluga whale jawbones. The oxidized fats were also pooling at the surface of the feet, risking degradation of the neighboring necklace elements. The rabbit skulls, which retained some bits of flesh and hair, suffered from discoloration and mold, negatively impacting the artist’s intended aesthetics. Swabbing with ethanol proved to be the solution for both of Memento Mori’s problems – ethanol was used to degrease the surface of the turkey feet while it also acted as a biocide, killing the mold on the rabbit skulls, in addition to reducing the discoloration. Scaturro also employed preventive strategies which included the use of barriers to prevent transfer of the turkey fats to other parts of the necklace and anoxia to slow the oxidation of the fats.
The treatment of Incubus, the inspiration for the talk’s title and my grim interest, was still in progress at the time of Scaturro’s talk. The necklace, which resulted in a charge of indecency for the artist at the time of its unveiling, contains 5 vials of semen, one donation having been made by the artist himself. Over the past 30 years, the semen has discolored and partially evaporated – how best to address this issue, Scaturro was undecided. She raised two amusing points while discussing her research into the degradation mechanisms of Incubus: one, there is little information available on how semen degrades over thirty years; and two, it would be interesting to understand what elements of the five donations were responsible for the variations in color and evaporation rate.
Simon Costin, Incubus, 1987. Silver, copper, glass, baroque pearls and human sperm. Metropolitan Museum of Art (2006.364a, b).

Her first steps to the treatment of Incubus involved the creation of permanent upright storage for the necklace, thereby avoiding contact between the rubber stoppers on the vials and their contents. Scaturro made note that storage and display at a consistent temperature (as opposed to cold storage and room temperature display) was best practice for slowing the evaporation of the semen. She was also considering applying cyclododecane to improve the seal of the vials – the benefit of cyclododecane wax being its gradual sublimation at room temperature, making it possible to display the necklace without wax coatings affecting the aesthetics.
Scaturro concluded by noting that further interviews with Simon Costin were planned with the hopes that he might be able to offer direction as to the refilling or not of the vials of semen.
Overall, Scaturro handled the unusual topic with professionalism, inciting only minimal nervous giggling. The talk provided a window into the extremes of art and art conservation, and offered an example of how to approach the even the most macabre of objects.

42nd Annual Meeting – Photographic Materials Group, May 31, “Comparative Study of Handheld Reflectance Spectrophotometers” by Katie Sanderson

Katie Sanderson, Assistant Conservator of Photographs at the Metropolitan Museum of Art (MMA), presented a most informative comparative study of handheld spectrophotometers undertaken at MMA. When the Department of Photograph Conservation decided to replace its existing handheld spectrophotometer—an X-Rite 968—Sanderson along with Scott Geffert, Senior Imaging Systems Manager, researched current units available to determine the best replacement and variation in measurements taken by each.
Sanderson began by outlining the factors to consider when replacing a spectrophotometer: data continuity (extant data over 20 years); instrument agreement; data translation; software compatibility with previous and future instruments; and longevity and support (the previous spectrophotometer is no longer supported by X-Rite but still takes good data readings). In total, seven spectrophotometers—four by X-Rite and three by Konica Minolta—were tested against the MMA’s X-Rite 968 and a bench-top spectrophotometer equipped with an external remote diffuse reflectance accessory probe in the Department of Scientific Research. The seven spectrophotometers examined were:

  • X-Rite 964
  • X-Rite eXact
  • X-Rite Ci64
  • X-Rite RM200
  • Konica Minolta 2600D
  • Konica Minolta 2500c
  • Konica Minolta FD-7

Before delving into the specific finding of each unit tested, Sanderson provided a brief overview of how spectrophotometers work. She explained that an object is illuminated by a light source of a specific spectral range, a detector collects any reflected light, and a unique spectrum is produced. While some light sources extend into the ultraviolet region of the electromagnetic spectrum, most are within the range of visible light (400-700nm). The two most common geometries for spectrophotometers are 0/45—in which the first number represents the angle (in degrees) of the light source and the second number the angle of the detector—and integrated spherical.
As Sanderson described, some of the units tested had an integrated spherical geometry that takes into account specular reflectance; these spectrophotometers can be operated in either specular component excluded (SCE) or specular component included (SCI) mode. The aperture of the X-Rite units was set to 4mm—that of MMA’s current spectrophotometer—andthe Konica Minolta units were set to 8mm as they exhibited a range of apertures and, in some cases, were not adjustable.

Sanderson_1
X-Rite Digital SG ColorChecker. Image courtesy of X-Rite

 
To determine an appropriate replacement, several reference standards and sample objects were tested with the seven spectrophotometers. The reference standards tested were obtained directly from X-Rite that is about to release a new Digital SG ColorChecker. The new target will include the same colors as the existing one but will utilize new pigments for some colors. For this comparative study, MMA obtained samples of the new standards to assemble its own large-format color checker. Ceramic BCRA calibrationcolor tiles were also tested as well as objects with varied surface qualities—chromogenic photographic prints (glossy and matte), watercolorpaper, textiles, and paintings. Five readings were taken and averaged for each spot tested; the units were lifted and repositioned before each measurement to account for a margin of error in positioning when monitoring color shift in objects over time using a spectrophotometer. Mylar® templates were created to facilitate positioning of the meters. All testing was completed by a single operator and resulted in approximately 12,000 readings!
To evaluate the variation in measurement between spectrophotometers, MMA’s X-Rite 968 was used as a master and delta E values were calculated for each of the 140 X-Rite color references. Sanderson summarized the results of this comparative study as follows. Meters with a 0/45 geometry produced readings with the closest match to the unit currently in use, which was not surprising as both are 0/45 instruments. When operated in SCE mode to exclude specular reflectance, the integrated spherical instruments fared worse than the 0/45. The easiest-to-use instruments were lightweight with built-in crosshair targets to facilitate alignment with a template. Finally, Sanderson introduced the concept of acceptable tolerance meaning that the operator should simplify the use of spectrophotometric readings by using a single instrument with a single set of standards. During the Q&A session that followed this presentation, a member of the audience asked which spectrophotometer MMA ultimately selected.   Sanderson responded that the X-Rite eXact was selected for several reasons: it is lightweight; it produces data reasonably consistent with MMA’s existing spectrophotometer (understanding that data translation will be necessary regardless of which instrument is chosen); and long-term support from the manufacturer as well as continuity in data and software.
Sanderson_2
X-Rite eXact spectrophotometer. Image courtesy of X-Rite

 
The presentation concluded with a discussion of areas of further research within this project, specifically continued analysis of data pertaining to the UV-radiation source found in some of the meters as well as the use of SCE settings in spherical integrated systems for more highly textured surfaces like those found in textile objects. Finally, it is a goal of MMA to complete processing of all data collected during this study and make it available to a wider audience so that it might contribute to more standardized color communication within the field of conservation and allied professions.

42nd Annual Meeting – Photographic Materials, May 31, “Technical Investigation of Environmental Concerns for the Exhibition of Diazotypes at the Metropolitan Museum of Art,” by Greta Glaser, Katie Sanderson, and Maggie Wessling

Francesca Woodman, Blueprint for a Temple (1980), diazo collage. Image courtesy metmuseum.org.
Francesca Woodman, Blueprint for a Temple (1980), diazo collage, 173 1/4 × 111 3/16 in. Image courtesy metmuseum.org.

Greta Glaser and Maggie Wessling presented on diazotype research that was conducted in the Photograph Conservation Department at the Metropolitan Museum of Art between 1999-2012. One catalyst for this research was the 2012 display of Francesca Woodman’s Blueprint for a Temple, made up of 29 separate diazotype prints collaged together to form one image. The goal for research was to determine the best display and storage methods for the long-term preservation of diazotypes—generally through to be sensitive to deterioration caused by the environment.
As an overview of the process, Glaser described the nature of diazotypes as single layer direct positives often printed on paper supports of macerated cotton and purified wood pulp. The combination of diazo compounds with a phenol coupler and acid stabilizer produces the image, resulting in a range of possible colors, including the most common bluish-purple. Diazotypes were first marketed in the United States in the 1920s and could be used for photographic images as well as architectural drawings and other reproductions because of their ability to print with very little dimensional change from the original negative.
In order to make a thorough investigation of diazotypes and their response to the environmental, Glaser and Wessling set up light and relative humidity experiments on vintage as well as freshly processed sample papers, and Sanderson collected data on the Woodman print during installation. All experiments were calculated for roughly six months of display. Their combined spectrophotometer and microfade testing analysis produced the following summarized results:

  • High humidity and light = yellowing and fading (reddening)
  • All environments at or below 50% RH = same result
  • In the dark, yellowing still occurs, but fading does not = greenish cast
  • The rate of color change accelerates with age
  • After 20 minutes of testing, samples fade between blue wool 2-3 (equivalent to approximately 1.2 million lux hours of exposure to cause noticeable fading)

Wessling summarized their conclusions from the study and highlighted the fact that environmental conditions were not controlled during analysis, which may have an affect on the data. Ultimately, diazotypes will fade with light exposure and will become yellowed in the dark, but if we can reduce the relative humidity, especially during display, the effects of exhibition will do less to alter the permanence of these photographs.