Topics in Photographic Preservation 1986, Volume 1, Article 5 (pp. 13-15)
Instructions for a Preservation Quality Photographic Album Based on an Oriental
Design
Sharon Gavitt Moody
All too frequently, the advice given to the general public relating to the preservation of black-and-white photographic images stresses the “don't” rather than the “do's”. The following article describes in detail the preparation of a photograph album that utilizes methods and materials regarded by many conservators as compatible with the goals of photographic preservation.
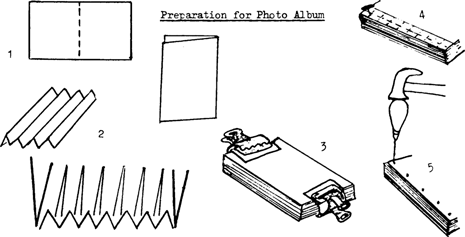
Tools and Supplies: 34 sheets of acid free/lignin free paper, 2 sheets of one ply 100% cotton cover sheet, 2 bull dog clamps, 2 small pieces of acid free blotter or scrap paper, thumb tack, awl and hammer or drill, ruler or 1″ wide straight edge, scrap paper.
- Fold paper in half lengthwise or with the grain.
- Make spacers(accordion fan) 1″–1 1/4″ wide and the length of the folded paper using a straight edge and bone folder. Insert open sides of folded paper between the folds of the spacers. Covers: using a heavier stock, fold paper in half (the same size as album) and place open side out from the spine, one for the front and one on the back of the album.
- Hold pages and spacers firmly together with a heavy scrap of paper and bull dog clips, being sure pages are flush with each other.
- Make a jig out of a piece of paper the length of the spine and one inch wide. Fold in half lengthwise and bring both ends together. Fold 1/2″ at ends, unfold, bring one end up to the 1/2″ fold mark of the other and crease at fold. Fold in half at that mark again and again. Open up. Lay jig flush against spine and edges. Mark where the folds intersect with a push pin on the cover paper. Remove jig. (5) Make holes were marked using an awl or nail and a hammer. A drill with a small bit could also be used. Be sure the bull dog clips and the heavy pieces of paper are left on, holding the pages together until the book is sewn.
Oriental Binding for Photo Album – Sewing
- Start lacing at the bottom hole of the back cover

- At the last hole bring the thread around the top of the book and through the last hole to the front.

Supplies
No. 3 binding thread needle – embroidery needle or binding needle
- Lace around spine from the front to the back, through the last hole from the back to the front.

- Run a stitch to the next hole from the front to the back.
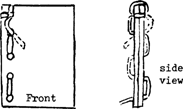
- Side loop from the back to the front around the side through the hold to the back.

- Running stitch back to front. Continue lacing running stitches and side loops until you reach the bottom hole.

- At the bottom hole bring remaining thread around bottom of album to the back and tie both ends together in a suture fashion: 3 twists (or overlaps), turn and one more twist. Trim thread close to knot.

Alternative to Photo Corners
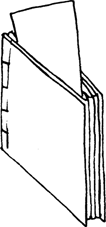
- Insert a heavy piece of cardboard inside folded sheets(or page).
- Place photograph where you would like it and mark corner locations with a pencil.
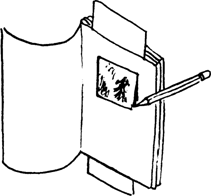
- Remove photograph and cut slits, where marked, to hold corners.
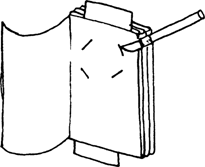
- Remove cardboard and insert photograph.
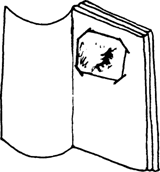
NOTE: Only use one side of each folded page. Photographs facing each other on adjoining pages may stick together when the album is closed, unless interleaving is used.


