Topics in Photographic Preservation 2001, Volume 9, Article 2 (pp. 44-60)
Decorative photo buttons were popular in the United States in the early 20th century. They were made by laminating a photograph and paper mat with cellulose nitrate film that was wrapped around a metal support and machine-pressed into place. Fluctuating environmental conditions and inherent tension of the button layers often cause the paper and plastic laminate layer to split, and the edges of the split to lift out of plane. The history and manufacture of early decorative photo buttons and will be discussed in relation to the examination and treatment of buttons at the Art Conservation Department. The paper presents a new method of repairing photo buttons exhibiting large splits that can be accessed from the front of the button. G-10, a thin, stiff embedded fiberglass epoxy sheet (Accurate Plastics) and Beva® 371 film adhesive are used to secure the splits. The construction of inconspicuous paper inserts is explained.
The photo button craze began in America around 1900 as the demand for the decorative display of family pictures increased, and buttons soon also gained popularity in England (Flukinger et al. 1977, 66). They presented a novel decorative means of displaying photographs in private residences, but also entered the public sector as they were adapted for wearing. Photo buttons appear to have been at their zenith in American society from around 1910 through the 1920s. Several firms such as Cruver Manufacturing Company of Chicago, (Palmquist 1979 and 1982) Whitehead and Hoag Company of Newark New Jersey (Hake and Jones 1991, 274–279) and Dorrett and Martin of London (Flukinger et al. 1977, 66–68) manufactured photo buttons and supplied button-making materials to professional photographers. The Cruver Manufacturing Company encouraged professional photographers to sell photo buttons promising them increased revenues for their efforts. Popular decorative backgrounds for Cruver photo buttons included society or lodge emblems, patriotic scenes and floral prints (Palmquist 1979 and 1982). Although to date little information has been recorded on the history and manufacture of photo buttons, awareness of them has increased among photo collectors, historians and conservators as these interesting objects continue to emerge at flea markets and in antique shops across the United States.
Buttons range in size from less than 1 inch to about 9 inches diameter and can be circular, oval or rectangular in shape. Large photo buttons were often called medallions and could be displayed with a table stand or hung on the wall. Small photo buttons with pin backings could be worn. Photo button pins were designed to promote political campaigns, commemorate events and advertise for products. Photos were also made into mirrors, plaques, paperweights, boxes and jewelry in a similar manner as photo buttons. As the demand for these photographic novelties increased, salesmen went door to door soliciting orders for photo buttons and convincing potential clients that their loved ones would look much more distinguished if displayed in a decorative photo button (Palmquist 1979 and 1982). Although most photo buttons were commercially manufactured, the individuality of the people depicted in the photographs they contain makes them unique.
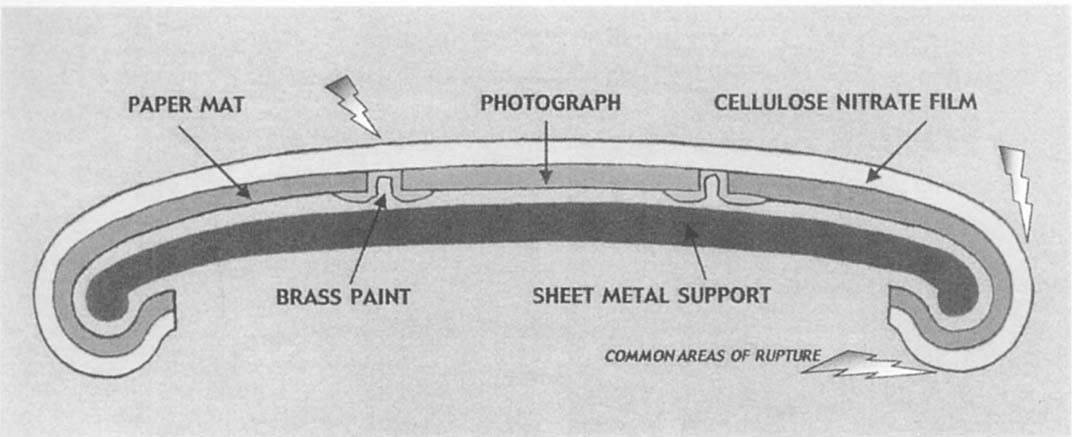
A photo button is a composite structure consisting of a paper photograph sealed with a plastic laminate and pressed around a metal support (Fig. 1). The button contains a photograph set into the opening of a paper mat. While original photographs could be used, photographic or printed copies of them were also employed in button manufacture. The paper mat usually features one or two oval or rectangular openings for the insertion of photographs. It consists typically of a smooth machine-made paper that is printed on the front with geometric designs or floral motives using (offset) lithography or relief printing. Before the paper mat was assembled with a button, these printed designs were sometimes enhanced through local application of watercolors. The edges of the photograph were usually trimmed slightly smaller than the opening of the decorative paper mat, leaving a space 2–4 mm wide between the two. Both the photograph and the paper mat were faced with a plastic film. Late 19th-century and early 20th-century photo buttons examined in this study were faced with a cellulose nitrate film (as plastic technology evolved and became available during the 20th-century, buttons were also faced with acetate-based, polyester and other clear plastic covering films). The plastic film united the paper mat and photograph, protected the button surface during display and use, and contributed to its smooth appearance that was probably considered an attractive characteristic of all buttons. The lamination of the photograph to the clear covering film gave the image a glossy (sometimes also matte) surface that enhanced the contrast and saturation of color.
Figure 1. Cross-sectional diagram of a photo button with a photograph in the center and a surrounding paper mat (layers of button structure are inflated so they can be distinguished easily).
Little information exists about the techniques that were used to achieve the bond between the cellulose nitrate film and the photo and paper mat. It appears, however, that some button manufacturers applied a thin adhesive layer to the cellulose nitrate film to ensure its uniform attachment to the photograph and paper mat layers. Through visual examination of several late 19th- and early 20th-century buttons, preliminary conclusions could be drawn regarding a possible method of lamination. An adhesive appears to have been spread across the cellulose nitrate film. This is evident with buttons that show small areas of unattachment between the cellulose nitrate film and photo or paper mat. In these areas, a thin, streaky, transparent deposit can be observed on the underside of the cellulose nitrate film. After application of the adhesive, the paper mat and photograph would have been laid face down on the adhesive layer (at this point, air bubbles may have been removed with a brayer). Once the cellulose nitrate film had been adhered to the photo and paper mat, the laminate was turned face down and a band of brass paint was applied on the reverse in the narrow space between the edge of the photograph and opening of the paper mat (and often carried over to the underside of the photograph and mat as well). The brass paint created a decorative gold-colored border around the photograph. The photograph, paper mat and cellulose nitrate film were then wrapped around a metal support and pressed into place with a button-making machine (Jones 1974; Hasluck 1907; Flukinger et al 1977, 69; similar machines are used today for making modern pin-back buttons). In the case of two photo buttons, it could be observed that the laminate must have been wrapped around the metal support before an adhesive used in the lamination process had set. As a result, some adhesive had been squeezed out laterally along the crimped edges and had spilled onto the button's metal support (the spilled adhesive residues are insoluble in water and appear opaque and brownish).
Some photo buttons contain a sheet of newsprint between the metal support and paper layers. Underneath one split photo button, portions of newsprint were revealed that show an advertisement for photo buttons (Fig. 2). The decorative paper mat of one button depicted in the advertisement showed a design similar to that associated with a button studied during this project. Because paper mats were commercially produced, it is common for multiple buttons to have the same paper mat designs.

Figure 2. Detail view of a photo button split along the brass-painted border surrounding the photograph. One side of the split edge has lifted out of plane, revealing a layer of newsprint that had been crimped around the metal support together with the photo and paper mat laminate. A strip of the G-10 repair support material is positioned underneath the split area.
Approximately 40 buttons were examined during this study. In cases where testing was possible, identification of cellulose nitrate was made using the diphenylamine spot test (Odegaard and Carroll 1999; Reilly 1991, 157). The testing procedure involved the following steps: the right edge of each button was gently scraped with a frosted microscope slide; a drop of diphenylamine in sulfuric acid was then placed on the slide; the presence of nitrate in the scraped sample was indicated by formation of a dark blue streak.
Due to the chemical instability of the cellulose nitrate that causes its shrinkage over time, and due to the hygroscopic nature of the cellulose nitrate and paper materials that causes them to respond to climatic changes in the environment, photo buttons exhibit a tendency to split through their laminate layer. Splitting usually occurs along the brass-colored border where the cellulose nitrate film is unsupported and along the edges of the button which are tensioned around the metal support. Once a split has occurred, the tension with the laminate easily causes the split to grow longer and allows the split edges to lift out of plane. This condition causes the photo button to become unsuitable for handling and display.
Most of the buttons examined in this study exhibited no or only very little separation between the cellulose nitrate and photo and paper layers, attesting to the lasting effectiveness of the lamination process developed by button manufacturers. The surface of buttons was examined under magnification using raking light conditions to locate the few and usually small areas where the photo or surrounding paper mat and cellulose nitrate had remained unadhered or had separated after manufacture. Observations of these areas provided evidence regarding the possible use of an adhesive for the lamination procedure. Along the crimped edge of photo buttons, delamination of the paper mat and cellulose nitrate layers could be observed. The paper mat of one of the buttons treated had split internally leaving the printed paper surface adhered to the cellulose nitrate. The adhesive is possibly cellulose nitrate-based, but still remains to be further analyzed.
Deteriorated cellulose nitrate is known to exhibit a yellowish fluorescence visible under long-wave ultraviolet radiation (Odegaard and Carroll 1999). All of the buttons covered with cellulose nitrate were found to fluoresce, indicating that they had undergone the expected deterioration (the photographic image material, paper supports and pigments used may sometimes also contribute to the fluorescence in local areas). The yellowish discoloration that usually accompanies the deterioration of cellulose nitrate is difficult to observe, because the film is too thin to show the color change. Nonetheless, it can be assumed that photo buttons with a new cellulose nitrate layer appeared somewhat brighter than they do today.
SEM analysis on the brass-colored paint of the two damaged photo buttons treated as part of this project revealed nearly identical compositions of copper and zinc (results of one of the two analyses can be seen in Fig. 3). It seems that the brass powders used for producing the two paints were quite similar in composition, even though the buttons were likely manufactured by different companies.
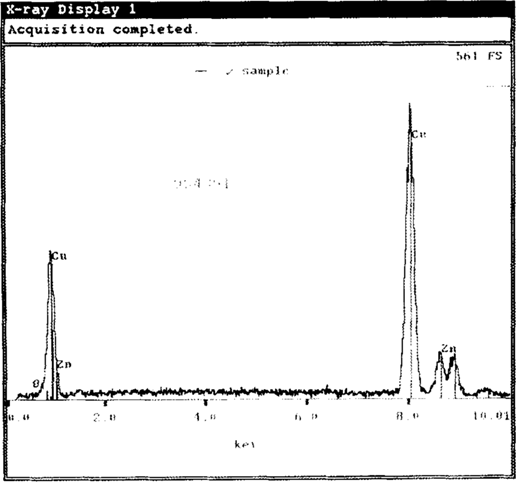
Figure 3. SEM spectrum showing the predominance of copper and zinc in the brass paint of a photo button (family of Martin Penszak, see Fig. 12).
Existing treatment options were investigated by examining previously repaired buttons and discussing treatments with photo conservators. Photo buttons have been treated in situ by adhering split edges directly to the metal support or to an intermediate layer of polyester with adhesive, heat-seal tissue or Japanese paper coated with adhesive applied to it. Some conservators have chosen to separate the laminate from the metal support temporarily in order to repair splits from the reverse and reinforce weak areas that otherwise would be inaccessible.
Several types of adhesives were considered for repair but were eliminated due to the potential problems they might cause. Solvent-activated adhesives might dissolve the cellulose nitrate, become trapped inside the button layers without means of evaporation, and cause staining or migration of degradation products in the paper layers. Aqueous adhesives also have a potential for staining the paper and photograph layers, and they may not provide a bond sufficiently strong enough to secure the split edges that are often distorted and stiff.
Due to the shrinkage of the cellulose nitrate, the edges of the split laminate usually cannot be joined anymore. A gap remains between them that can measure as much as 2 mm in width. The gap can prove distracting because it tends to occur close to the center of the button. Paper, pulp, cellulose powder and pigmented wax have been used by conservators to bridge gaps between repaired split edges. Fills have been inpainted with watercolors, acrylic or gouache. Conservators have coated fills with B-72, acrylic medium and PVA to imitate the shiny surface of the cellulose nitrate.
The treatment discussed here concerns the repair of splits that are long and curved enough to have caused one of the split sides to lift out of plane, thereby providing limited access into the interior of the button. A secure, inconspicuous and relatively simple repair of such splits can be achieved using an epoxy-embedded fiberglass laminate sheet (G-10, Accurate Plastics). This rigid support can be inserted underneath the split area. G-10 has been used in paintings conservation as a stable, rigid support for mending torn canvas paintings. Although the material has been proven to yellow upon prolonged light exposure (Hamm 2000), this characteristic was not of major concern to us since the G-10 support would be protected from light by the paper and cellulose nitrate layers.
The G-10 sheets can be easily cut and shaped to fit between the split laminate layer and the metal support. Despite its thinness, the material retains enough rigidity to hold the edges of the split adhered to it in plane. It also acts as a protective barrier preventing the adhesive from adhering to the metal support or newsprint covering it. In preparation for treatment, a 10 mil sheet of G-10 can be sanded to 8 mil using a hand-held belt sander or sandpaper. The G-10 then can be cut into strips following the shape of the split and overlapping it ca. 5 mm on each side. The edges of the G-10 strip should be chamfered with sandpaper to accommodate the strips within the button structure. The center section of the G-10 strip that is to secure the very edges of the split should not receive any additional sanding.
We selected Beva® 371 heat seal adhesive film (1 mil thickness) to adhere the split edges to the G-10 support. The low activation temperature, strength, good aging characteristics, reversibility and minimal preparation requirements make Beva a viable adhesive option for mending photo buttons. Beva film is cut so as not to exceed the edges of the G-10, and is applied to it with a heated spatula. Next, the G-10 strips can be positioned lengthwise with the adhesive side facing up underneath the split area (Fig. 2). Once it is positioned, the G-10 strip is first adhered along the edge of the split that remains in plane (Fig. 10). This is achieved by activating the Beva film with a heated spatula panned over the surface of the button through a silicone-coated polyester sheet. An area ca. 3 cm in length can be treated at a time, slowly moving the spatula back and forth without ever resting it in one spot. After ca. 5 seconds, the spatula can be lifted and immediately pressure is applied by hand to secure the bond.
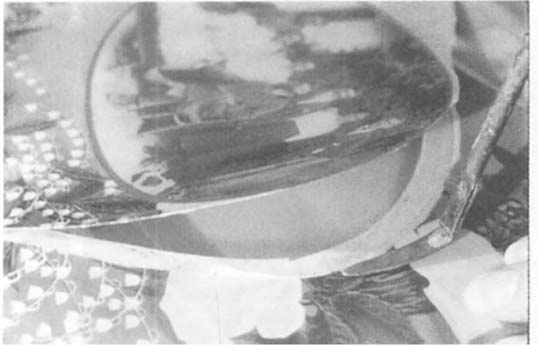
Figure 10. The G-10 support strip is adhered with Beva 371 film underneath the split of the photo button laminate that remains in plane.
The application of heat to cellulose nitrate may appear a risky procedure given the fact that the material is very flammable. Cellulose nitrate has been known to deteriorate when subjected to temperatures of 275° F or less depending on its composition and age (Selitz 1988, 17–22). The greatest risk, however, is posed by rolls of cellulose nitrate film that may ignite at temperatures as low as 105° F when stored in a contained environment that does not allow the escape of the volatile gases emitted (UNESCO 2000). A cellulose nitrate film applied to the surface of a photo button; however, is less hazardous because, aside from the fact that its composition may also differ from that of cellulose nitrate film, it represents less mass of the material than do nitrate film rolls. The gases emitted from individual sheets of the film material are usually able to escape easily. Nonetheless, the local application of heat to the photo buttons was approached with special caution. The temperature was increased slowly at first at test spots of each new button while the structural stability of the cellulose nitrate was monitored. The temperature of the spatula was checked with a digital thermometer so as not to exceed 190° F. We found that spatula temperatures between 170° and 185° F were adequate for prompt activation of the Beva film.
Two techniques of constructing inserts during the process of repairing split edges of photo buttons are presented below (Fig. 4). One technique (Fig. 4.A) can be used to make inserts along splits within the brass-painted borders surrounding the photographs. Here, the brittle cellulose nitrate film is supported by neither photograph nor paper mat. The insert paper is attached to the raised side of the split before it is adhered to the G-10 support. The insert extends underneath the cellulose nitrate providing it with permanent support. Another technique (Fig. 4.B) is suggested for the repair of splits running through the paper mat. In this case, the two split edges are adhered to the G-10 support before insertion of the inserts. This repair technique is also suitable for making inserts along splits running through the photograph. The first technique (Fig. 4.A) is simpler and faster to execute than the second technique (Fig. 4.B) but the latter produces more inconspicuous results. A detailed description of the two techniques follows.

Figure 4. Cross-sectional diagram of repaired splits in photo buttons, showing the placement of repair materials and areas of their attachment to the button structure.
Repair of split along brass-painted border surrounding the photograph (Fig. 4.A):
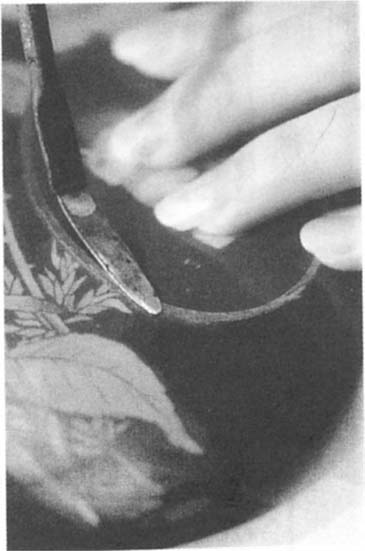
Figure 5. The photo button laminate raised along the area of a split is set into plane and adhered with Beva 371 film to a G-10 support strip positioned underneath the split.
An example of the results of this treatment technique can be seen in Figures 6 and 7. An extended split along the brass-painted areas surrounding the two photographs of two children was repaired. Figures 8 and 9 provide detail views before and after treatment of an area along the portrait of the girl.
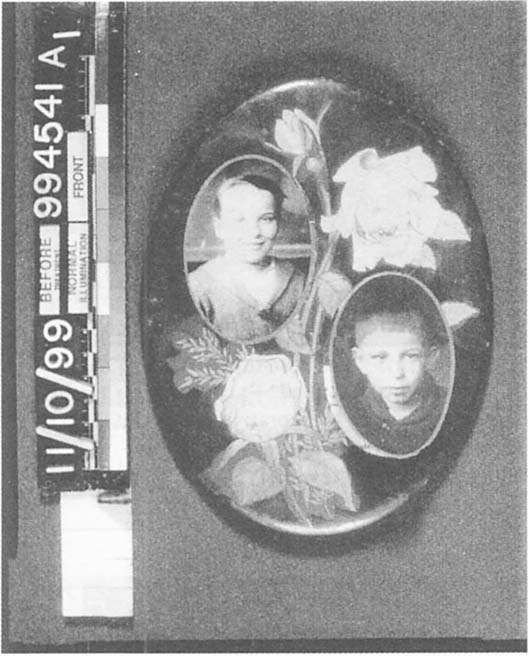
Figure 6. Photo button with separate portraits of an unknown boy and girl (5 3/4 × 7 3/4 in.). Origin of the button is unknown, date estimated 1920–1930s. It was purchased October 1999 at the flea market in Clarence, N.Y. Both portraits are likely silver gelatin developing out paper photographs. The normal illumination view before treatment illustrates splits along the brass-painted border that surrounds each photograph.
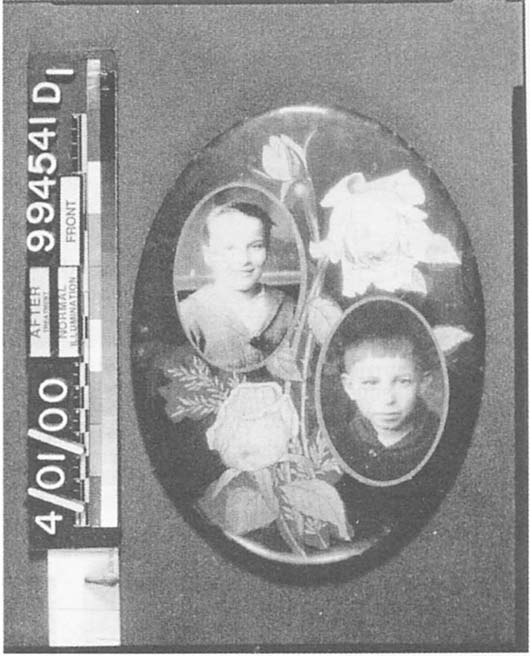
Figure 7. Photo button with two separate portraits seen in normal illumination after treatment. The splits along the brass-painted borders of both photographs were repaired using the technique illustrated in diagram “A” in Fig. 4.
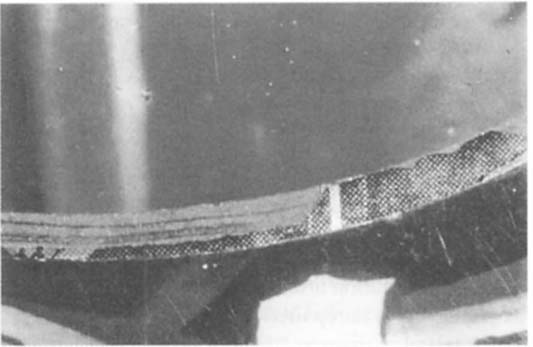
Figure 8. Detail of Fig. 6 showing the brass-painted border surrounding the portrait of the girl. Normal illumination view before treatment.
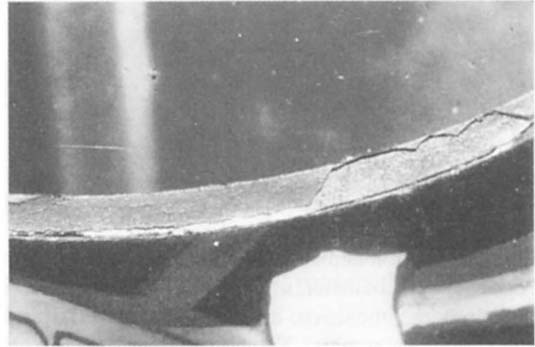
Figure 9. Detail of Fig. 7 showing the brass-painted border surrounding the portrait of the girl. Normal illumination view after treatment.
Repair of split within the paper mat (or photograph) (Fig. 4.B):
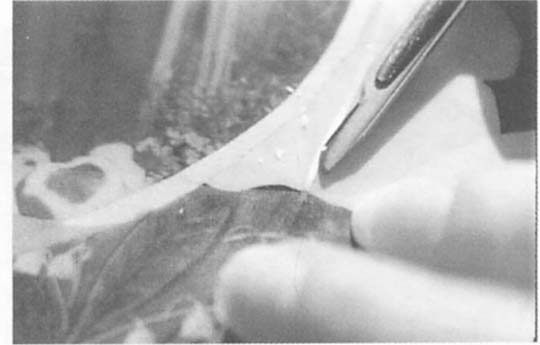
Figure 11. A paper insert is made to fill the gap between the split edges of a decorative paper mat. The surface of the inserted paper strip is shaped with a scalpel to achieve a level fit.
An example of this treatment can be seen in Figures 12 and 13. The split in the decorative paper mat of this 9-inch diameter button extended across its entire center. In addition to repairing the split on the front of the button, a small tear along the crimped edge on the reverse of the button was reinforced with medium-weight Japanese tissue paper adhered with wheat starch paste. A thin spray coat of B-72 was applied to the metal support to protect it.
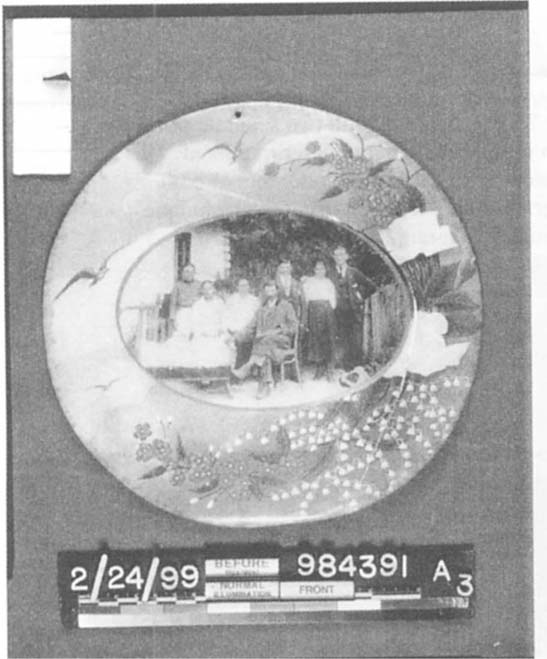
Figure 12. Photo button depicting the family of Martin Penszak (9 in. diameter, unknown photographic process; the image is locally enhanced with red and green watercolor). The portrait was likely taken in the late 19th-century in Poland and button assembled 1910–1920s after Penszak's arrival in the United States. The normal illumination view before treatment shows a large crescent-shaped split that runs through the decorative paper mat.
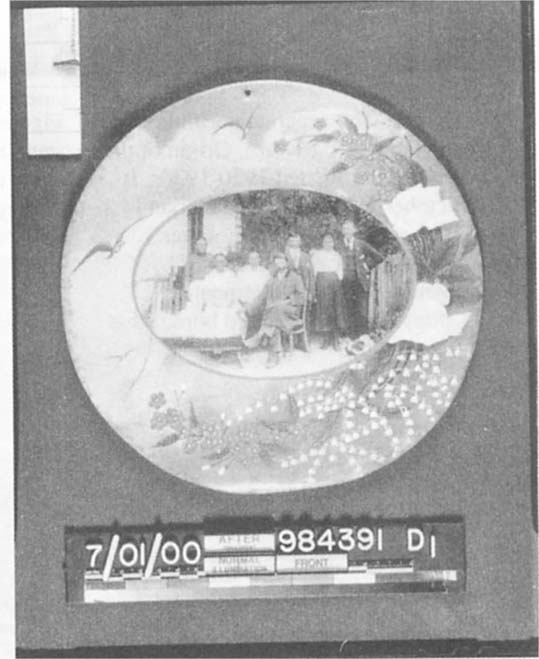
Figure 13. Photo button (family of Martin Penszak) seen in normal illumination after treatment. The split in the paper mat was repaired using the technique illustrated in diagram “B” in Fig. 4.
Because little information about the historical manufacture and modern treatment of photo buttons is available, it will prove useful to conduct further research on these interesting composite objects. One of the questions that still remain open concerns the attachment of the cellulose nitrate film to the photograph and paper mat, especially the use of adhesive in the lamination process. Meanwhile, we hope that the treatment technique presented here provides conservators faced with the day-to-day problems of treating these objects with another useful solution.
The authors wish to thank the faculty at Buffalo State College and Paul Messier, adjunct faculty mentor, who have made significant contributions to our treatments and research. We would also would like to extend our gratitude to the photo conservators who have shared their treatment knowledge of photo buttons, and Dr. Peter Bush and Catherine Green at The University of Buffalo for their help with the SEM analysis.
Blank, S. 1990. An Introduction to Plastics and Rubbers in Collections. Studies in Conservation 35 (2): 53–63.
Chicago Ferrotype Co. c. 1908. Directions for Operating the “Wonder Cannon” Automatic Photo Button Machine. Operation Manual.
Dr. Don's Buttons. 2000. Button Making Tips. [http://www.buttonsonline.com/button_making_tips.html]
Flukinger, R., L. Schaaf, and S. Meacham. 1977. Paul Martin: Victorian Photographer. University of Texas Press.
Hake, T. and R. King. (1986) 1991. Price Guide to Collectible Pin-Back Buttons 1896–1986. Iola, Wisconsin: Krause Publications.
Hamm, J. 2000. Personal communication. Art Conservation Department, Buffalo State College, Buffalo, NY 14222.
Hasluck, P., ed. 1907. Photographic Buttons. In The Book of Photography Practical, Theoretic and Applied. London, Paris, New York and Melbourne: Cassel. 198.
Jones, B. E., ed. (1911) 1974. Buttons, Photographic. In Encyclopedia of Photography. New York: Arno Press. 79.
Odegaard, N. and S. Carroll. 1999. Spot Testing for Materials Characterization. Unpublished course notes and personal communication. Art Conservation Department, Buffalo State College, Buffalo, NY 14222.
Plamquist, P.E. 1982. Button, Button, Who's Got the Photo Button? The Photographic Collector 3(3): 7–16.
Palmquist, P.E. 1979. The Cruver “Photo Medallion” Sales Kit. Photographica 11 (9): 8–10.
Reilly, J.A. 1991. Celluloid Objects: Their Chemistry and Preservation. Journal of the American Institute for Conservation. 30 (2): 145–162.
Schultz, J.R. 1986. Political Campaign Buttons: History, Collection, and Care. Illinois Heritage Association Technical Insert 20 (March-April): 1–2.
Selwitz, C. 1988. Cellulose Nitrate in Conservation. Marina del Rey, California: The Getty Conservation Institute.
Storch, P. 1998. Care and Conservation of Political Campaign Buttons. Minnesota Historical Society Interpreter, (March): 3–6.
UNESCO. 2000. Safeguarding Our Documentary Heritage. [http://webworld.unesco.org/safeguarding/en/all_phot.htm]
G-10 High Pressure Laminate (fiberglass and epoxy), pale translucent green color Accurate Plastics, Inc., 18 Morris Place, Yonkers, NY 10705
Beva® 371 film Conservator's Products Co., P.O. Box 411, Chatham, NJ 07928
Silicone coated polyester film University Products, Inc., 517 Main Street, P.O. Box 101, Holyoke, MA 01041–0101.
Heated spatula TALAS, 568 Broadway, New York, NY 10012.
Tip for heated spatula nandmade from brass tubing and sheet silver by Sara Shpargel at Buffalo State College (based on model made by Amy Gerbracht at Buffalo State College)
Kiethly 872 Digital Thermometer
Yale, handmade antique laid paper Twinrocker, 100 East Third Street, P.O. Box 413, Brookston, IN 47923
AYTEX-P, precipitated wheat starch paste General Mills, distributed by TALAS, 568 Broadway, New York, NY 10012.
Designer's Opaque Water Colors Grumbacher, made in Germany
Polyvinyl Acetate pH-Neutral White Adhesive Gaylord Bros., Syracuse, NY.
Acryloid B-72 Rhom & Haas, Philadelphia, PA