Topics in Photographic Preservation 2007, Volume 12, Article 20 (pp. 131-140)
Presented at the 2007 joint PMG/ICOM-CC WGPM Meeting in Rochester, New York
This paper describes reversible mounting methods devised to exhibit large-format unmounted photographs by conservators from George Eastman House/International Museum of Photography and Film, Amon Carter Museum, and Atelier de Restauration et de Conservation des Photographies de la Ville de Paris. The descriptions of similar approaches devised by other conservators follow in addendum.
As more and more large-format photographs enter the fine art market, private collections, and museums, conservators are facing the challenge of caring for their storage, exhibition, and transportation. Very often, artists will permanently mount their large photographs onto rigid substrates for better support and aesthetic reasons. However, a significant number of large-format photographs remain unmounted.
Traditional presentation methods used for smaller formats including photo corners or hinges are often inadequate to support photographs larger than 30 × 40 inches. Large-format photographs will tend to buckle or sag if not properly supported during exhibition. An ideal conservation mounting system should keep the photograph safely flat, be aesthetically pleasing and, if possible, be reversible. Considering these requirements, the edge-lining method used on canvas paintings seemed a possible alternative. The method consists in attaching edges strips along the back of a canvas and stretching them around a rigid panel.
In 2006, the Conservation Department at George Eastman House tested the stretching edge-lining method for fourteen unmounted chromogenic photographs that had been approved for a three-month loan. Twelve prints were 40 × 60 inches Kodak Professional Endura Paper by artist Andy Lock. The other two were 98 × 23 inches digital chromogenic prints by German artist Johannes Hepp. The photographs by Andy Lock had been stored horizontal between weights and were flat to begin with; those by Johannes Hepp had been stored rolled and exhibited visible cockling as the mounting process began. The mounting method was devised in a way that it could be undone or kept as a long-term mounting solution after exhibition; it involved three stages: lining, mounting, and sealing. The lining process was consistent for all the photographs; there were slight variations in the mounting and the sealing because of the difference in object size and planar condition.
Unlike canvas, resin-coated photographic paper (RC paper) has a sleek surface and can be sensitive to heat and to some organic solvents. Preliminary tests were carried out to find the appropriate lining materials and adhesives. Different combinations of Japanese paper, non-woven polyester webbing of various thicknesses, and adhesives were tested. Hollytex 3221 and Lascaux 498 HV provided the best working properties with good strength and adhesion.
Lascaux 498 HV can be used directly as a paste or reactivated with organic solvents. We preferred the reactivation method, which provided good adhesion bond between the Hollytex and the RC paper, yet was very easy to peel off. This method also provided cleaner application; the adhesive strips could be prepared ahead of time and required only light pressure for bonding.
Different solvents and solvent mixtures were tested. A mixture of toluene and heptane (1:1) reactivated the adhesive quickly, evaporated at a rate that allowed enough working time, and did not cause harm to the RC support and the image dyes.
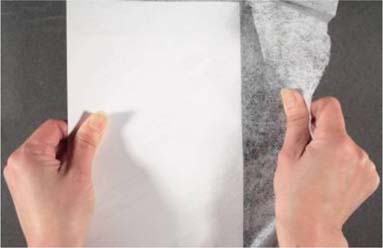
Reversibility of the attached lining strips was one of the main concerns. Tests showed that Lascaux 498 HV has very good tensile strength but very poor sheer strength. These properties enable tight stretching from sideways (figure 1) and easy removal of the strips (figure 2).

Figure 1: Strips had good tensile strength
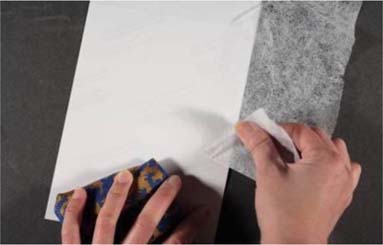
Figure 2: But they have very poor shear strength
For this reason, the mounting substrate had to be at least one centimeter wider than the photograph at all edges, so that the strips could be stretched out first before wrapping around it. The adhesive residue was easily removed with a Magic Rub eraser or rubber cement pick-up stick.
The lining process involved preparing the strips and attaching them to the edges around the back of the photographs. The corner strips were cut in an L-shape to prevent weak joints at the corners.
Lascaux 498 HV was applied on the strips in bands of about 3 cm wide and allowed to dry. The solvent mixture of heptane/toluene was applied to the adhesive. When the adhesive became sticky, the lining strip was attached to the photograph. Light hand pressure was enough to obtain a good bond. The adhesive was let to set under light weights.
After the adhesive was set, the photographs were mounted onto Tycore panels, which consist of a core of paper honeycomb cells sandwiched between off-white Bristol boards. Tycore was chosen due to its light weight and rigidity. The panels were cut about 1 cm bigger than the photographs at all edges. As mentioned above, the extra space allows the edge strips to be stretched out before wrapping around the panel.
Stretching of the strips was performed with the photographs face down on a sheet of Mylar. The Tycore panel was positioned precisely over the back of the photograph.
The corners of the L-strips were trimmed tangentially to the corners of the panels (figure 3) for easy stretching and clean joints (figure 4). The lining strips were stretched from all four sides at the same time and attached to the back of the panel with 3M 415 double-sided tape.
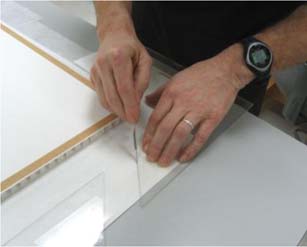
Figure 3
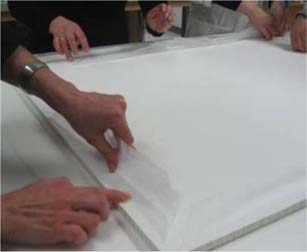
Figure 4
In order to prevent fluctuations that could affect their planar stability, the mounted photographs were sealed inside a humidity-conditioned package. A piece of Artsorb conditioned at 40% relative humidity (RH) was adhered to the back of the Tycore panel and covered with a sheet of Marvel seal 360. Quarter-inch thick high density polyethylene black spacers were used to cover the visible outer edges of the Tycore panel.
Plexiglas glazing was added and the entire package was sealed with 3M 427 aluminum foil pressure-sensitive tape (figure 5). The middle section of the 3M 427 tape was covered with a strip of Teflon wide enough to block the tape from sticking to the lining strips (figure 6). The corners of the package were reinforced to ensure good sealing (figure 7). The sealed packages were then secured into their frame. Figure 8 shows a cross section of the sealed package.
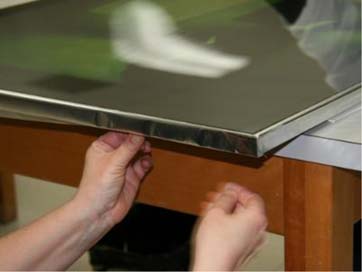
Figure 5
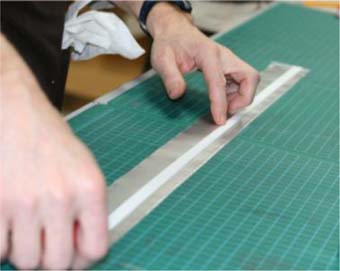
Figure 6
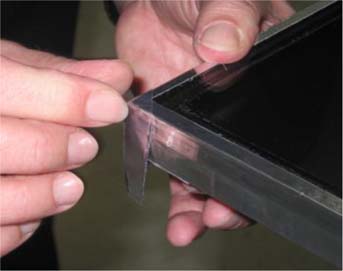
Figure 7
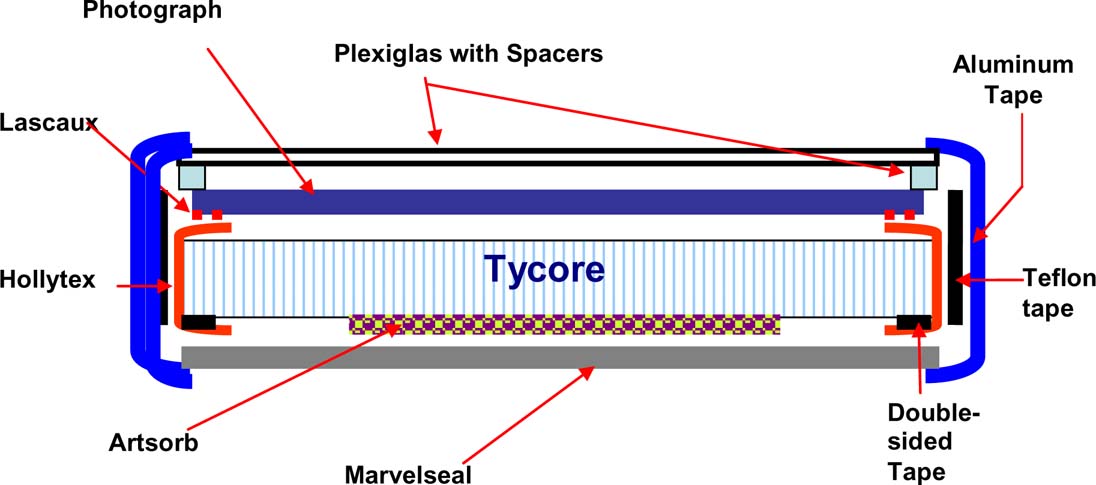
Figure 8: Cross-section of the sealed package
Because the two panoramas are longer than the maximum available size of Tycore panel, a custom panel was constructed by joining two sheets of Tycore with epoxy and PVA. Concerns with the off gassing of these adhesives prompted the isolation of the entire panel with aluminum foil and metal tape before the photographs were mounted. Due to their length, these custom-made panels were somewhat flexible. The rest of the process was the same as that for Andy Lock's photographs. The planar distortion was significantly reduced but not completed corrected.
The photographs were examined upon their return from exhibition. Most of the photographs by Andy Lock remained flat and only one photograph exhibited slight cockling. We also noticed that the photographs buckled immediately when we lifted the frames from one corner and that the buckling disappeared after the corner was set down. It is evident to us that the Tycore panel is not rigid enough to resist the flex from the frame.
The mounting method did not work for the two panoramas by Hepp. The buckling was very visible and the photographs were in contact with the Plexiglas in some areas. Apparently, the RC paper had expanded as the lining strips were well adhered. Unfortunately, no datalogger was incorporated to record the temperature and RH the photographs were experiencing. It is still inconclusive whether it is the RH or temperature fluctuation that affected the dimensional stability of these two photographs.
In 2006, the Amon Carter Museum organized the exhibition Regarding the Land: Robert Glenn Ketchum and the Legacy of Eliot Porter1. The exhibition was to last four months, from September 2006 to January 2007. Among the works selected for the exhibition were thirty-eight unmounted color photographs measuring 30 × 40 inches –thirty-six Cibachrome® or Ilfochrome® and two Fujicolor Crystal Archive. About half of the photographs belonged to the museum; the other half was borrowed from several private collectors. All the photographs in the exhibition would be over matted with a four-ply white window mat. Previous experience with over matted and cornered photographs of that size had resulted in sagging of the art inside the mat board to the point where the surface of the photograph came in contact with the acrylic glazing. To prevent this from happening again, we decided to use the edge-lining approach.
The materials selected were a medium-weight non-woven polyester web Reemay 2014 (8 mil) for the hinges, and acrylic adhesive Lascaux 498 HV. Straight adhesive was applied with a brush on both sides of the Reemay strips and let dry.
The photographs were placed face down on the table, over sheets of blotter and a very smooth non-woven polyester web. Prints were held in place with a few soft weights. When the hinges were ready to be applied to the verso of the photographs, the adhesive was reactivated in the fume hood with a 1:1 solution of toluene and heptanes. After the hinges were positioned along the edges of the prints, slight pressure was applied with fingers and bone folders. Everyone working on the hinging was wearing a respirator. The photographs were air dried until the solvents had completely evaporated.
We wanted a relatively inexpensive, non-hygroscopic, rigid support that would not bow when handled. Dibond®, an aluminum composite material consisting of a core of polyethylene faced with thin sheets of aluminum on both sides was used. Sheets of Dibond® cut approximately an inch wider than the photographs all around were centered on top of the prints' verso. The hinges were then stretched over and secured on the verso of the Dibond® panels with 3M 415 double-sided adhesive.
The mounted photographs were cornered into sink mats made of white Coroplast® (for the back) and corrugated blue board (for the walls). The photographs were over matted with rag board and an acrylic glazing was placed on top. The package was sealed with white Artists' Tape™ (figure 9). Although not appropriate for long-term usage, the tape would protect the art from eventual water spills during exhibition and prevent dust from entering the package. The packages were placed in the frames vertically to avoid any bowing of the acrylic glazing and its contact with the photograph.
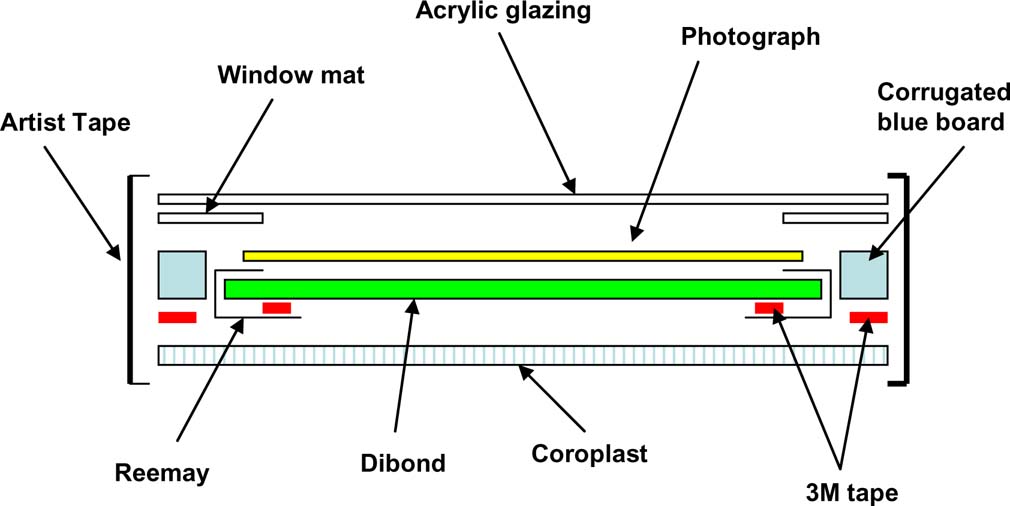
Figure 9: Cross-section of assembled package
The photographs remained very flat and no planar distortion or bulging was observed during the exhibition. Unmounting was very straightforward: the packages were opened, the mounted photographs taken out of their sink mats, and the strips of Reemay cut with a blade along the double-sided adhesive line on the back of the rigid panel. The hinges were removed mechanically and the adhesive residues were brushed away after rolling swabs of ethanol along the edges. No changes in coloration or texture were noticed on the verso of the prints. This completely reversible mounting technique was simple enough and safe for the objects.
A request from the Carnavalet museum2, when it purchased five large Ilfochrome® glossy prints from Stéphane Couturier3, prompted ARCP, the Atelier de Restauration et de Conservation des Photographies de la Ville de Paris (Paris Photography Conservation and Preservation Laboratory) to seek alternatives to the Diasec® mounting process favored by the artist.
While we were quick to opt for the kind of stretched mounting technique used for paintings and graphic artwork, we yet had to identify materials suited to Ilfochrome® prints. We favored materials of a composition similar to the prints themselves, responding identically to climate fluctuations and meeting the requirements of preventive conservation. The most suited materials were selected on the basis of tests conducted beforehand. Having seen a prototype, Stéphane Couturier agreed to a light-backed, hinge-stretched mounting solution. After being mounted the images were framed, eventually to be stored vertically, space being in short supply.
The support material was an alveolate polycarbonate board, chosen for its lightness, rigidity and chemical composition.
To prevent any direct contact between the backs of the prints and the polycarbonate surface, conservation cardboard sheets (grade 089 Klug, 1mm thick, no alkali reserve) were pasted with roller-applied acrylic glue Lascaux HV498 on both sides of the support boards. Adhesion was optimized by scratching the surfaces of the boards with a medium-grain abrasive pad prior to pasting.
The edges of the board were also insulated using two coats of paper adhesive Filmoplast P90, 3cm wide, over and under the cardboard sheets (figure 10). Thus covered the boards were placed between sheets of blotting paper, pressboards and weights, and left to dry for 48 hours. After drying, two strips of double-sided 3M 4154 adhesive tape were applied side by side along the edges on the back of the boards. Their purpose was to attach the hinges when mounting and stretching the prints.
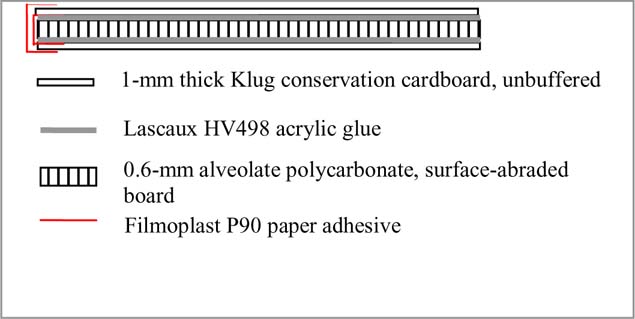
Figure 10: Cross-section of support board
Two adhesives (an acrylic glue Lascaux HV498 and an acrylic double-sided tape 3M 415) and three hinge materials (a thick Japanese paper-Kozo 31 g/m2, a non-woven material made of polyester, viscose, and cellulose Cokon 35 g/m2, and a non-woven polyester material Bondina 100 g/m2) were tested. Adhesion and tensile strength tests were performed for each adhesive-hinge pair. The selected pair was the non-woven polyester hinge with double-sided adhesive tape.
Strips of double-sided adhesive tape were applied to the back of the print, along all four edges. Each length of tape was divided into five segments so as to distribute tensions4.

Figure 11: Overall view after the hinges were placed ©arcp
The non-woven polyester hinges were attached to the strips of adhesive tape with the same distribution. On the corners the protective strip on the adhesive tape was slit diagonally.
Thus prepared the image was placed on the board, which exceeded it by a few millimeters. It was maintained in place with glass panes arranged crosswise and doubled up with weights. The contraption was set on the workshop table, in overlap so as to have access to the double-side tape used for fixing the hinges on the back of the mounting board.
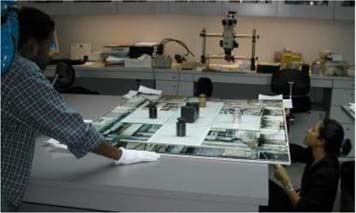
Figure 12: Stretching ©arcp
We started with the central hinges on the short sides of the prints, securing them one after the other. Then we attached the central hinges on the long sides. We always worked from the center of the hinges outwards. Before attaching a hinge, we slit the protective strip of the double-side tape on the back of the board, to match the size of the hinge. We stripped it off as the hinge was being attached, to prevent the adhesive surface of the tape from sticking to the table during operations.
The side hinges on either side of the central hinges were then secured in the same fashion, first on one side, then on the opposite side of the print, ending with the angles. Weights were removed gradually.
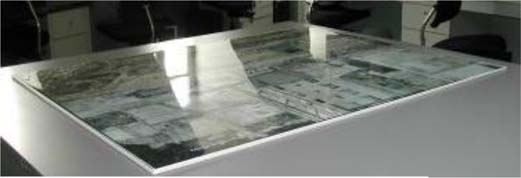
Figure 13: The print, mounted ©arcp
When mounting was completed, the back of the board was dressed with Filmoplast 90 along the edges so as to cover the hinges.
A frame was custom-built for the print. A raising strip made of conservation cardboard protected the print from the Plexiglas pane. The groove was itself covered with a strip of conservation cardboard so as to prevent any damaging contact between the wood and the hinges.
The bottom of the frame was made of honeycomb polycarbonate board. This made the frame more rigid while remaining light. It was secured using a back frame, itself screwed into position on the back.
With polyester showing little response to hygrometric variations, and the work being intended for permanent framing, we decided to seal neither the mounted print nor the frame.
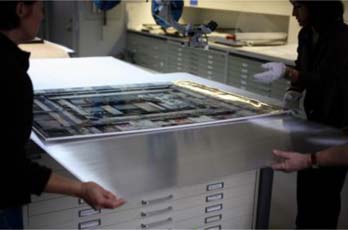
Figure 14: Placing bottom of frame ©arcp
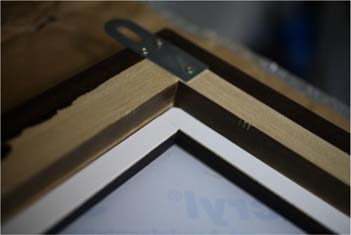
Figure 15: Frame raising strip ©arcp
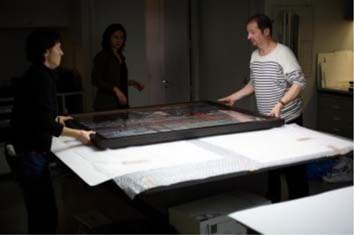
Figure 16: Placing frame, face up ©arcp
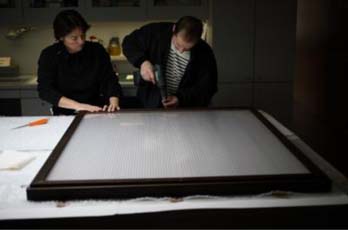
Figure 17: Closing frame, face down ©arcp
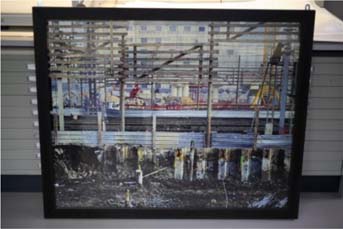
Figure 18: Print, mounted and framed ©arcp
The result was satisfactory, especially as regards flatness — a most critical issue with this highly glossy process where reflections amplify the slightest distortions. No alterations were found after the prints had been stored vertically for ten months. There is, however, room for improvement; in particular the support board should be more rigid. And of course we have no long-term practice of this technique, so monitoring stability over time will be the key in assessing it.
The authors want to thank the following for supporting, encouraging, and participating in these projects: Andrew W. Mellon Foundation, Luisa Casella, Karina Kashina, Gustavo Lozano, Gawain Weaver, Rachel Wetzel, Katharine Whitman, Stefania Ruello, Mark Beeman (George Eastman House); Fran Baas, Greg Bahr, Takako Tanabe, and Jim Belknap (Amon Carter Museum); Anne Cartier-Bresson (Director), Claire Tragni, Ragounathe Coridon, David Martineau (conservators) and Jean-Philippe Boiteux (photographer) for the ARCP and Françoise Reynaud (Curator of photographs) for the Musée Carnavalet.
1 Rohrbach, John with Robert Glenn Ketchum. Regarding the Land: Robert Glenn Ketchum and the Legacy of Eliot Porter. Fort Worth, TX: Amon Carter Museum, 2006.
2 Dedicated to the history of Paris, the Musée Carnavalet houses some 150,000 documents in its graphic arts division, some of which date back to the invention of photography (1839). The variety of photographic processes (daguerreotypes, calotypes, salt prints, albumen prints, woodburytypes, black & white and color photographs) reflects the wealth of the collection, which includes some of the greatest artists in the history of photography: Le Secq, Nadar, Marville, Baldus, Collard, Atget, Doisneau, Ilse-Bing, Cartier-Bresson, Brassai, etc. See http://www.carnavalet.paris.fr/
3 Stéphane Couturier was born in 1957 in Neuilly-sur-Seine near Paris. His work on urban landscapes is to be found in many galleries, institutions and collections in France and elsewhere (USA, Switzerland, Germany, Belgium…). See Mathieu Poirier in Stéphane Couturier, Éditions Adam Biro, Paris 2004.
4 In the first trial we used a single continuous hinge on each side. As this led to serious distortion, we unmounted the print and re-mounted it using the segmented technique, and flatness was restored.
JIUAN-JIUAN CHEN
Assistant Director for Conservation Education, Advanced Residency Program in Photograph Conservation, George Eastman House/Image Permanent Institute, Rochester, New York (ARP)
ROSINA HERRERA
Mellon Fellow, ARP
PATRICK RAVINES
Mellon Fellow, ARP
RALPH WIEGANDT
Senior Research Fellow, ARP
SYLVIE PÉNICHON
Conservator of Photographs, Am on Carter Museum, Fort Worth, Texas
MARSHA SIRVEN
Conservator of Photographs, Atelier de Restauration et de conservation des photographies de la ville de Paris, France
Papers presented in Topics in Photographic Preservation, Volume Twelve have not undergone a formal process of peer review.