Topics in Photographic Preservation 2009, Volume 13, Article 23 (pp. 170-180)
Presented at the 2009 PMG Winter Meeting in Tucson, Arizona
Alfred Stieglitz’s lantern slides have remained largely understudied and until recently, were a lost chapter in Stieglitz’s ouvre. They were produced from negatives taken in his early years as a photographer, often on his travels to Europe. Many of the images Stieglitz captured as lantern slides are unique: only a few images exist and in most cases were not printed in any other format.
Stieglitz considered the lantern slide process a great medium to express his art. More than simple positives on glass, his slides are objects of delicate appearance and color. Stieglitz refined developing and toning techniques that allowed him to achieve maximum results, publishing his improvements in photographic journals. Though the published formulas and directions are clear, the difficulties of the process meant that only an extremely skilled photographer could master them.
Conservation techniques, technical examination and material analysis applied to the group of twenty – nine lantern slides held at the George Eastman House International Museum of Photography and Film have shed new light on the making and presentation of this rare group. .
Stieglitz’s lantern slide collection at George Eastman House
Following Stieglitz’s death in 1946, Georgia O’Keeffe, assisted by Doris Bry, worked to organize and distribute the photographer’s legacy to selected public collections.i The largest collection of Stieglitz’s work was deposited at the National Gallery of Art in Washington, DC. Known as The Key Setii, it includes an example of every print that had ever been mounted before Stieglitz’s death. It is worth noting that there are no lantern slides in The Key Set.
One hundred Stieglitz’s prints, autochromes and lantern slides were delivered to George Eastman House between 1951 and 1952. The acquisition also included his photographic equipment, two complete sets of Camera Work and two calotype negatives by the Scottish photographers D.O. Hill & Adamson.
Geogia O’Keeffe’s Conditions for the Care of the Alfred Stieglitz Collectioniii includes carefully considered recommendations for the storage and exhibition of this invaluable collection. Interestingly, this text does not include any special directions for the group of lantern slides. Since Stieglitz himself loved the technique of slide making, the distinction between the prints and his lantern slides probably reflects O’ Keeffe’s personal predilection.
Alfred Stieglitz and the Lantern Slide
In 1891, Stieglitz joined The Society of Amateur Photographers of New York, which was an early organization established in 1884 and devoted to amateur photography. The members of such clubs regularly organized exhibitions for viewing and sharing their work. For this purpose, they relied on lantern slide projection, an effective medium for sharing images to a large audience. Additionally, a branch of the organization, The American Lantern Slide Exchange, employed slides to discuss and criticize the activities of similar societies around the country.iv
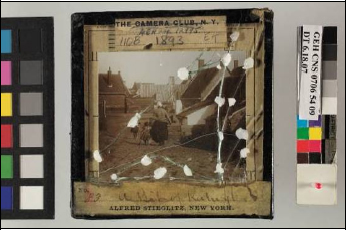
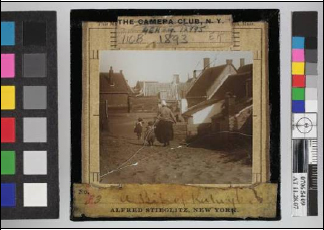
In 1897 the Society merged with a parallel association, the New York Camera Club to form The Camera Club of New York. Stieglitz was offered the presidency of the new organization but declined the office. Instead, he became vice–president and took a seat on the “Exhibitions and Lantern Slides Committee.” Some of his extant slides bear a printed label with the legend “The Camera Club, N.Y.” Stieglitz also assumed the chairmanship of the Publications Committeev after which the lantern slide process became a common subject in the journal The Amateur Photographer.
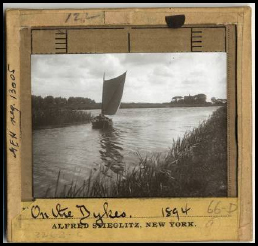
Stieglitz exhibited lantern slides during the time he lived in Germany and New York and was traveling through Europe. The George Eastman House collection contains examples dated from 1886 to 1894. At that time, Stieglitz was interested in photographing the local landscape and people. Accompanying his photographs he published notes and impressions of the scenery, appearance and life style of the inhabitants. In his personal accounts he also included technical information.vi
To date, no lantern slides made after 1900 have come to light. At that time, Stieglitz started experimenting with the new process of autochrome as well as the gelatin silver paper. More importantly, his aesthetic approach had changed dramatically. He had moved away from Pictorialism and no longer participated in the photo club activities for which he made his masterful lantern slides.
Characteristics of this collection
All but two of Stieglitz’s lantern slides at the George Eastman House have a square European format (3¼ × 3 ¼in) instead of the rectangular American format (3 ¼ × 4 in) It is common to find examples of irregularly hand cut -cover glass.
It is not easy to determine whether a given lantern slide was made in camera (with reversal development) or copied from a negative, but the second method was more common at that time. Stieglitz printed some of those images also on paper, and therefore an original negative probably exists. Apart from that, he actually mentioned the use of a reduction camera.vii Stieglitz used gelatin dry plates in all the examined lantern slides.
When it came to making the positive from those negatives, he specifically mentions his preference for Carbutt plates over those from Eastman.viii He considered Eastman plates too slow and found they required exposure times between 35 and 45 times longer than the Carbutt plates. In addition to longer exposures, a stronger developer was needed for Eastman plates. He also describes Carbutt plates that stained after processing; a problem he thought was caused by the developer (hydroquinone) After testing the developer and comparing the results to Eastman plates, he concluded that that the stain was caused by an old batch of Carbutt plates:
“The Carbutt slide emulsion deteriorates in a much shorter time than the Eastman, probably due to the excess of iodide of silver in it, used to make the emulsion works clear. In a slow plate, like Eastman, the amount of iodine of silver, if used at all, cannot be very great.”ix
Once the image was exposed and processed, it was often toned to different colors. Stieglitz cared a lot about the tone of his lantern slides and most of his examples exhibit tonal adjustment.
Many of the untoned lantern slides exhibit slight warm tone. For his “artistic work”, Stieglitz preferred warm image tonality while black is acceptable for other subjects.x The final color of the photographic plate depends on silver particle size, which varies depending on the silver halides in the emulsion and the exposure and developer times. At the time Alfred Stieglitz was using dry plates, there were many products based on bromide–chloride or bromide–iodine combinations that yield a warmer tone than the later bromide based emulsions, as discussed above. Smaller particle sizes can be achieved by using a long exposure and weaker developer, key for obtaining warmer tones.
In addition, there are some very striking examples that exhibit colors from brown to red or blue. Stieglitz even had a method to tone partially or completely, with one or two colors.
In 1892, The Photographic Times published a talk Stieglitz had given to The Society of Amateur Photographers of New York on the use of uranium nitrate salts for toning. In this article, Stieglitz gave formulas and instructions for obtaining six different image colors from blue to red. Five years later, in The Amateur Photographer, he published other formulas for achieving blue, green and red tones (here, only red is uranium nitrate-based too) He also described what he called local and partial toning based in gold chloride.xi
Stieglitz also perfected the finishing and mounting of his lantern slides, as he was very particular about the final presentation of this work. After they were processed, fixed and toned, the plate, paper window mat and cover glass were sealed with paper tape to protect and hold the pieces of glass together. He displayed all his lantern sides in the same personal and peculiar way, with the same type of binding tape, window mat and labeling with handwritten inscriptions. This original appearance has been preserved in all but four cases, where past intervention campaigns resulted in the replacement of the binding tapes and the loss of valuable inscriptions.
The presentation elements add valuable information to the way lantern slides were conceived as objects.
• Binding tape
The package formed by the photographic glass plate and the cover glass is bound with four strips of paper tape around the edges that overlap along the corners at a 90-degree angle (fig. 1). The traditional tape used for closing lantern slides was sold at that time in a roll with a gum based adhesive.
This binding tape is never composed by one singular paper strip.
Figure 1
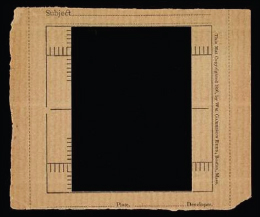
• Window mat.
The image is cropped and masked with a paper window mat that serves as a spacer between the emulsion and the cover glass.
Stieglitz used a pre-made commercial mask, which is a rather rare example of a specific mat sold for lantern slides (fig. 2). It came with several markings as a guide for cutting different sizes of windows. On the front, “This Mat Copyrighted 1890, by Wm. Garrison Reed, Boston, Mass.” appears in print, together with a series of lines to be filled with technical details. The “Plate” and “Developer,” information was never filled in by the photographer.
Figure 2
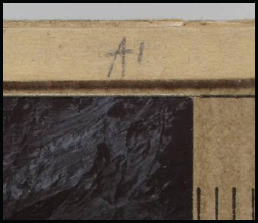
• Labels and inscriptions
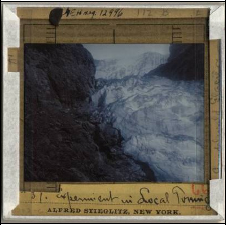
Stieglitz was careful in organizing, labeling and presenting his lantern slides. A paper label attached to the cover glass includes the title, date and sometimes his signature or the process information.
Figure 3
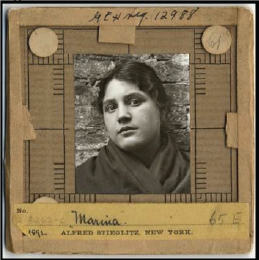
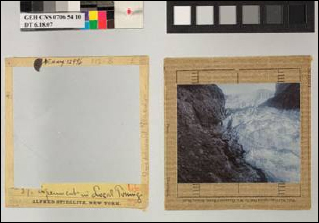
The pre-printed label that reads “Alfred Stieglitz, New York” is present in half of the collection (figs. 1, 4). In black ink, Stieglitz filled in the image’s title or location, and very often the year. We can also find a later numeration added in pencil by Georgia O’Keeffe or Doris Bry after Stieglitz’s death (figs. 1, 4). Stieglitz’s name appears more frequently pre-printed in this way than Figure 3 handwritten. Twelve of the twenty-nine objects in the collection have this label while only one carries his signature.
Figure 4
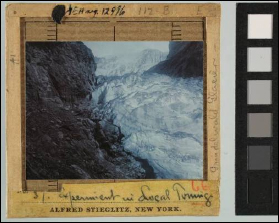
The most interesting inscription that appears (common in his prints but also in his lantern slides) is “A.1” (fig. 3). It was written by the photographer himself and refers to his grading of the print quality. An “A.1” print is what he was looking for after several proofs:
“But I try and try until I get what I want... I reject allothers – but what I am after is the A.1 – One fromeach negative.”xii
• Orientation Marks
Another characteristic of most of Stieglitz’s lantern slides are two round stickers near the top corners, for marking the correct orientation of the image when charging the slide in the magic lantern (fig. 4).
• Paper tabs
Along the edges and under the binding tape there are paper tabs, a great example of Stieglitz’s binding technique. In figure 4 we can see three paper tabs on the left, right and top edges holding the glasses from front to back. They appear to have been used by Stieglitz to keep the plate and the cover glass together during the binding process.
Condition of this collection
Before this project, the overall condition of the collection was fair. Existing records do not allow us to trace the condition of these lantern slides since their arrival at George Eastman House in 1952. O’Keeffe’s document Conditions for the Care of the Alfred Stieglitz Collection again doesn’t include any handling guidelines or any restriction for the lantern slides group.
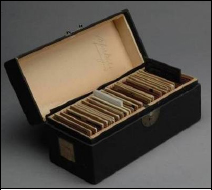
In the 1980’s a group of six lantern slides accidentally broke and shattered and needed more serious intervention. At that time, this group was rebound and stabilized with two sheets of glass or a piece of glass and a polyester sheet and then rebound in a Filmoplast P90 tape border. This method increased the width of the package that prevented the objects from being placed back in their original container slots (fig. 8).
As part of this project, ten of the 29 slides were conserved, prioritizing those with severe glass deterioration and breakage of support and/or cover glass.
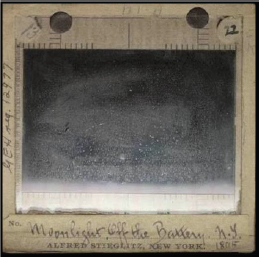
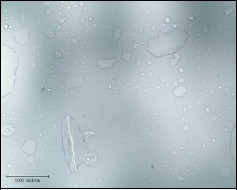
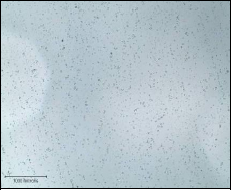
Advanced glass deterioration in the cover glass occurred in five cases, interfering with viewing the image. Figure 5 shows under axial specular illumination the advanced glass deterioration in the cover glass of Moonlight off the Battery, New York, 1895. Under magnification, no relationship between the condition of the cover glasses and the condition of the final image in the plates was noticed. For that reason, once the slide packages were opened and the cover glass cleaned with a 50% solution of ethanol and water, the glasses were reused and the slide rebound back.
Figure 5
Figure 6
Figure 7
Figure 8
In some cases, glass deterioration occurred on both sides of the cover glass. Figure 6 shows inner side of the cover glass on Moonlight off the Battery while figure 7 shows glass deterioration also on the outside. The presence of glass deterioration on the outside of the cover glass is likely due to the method employed in storing the lantern slides. Inside the original storage box (fig. 8) the lantern slides are kept in slots, in a vertical position and closely packed to one another. The gap between each lantern slide is so small that moisture can be trapped.
Besides glass deterioration, other chemical deteriorations were observed, such as silver mirroring. However the physical damages present in six broken examples were the main concern. The damages were assessed and divided into three case scenarios:
a. Broken cover glass: [Peasant working in the field], ca.1890; Maria Bellagio, 1887 and Experiment in local toning, 1894 (fig. 9).
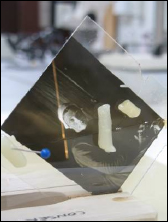
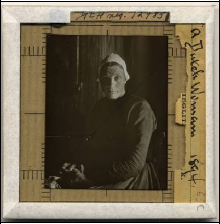
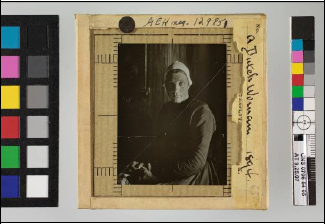
b. Broken photographic plate: A Dutch Woman, 1894 (fig. 16).
c. Broken both; cover A hook in Pallanza, 1887 and A bit of Katwijt, 1894 (fig. 18).
In the following, the methodology and treatment of this group will be discussed:
A. Broken cover glass
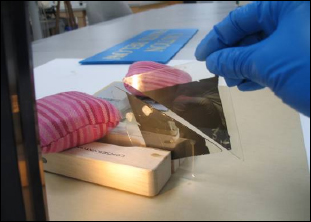
The treatment performed on the broken cover glass examples consisted in opening the slide package, replacing the damaged cover glass with a new one of the same thickness and rebinding with Filmoplast P-90 tape toned to match the original tapes.
[Peasant working in the field] had a binding tape from the 1960s or 1970s. Since this plastic tape had no historic value, it was replaced during treatment and kept with the original in a separate Mylar sleeve.
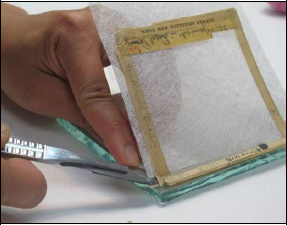
The other two examples, Maria, Bellagio and Experiment in Local Toning (fig. 9, before treatment), still had their original binding tapes. Several ink inscriptions on labels were attached to the broken cover glasses. These paper attachments were locally humidified for removal from the glass. The inscriptions (Stieglitz handwriting in blue ink and the George Eastman House former accession numbering in black ink) were highly water-sensitive and were fixed with Paraloid B-72 in Acetone (5%) prior to humidification.
The label adhesive and binding tape were softened and the ancillary elements released mechanically with the help of a scalpel or a spatula (fig. 10). The discolored, brittle and fragile paper elements were separated and then washed, flattened and reinforced with Japanese tissue and Methylcellulose.
Figure 9
Figure 10
When the package was opened (fig. 11, during treatment: cover glass with paper elements and spacer on photographic plate), the emulsion side of the photographic plate was dusted with an air bulb and the glass side was cleaned with a 50% water – ethanol solution. Finally, the whole package was put back together and rebound with a single strip of Filmoplast P-90 toned with Golden acrylics to match the original. Finally, the treated paper elements were reattached to the object over the new tape with Aquazol 500 in ethanol, thus preserving the original appearance and presentation (fig. 12, after treatment).
Figure 11
Figure 12
B. Broken Photographic Plate
If the photographic plate was broken but the cover glass remained intact, the treatment criteria varied. The original cover glass could be reused, the broken glass plate was removed and repaired and a third sheet of glass was added as extra support in the final assemblage. A Permalife paper spacer was incorporated between the plate and the new glass support to avoid the formation of Newton rings.xiii After treatment, this spacer remained hidden underneath the binding tape.
In the case of A Dutch Woman (fig. 16, before treatment), taking the plate out of the package did not require the removal of all tapes and labels. Since the cover glass was not being replaced, the pieces of broken glass plate could be removed by lifting the binding tape from the verso, where there were no inscriptions and direct humidification could be applied.
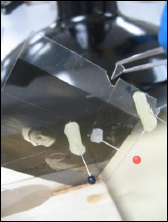
The separate treatment of the broken glass plate deserves special attention. An innovative method developed by Katherine Whitman during the 4th Cycle of the Advanced Residency Program in Photograph Conservation (ARP) was applied to this group.xiv Vertical assembly (fig. 13) allowed us to take advantage of gravity and guaranteed a perfect joint of the piecesxv. Before the actual repair, the separate broken glass fragments were rejoined and held together with “sticky wax” applied to the glass side of the plate (fig. 14). A lightline illuminated the object from the front, and facilitated an exact alignment of the pieces (fig. 14).
Figure 13
Figure 14
Figure 15
Once the pieces were aligned, the adhesive was wicked into the cracks with a small brush or tool such as a steel wool swab. With transmitted light it was possible to see the adhesive filling the space of the crack by capillary action, rendering the crack nearly invisible. Based on Whitman’s research, Paraloid B-72 in toluene was the adhesive selected for its reversibility and long drying time, a useful quality for alignment of the pieces needs. After 48 hours of curing, the sticky wax was mechanically removed and cleaned with Naphtha (fig. 17, after treatment)
Figure 16
Figure 17
C. Broken Cover Glass and Broken Photographic Plate
In two cases, A hook in Pallanza and A bit of Katwijt (fig. 18, before treatment) , both the cover glass and plate were broken. The conservation protocol in these examples was to replace the cover glass, glue the broken photographic plate and add a new glass as a support. The new sheets of glass (cover and new support) were selected a little thinner than the original (1 mm instead of 2.5mm) to minimize the increase in thickness of the whole package.xvi Between each piece of glass a Permalife paper spacer was incorporated to prevent again the formation of Newton rings.
The package was opened and its elements treated following the methods described above: treatment of original tapes and labels was performed and the plate was cleaned and repaired. Finally the package was re-assembled adding a Filmoplast P-90 binding tape toned to match the originals. To preserve the original presentation, the new tape was covered with the original biding tape and labels, as described before.
A bit of Katwijt was the only example in the collection that had a black binding tape (fig. 18, before treatment: the multiple pieces of glass were hold temporary with sticky wax). This unusual tape, made of very thick paper coated with a shiny media, was too deteriorated, skinned and friable to be reused.
Figure 18
Figure 19
Once the original black binding tape was removed and the package opened (fig. 19, during treatment), each component could be treated separately. The photographic plate was glued with Paraloid B-72 in toluene, as described above. Filmoplast P-90 toned in black color with Golden Acrylics was used to rebind the package (fig. 20). A final coating of Paraloid B-72 in Acetone was added to imitate the shiny surface of the original tape. Once the original labels reattached, the new tape was trimmed as usual, in order to match the original look of the object (fig. 21, after treatment).
Figure 20
Figure 21
Conclusions
Prior to this conservation investigation, half of the Stieglitz’s lantern slides at George Eastman House were in fair condition. Due to the general lack of knowledge of these objects, they are rarely requested and never exhibited but Stieglitz’s lantern slides are key examples of his early steps as a photographer. Parallel to his work on paper, these positives on glass are evidence of his aesthetics and interest in anthropological themes during his early years. Nevertheless what is even more revealing is Stieglitz’s personal interest in this media:
“The lantern slide is the most peculiarly fascinating branch of photography (...) The technique of slide making may be quite as interesting as any known printing processes, even including the gum methods that are now coming into vogue.” xvii
One hundred and fifty years ago, when extra-large format prints did not exist, the lantern slide projection was the only way of making a large photographic image, the size only limited by that of the wall. When a photograph is enlarged and projected, defects, scratches, dust and any other tiny disruption in a lantern slide would result in a greatly amplified disturbing spot on the screen. For this reason, careful processing, retouching and manipulation skills were essential.
Alfred Stieglitz pushed the process to it’s fullest potential, creating some of the most exquisitely beautiful examples of lantern slides recorded in the history of photography. In addition to the ones held at George Eastman House in Rochester, there are other collections in The Philadelphia Museum of Art, The Art Institute of Chicago and The Museum of Fine Arts in Boston. On one hand, a thorough characterization project, examination and analysis of those other groups is highly recommended to understand this important chapter in Stieglitz’s career. On the other hand, more research regarding the treatment and display of glass-supported photographs would contribute to the preservation of rare material from the masters of photography.
ROSINA HERRERA
Andrew W. Mellon Fellow
The Museum of Modern Art, New York.
i For this subject, see documents and correspondence in the registrar office at George Eastman House Museum.
ii Greenough Sarah, Alfred Stieglitz. The Key Set. The Alfred Stieglitz Collection of Photographs, Vol. 1, 1886-1922, National Gallery of Art, Washington, 2002.
iii This document accompained the Stieglitz estate and was sent attached to a letter to Beaumont Newhall, then director of the George Eastman House Museum, on June 18, 1951.
iv Valeria Wingfield, Camera Club of New York. Records, 1889 – 1983, The New York Public Library Humanities and Social Sciences Library Manuscripts and Archives Division, 1993, p.4; http://www.nypl.org/research/chss/spe/rbk/faids/cameraclub.pdf (accessed March 2007)
v Wingfield, 1993 (reference III), p.3.
vi Stieglitz, Alfred, “A day in Chioggia,” The Amateur Photographer, prize tour number (June 1889), pp.7-9; Alfred Stieglitz, “Cortina and Sterzing,” Sun Pictures from Many Lands (London, 1892), pp.60–61; Alfred Stieglitz & Louis H. Schubart, “Two artists haunts,” The Photographic Times, 26 (January–June 1895): pp. 9-12.
vii Stieglitz, Alfred, “Experience with slide plates”, The American Amateur Photographer, vol. IV, Feb. 1892, p. 63.
viii For a detailed comparison between Carbutt and Eastman plates see Stieglitz, 1892 (reference VII). The information in this article should be taken carefully because, at that time, the batches of plates differed from one to another and the technology wasn’t developed yet to get homogenous results in each batch
ix Stieglitz, 1892 (reference VII), p.62.
x Stieglitz, 1892 (reference VII), p.63.
xi This lecture “Toning slides with uranium salts, and a few additional remarks on the color of slides in general” was published first in The Photographic Times, January 22, 1892, pp. 42-43 and later in the Bulletin de la Soci&eeacute;t&eeacute; Française de Photographie,Tome Huitième, 1892, pp. 187–190. As part of this project, 10 lantern slides from the collection were analyzed with X- Rays Fluorescent in order to find out the nature of the toning element. The results of this analysis are in progress to be published. Some of the results can be consulted at the Advanced Residency Program webpage (http://www.arp-geh.org//indexsep.aspx?nodeidp=417, accessed on 8.26.09) A synthesis of the conclusions of the analysis can be found also at webpage Notes on Photographs, as part as the George Eastman House site (http://notesonphotographs.eastmanhouse.org/index.php?title=Herrera%2C_Rosina._XRF_Analysis_of_Alfred_Stieglitz%E2%80%99s_Lantern_Slides, accessed on 8.26.09)
xii Stieglitz to Paul Strand, 11 August 1919 (Center for Creative Photography, The University of Arizona, Tucson)
xiii This phenomenon is an interference pattern (concentric colored rings) caused by the reflection of light between two pieces of glass that are pressed together. The rings appear when there’s a tiny air gap between two pieces of clear material.
xiv See ARP capstone projects http://www.arp-geh.org//indexsep.aspx?nodeidp=401. See also Katherine Whitman and Ralph Wiegandt, “Case study: repair of a broken glass plate negative”, Topics in Photographic Preservation, Vol. 12, The American Institute for Conservation of Historic and Artistic Works, Washington D.C, 2007, pp.175-181.
xv This method has been developed and proposed by Stephen Koob, head of conservation at the Corning Museum of Glass in Corning, New York, who had used it for repairing glass objects but never for photographs.
xvi Each new sheet of glass that was incorporated was hand cut. The edges were sanded to avoid cutting through the binding tapes.
xvii “Some remarks on lantern slides”, The Amateur Photographer, vol. XXVI, Sep. 10, 1897, p. 203. At that time, Stieglitz was using photographic processes such as carbon, gum dichromate and photogravure.
Papers presented in Topics in Photographic Preservation, Volume Thirteen have not undergone a formal process of peer review.